NOTE: This article discusses an older version of Capture One Pro. To learn more about our latest version, click here.
There are numerous great reasons to make the switch from Lightroom to Capture One Pro, like powerful tethering, session workflow, masking functions and superior color editing features.
Luckily, there is no reason to worry about it being a time-consuming transition, because many key concepts are very familiar.
With this fast-track guide, you will learn about the most important differences and be ready to enjoy Capture One Pro 20 from day one.
In the grand scheme of things, Capture One Pro and Lightroom work the same. All changes to your images are done non-destructively by saving the edits in a database and keeping track of where your original photos are stored. This familiarity makes it easy to import your existing Lightroom catalog into a new Capture One Pro-native catalog so that you can continue to work on your image collection right away.
Please be aware that the following guide is only for Capture One Pro 20 (including the versions for Sony and Fujifilm)
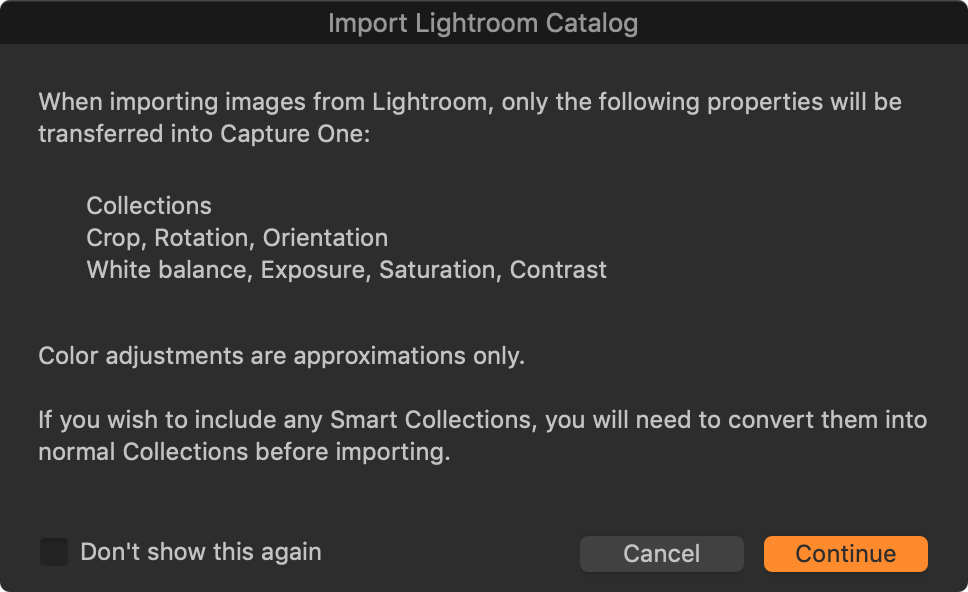
Importing your Lightroom catalog is easy.
Just select File > Import Catalog > Lightroom Catalog…. Capture One Pro will import key metadata like Rating, Color Label, Keywords and IPTC data and some basic image editing like White Balance, Exposure and Saturation.
Working with a Session instead of a Catalog.
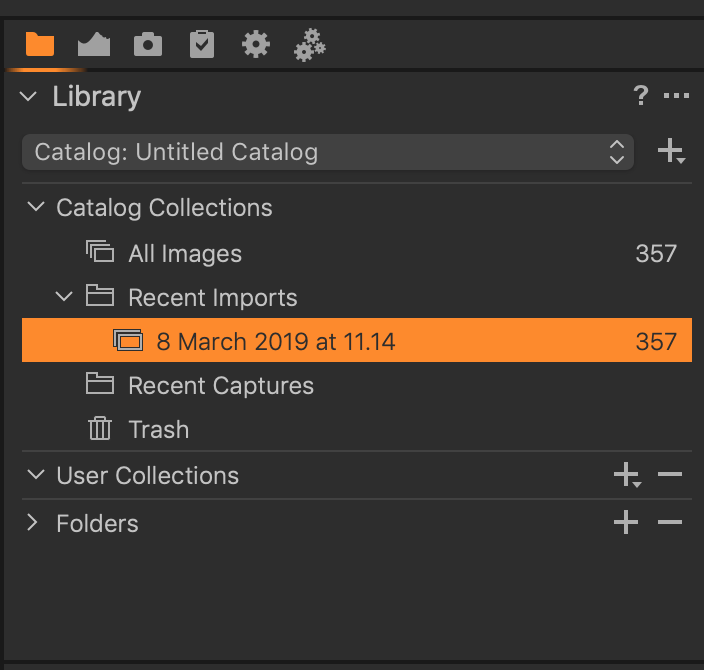
Unlike Lightroom, you also have the option of working with a Session instead of a Catalog. Sessions is the preferred workflow for a lot of photographers when working on a project. Session by default comes with a portable and autonomous folder structure.

The key advantage is that everything from captured images to exported files are kept within the same main folder. They can be managed in the Folders Area, and made into virtual collections in the User Collection Area.
Customize to your heart’s content
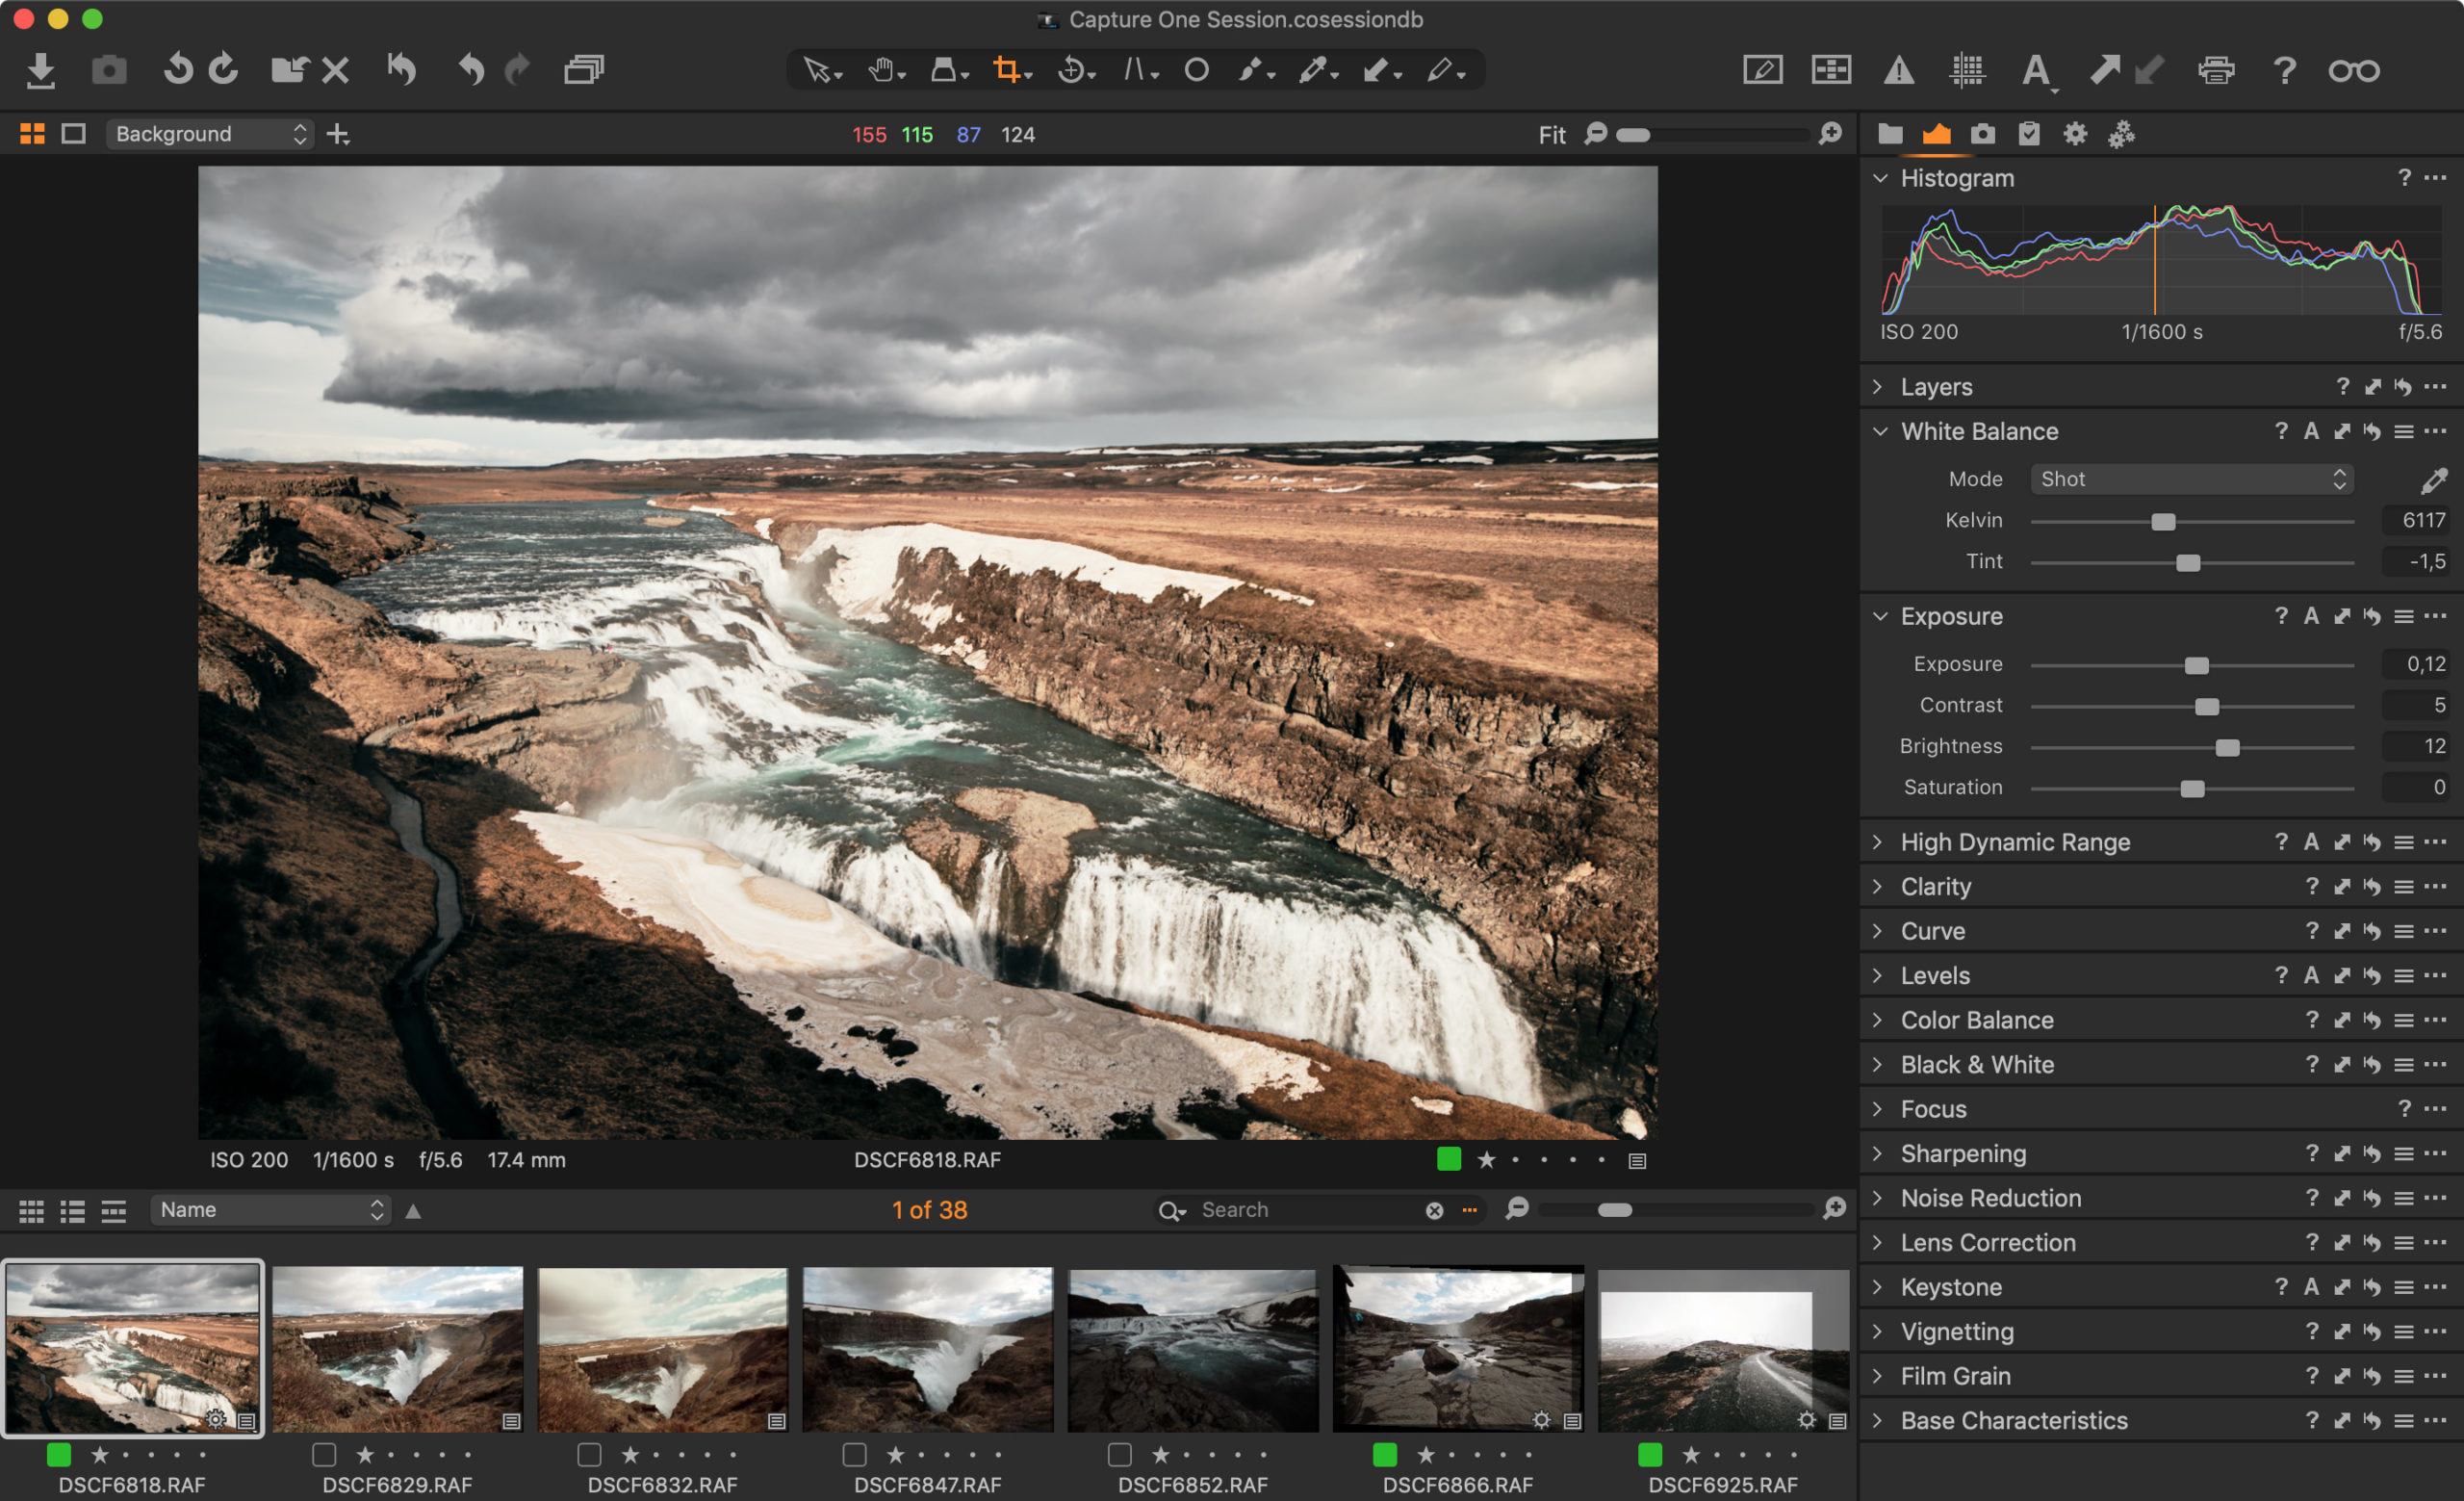
The biggest change that you will experience as a former Lightroom user is arguably the user interface. Gone are the different modules like Library and Develop where you can only do specific things. In Capture One Pro you have the freedom to do everything you want to do on the selected images. All Tools can be used at any given time.
Think of the way Photoshop is handling things with a toolbar and several selectable panels, and you get the idea. In Capture One Pro, panels are called Tools, and they are grouped in several Tabs to keep them organized.
If you want to get a quick and smooth transition, we have built a Workplace that will make you feel right at home as a former Lightroom user. Just select Window > Workspace > Migration
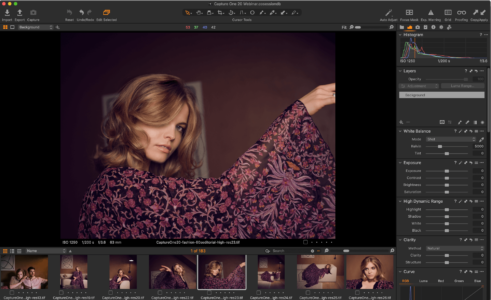
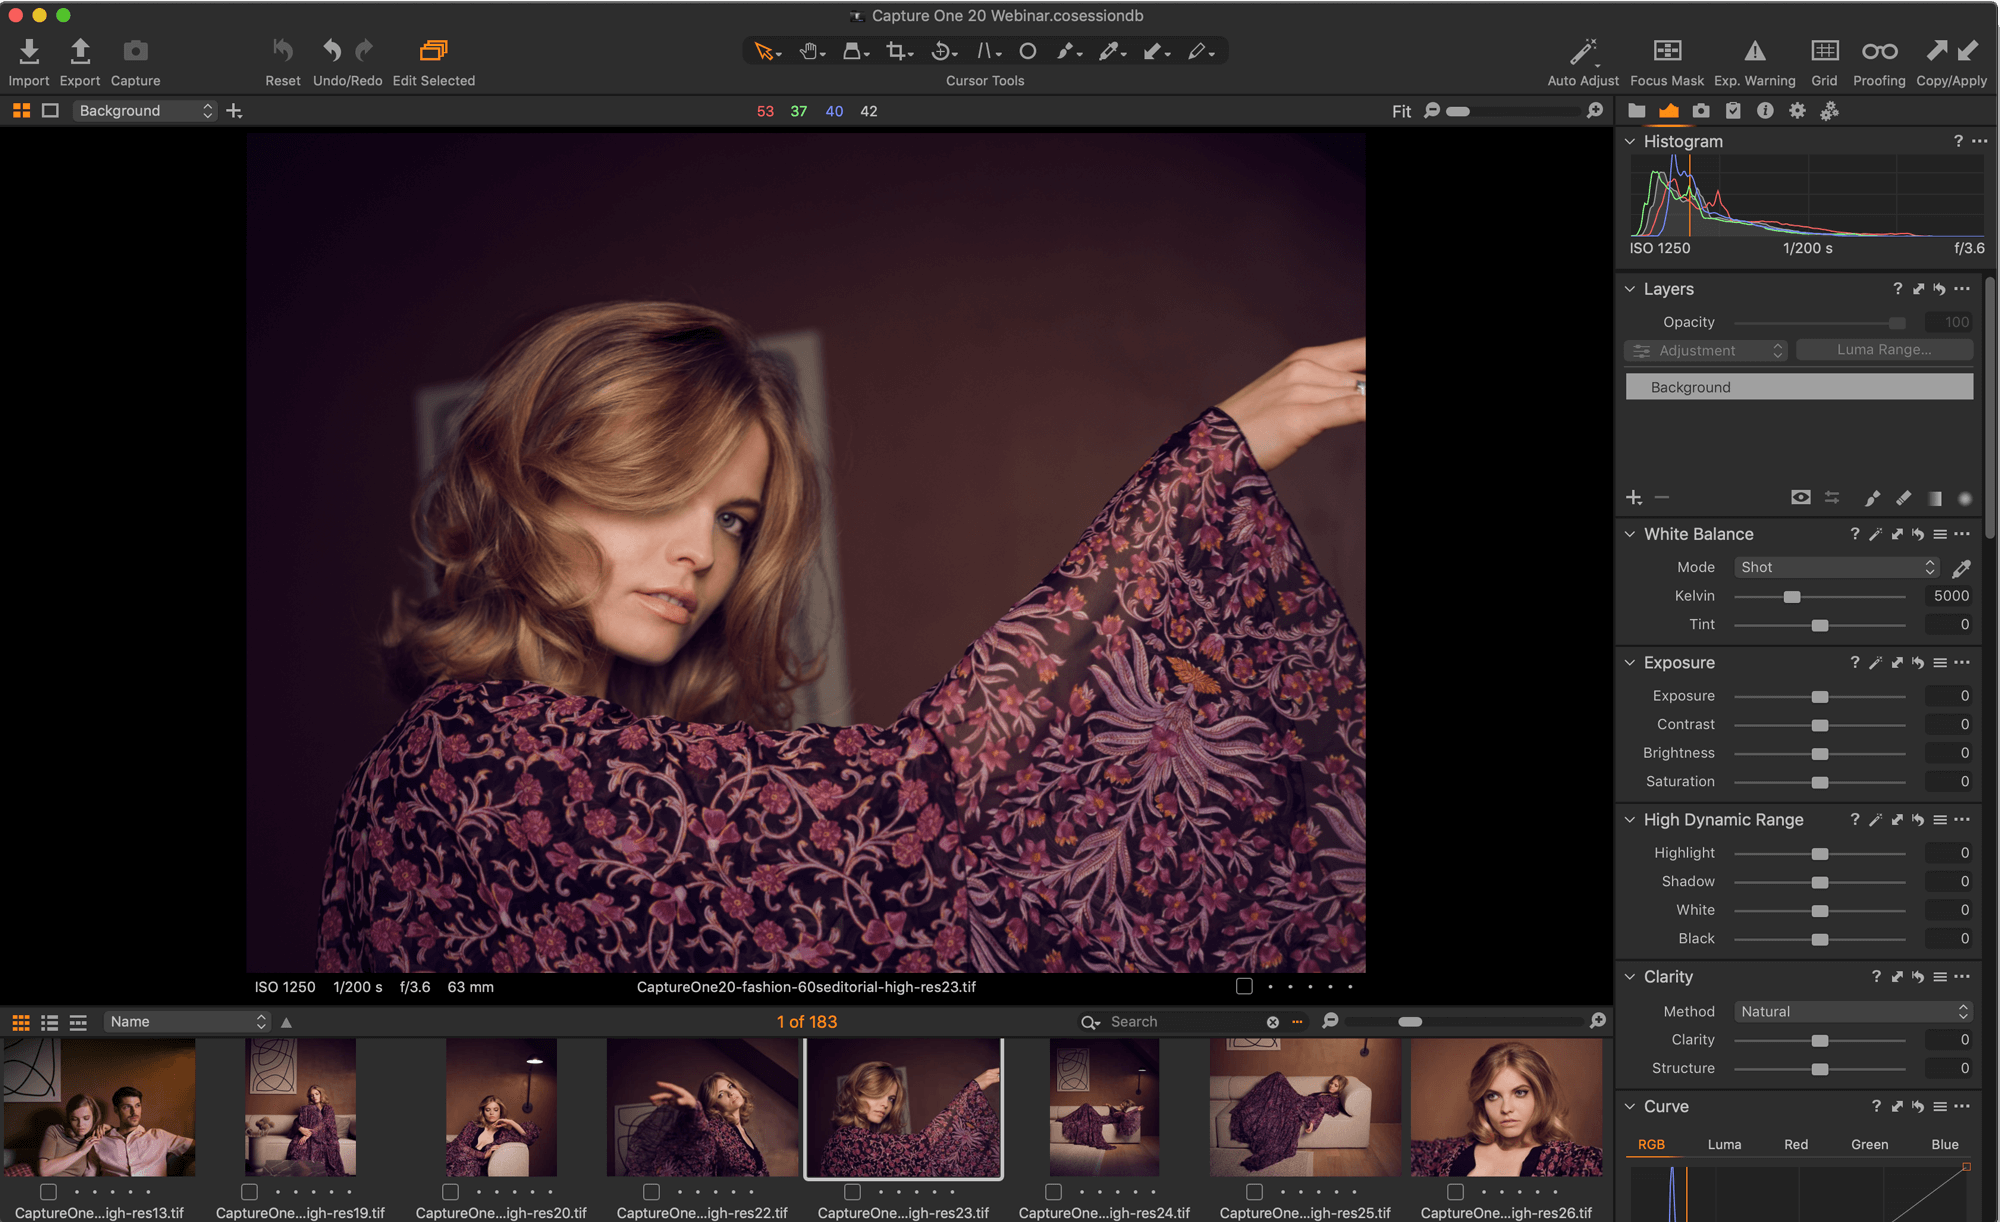
The cool thing to keep in mind about Capture One Pro is that all the Tools can be moved around as you wish. This gives you the possibility to set up a Tab with only those Tools you use the most. For example, you might want to move the White Balance Tool to the top of the Exposure Tab to mimic the way Lightroom is setup. Just right-click within a given Tab to add or remove Tools. It gets even better than that! You can open any Tool as a floating palette, just go to Window and Create Floating Tool – or simply drag any Tool out from the Tool Tab. Notice that you can also move tools from the pin-able area to the scrollable area, you might want to have your most used tools pinned and the other tools scrollable for easy access
This can be an extremely useful feature, because any Tool can be sized larger. Just imagine working with the precise control a bigger Curve Tool or Color Editor Tool will grant you.
The flexibility also gives you the option to have more than one version of the same Tool open. You can, for example, have access to the Red, Green and Blue channels on the Curve Tool or Levels Tool simultaneously. As a nice little bonus, you can choose to place the Tabs with Tools in either the left or right side of the screen. You find that option in the View Menu. It will also show you the shortcut keys to show and hide the Browser and the Viewer amongst other commands.
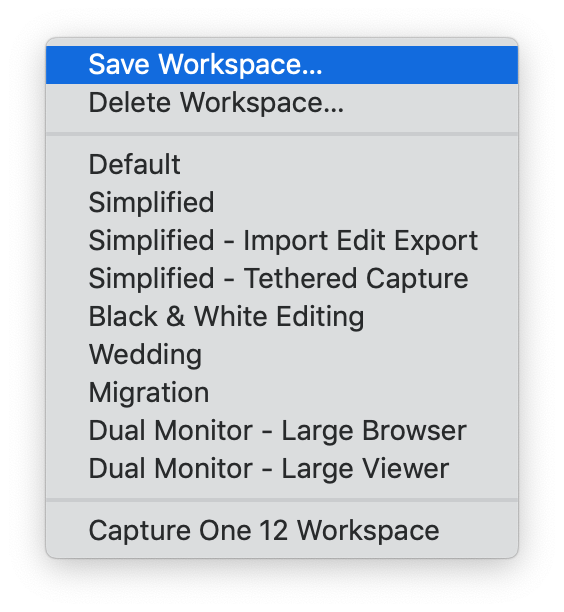
 Save the Workspace that suits you.
Once you can have customized Capture One Pro to your liking, you should take advantage of the ability to save your personal workspace under Window > Workspace. You can save it as a default workspace, or design different workspaces for different assignments.
One last, but very nice feature, is the ability to customize keyboard shortcuts. So, if you have trouble giving up on certain shortcuts from the Lightroom days, you might want to check whether those can be applied to an equivalent command in Capture One Pro.
Organize and sorting
By default, Capture One Pro always has the Viewer window open. If you want to have the equivalent to the grid of thumbnails in the Library module from Lightroom, just hide it by pressing Alt + Command + V on the Mac or Alt + Control + V on Windows. As mentioned above, you might like to customize this to a different key.
You need to be aware that Capture One Pro does not use the Pick or Reject
commands, so it is recommended to use Color Tags instead. Most use Green for Pick and Red for Reject.
Another minor difference that might confuse people switching from Lightroom is that Capture One Pro doesn’t differentiate between an original imported file and a Virtual Copy of it. All images are called a Variant. They are the same, the wording is just different. When you want to create a virtual copy in Capture One Pro, you can either create a New Variant (without any adjustments) or a Clone Variant that copies all the adjustments from the selected image.
 A Project needs an Album to contain images.
In the folders area you can manage files and images. You can also make virtual collections in the User Collection area, like Albums and Smart Albums, similar to Lightrooms Collections and Smart Collections.
There is one cool feature that you don’t want to miss out on when you are doing your initial assessment of your images. If you select View > Show Focus Mask, Capture One Pro will analyze the images and mark the areas in focus with a color. This will make it a breeze to reject those photos that are out of focus.
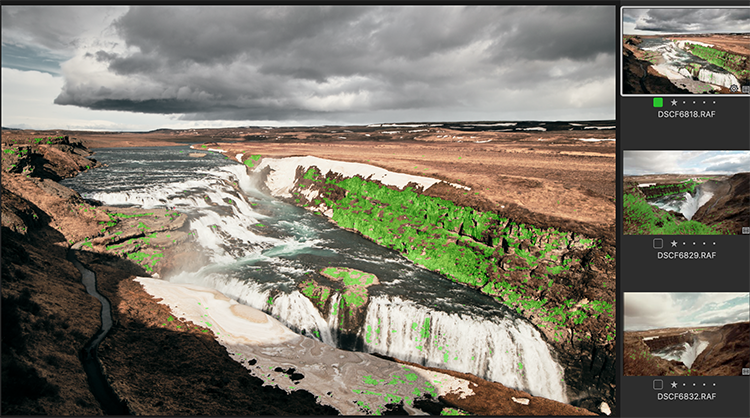 The green highlights shows where the imageis reallyin Focus.
At first glance, the ability to filter through your collection of images based on metadata might seem a bit limited with the Filters Tool. Don’t despair, as there is a long list of filter options to choose from.
 Adding additional filters
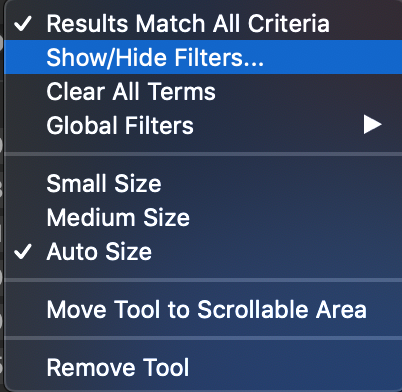
Just click on the three dots, select Show/Hide Filters… and mark any criteria that you want to add to the Filters tool. If you want to select more than one criteria in the Filters Tool – like a certain star rating from a certain date – just hold down Command (Mac) or Control (Windows) to enable several simultaneously.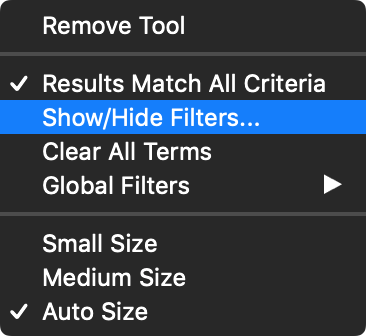 Likewise, the Advanced Search dialogue box has a very large list of search criteria that makes it easy to narrow down exactly what you’re looking for. A very convenient feature is the ability to create a Smart Album based on the chosen search criteria, or an Album based on the selected images right from the dialogue box.
If you go to Edit > Advanced Search – or you can use the shortcuts Alt + Command + F on Mac or Alt + CTRL + F on Windows.
The Compare View and Survey View from Lightroom are straightforward to enable. If you select more than one image, they will all be displayed in the Viewer. It can display up to eleven photos at once.
A nice little feature is that you can select, for example, four images and move to the next set of four images by selecting Select > Select Next set. That is very handy way of assessing many images. If you instead want to select one favorite image to compare other candidates against, you simply select Image > Set as Compare
Adjustments, Presets and Styles
Capture One Pro has the same expansive ability as Lightroom to copy metadata and image adjustments from one image to several other images. But there are a couple of subtle differences you need to know.
The most important one is that you need to enable the option Edit All Selected Variants in order to make adjustments to all of the selected images and not only the primary selected image. You do this by selecting Image> Edit All Selected Variants.
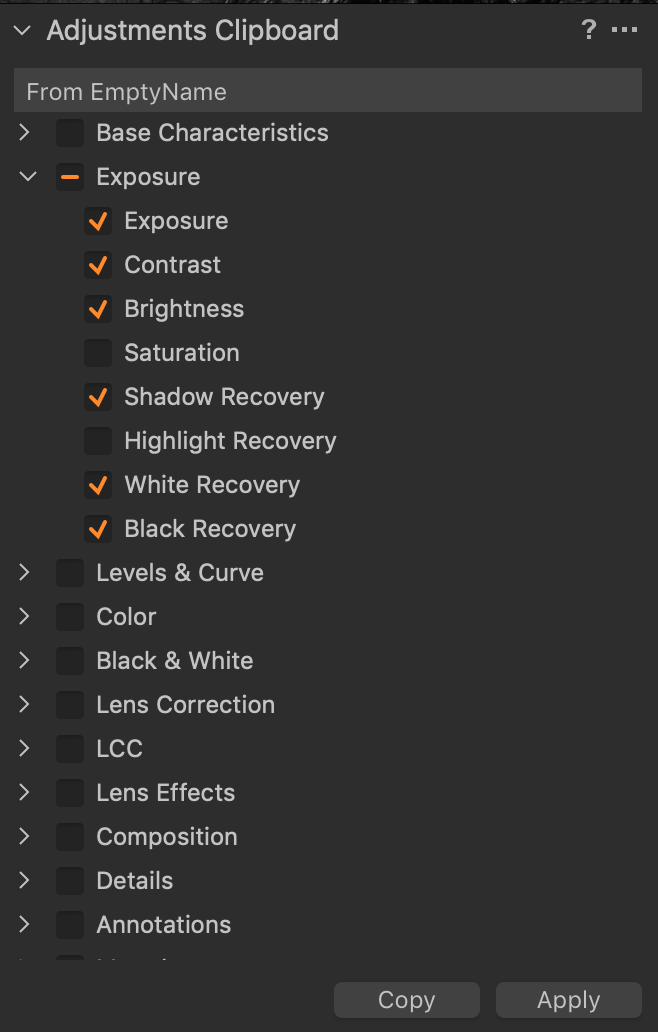
If you want to copy the Adjustments from a certain Tool, you click on small double arrow on top row. You then click Apply to copy the selected adjustments to the other images.

If you instead want to copy adjustments from several Tools, then click on Copy in the Tool bar. They will be transferred to the Adjustment Clipboard which is probably more familiar to you as a Lightroom user. Under the you can select which Adjustments you want to copy, and then hit Apply to copy them all to the selected images.

In the Tools tab you can Copy and Apply adjustments from one image to a single, or several, other images. The arrow up is Copy, and arrow down is the Apply function
 In the Adjustment menu you can specify which Adjustments to apply to more images.
You also have the option to save certain adjustments for later use, but it’s important to note that Capture One Pro distinguishes between Presets and Styles. A Preset is saved per Tool, while you can think of a Style as a collection of several Presets.
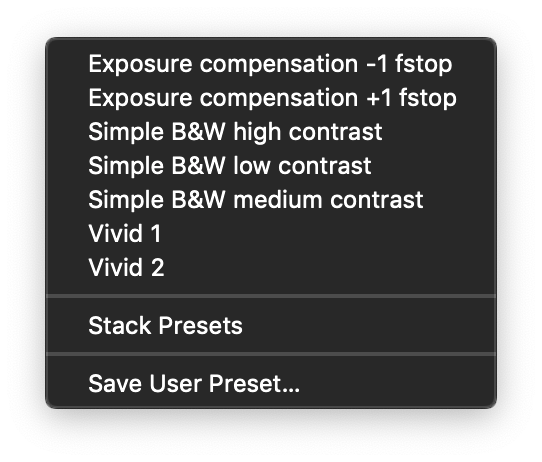
If you want to save the adjustments from a Tool, just click on the three lines icon and choose Save User Preset…. In the same sub-menu, you will also find built-in Presets depending on the Tool in question.
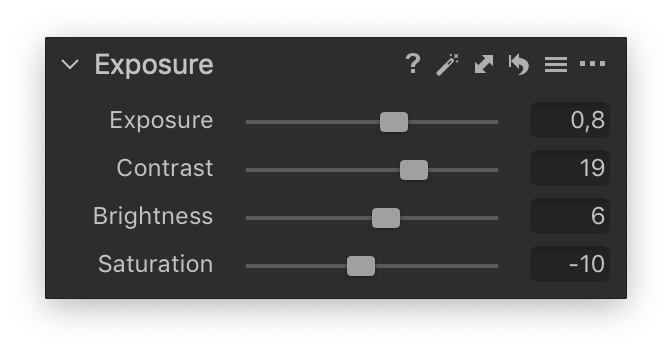
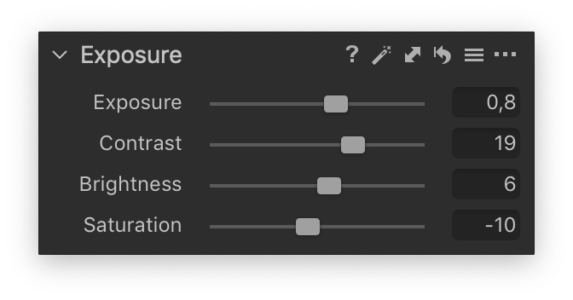
The Brightness slider works great when you to brighten midtones the most.
The sliders in Exposure Tool works like you would expect, but with one notable difference. Saturation is more akin to Vibrance in Lightroom as it primarily saturates the more subdued colors while affecting the saturated tones less. It works so well that you will probably not miss having the separate Vibrance and Saturation sliders from Lightroom.
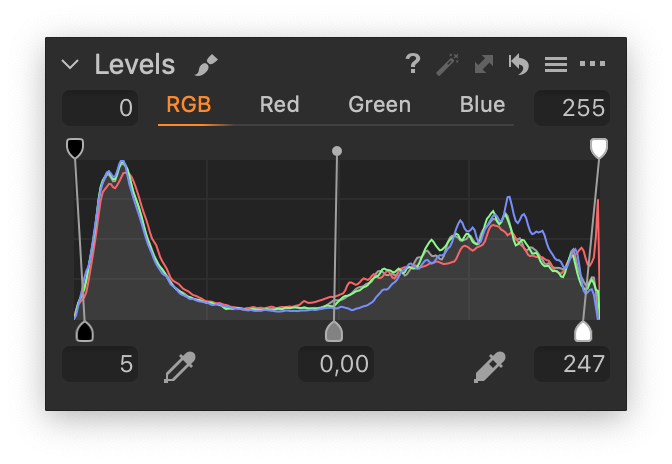
The Black and White sliders in Lightroom is used to set the black and white point in the image, and this is done with the Levels Tools in Capture One Pro.
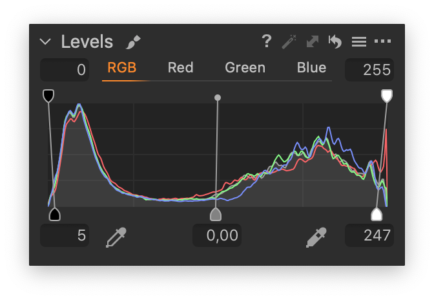 The Levels Tool is excellent to establish the base contrast by setting
the black and white points.
The tool works exactly like you are used to in programs like Photoshop. It can obviously do more than simply adjust the black and white points. Hitting the A icon in the Levels Tool will automatically set them both. That is a very handy shortcut to remember.
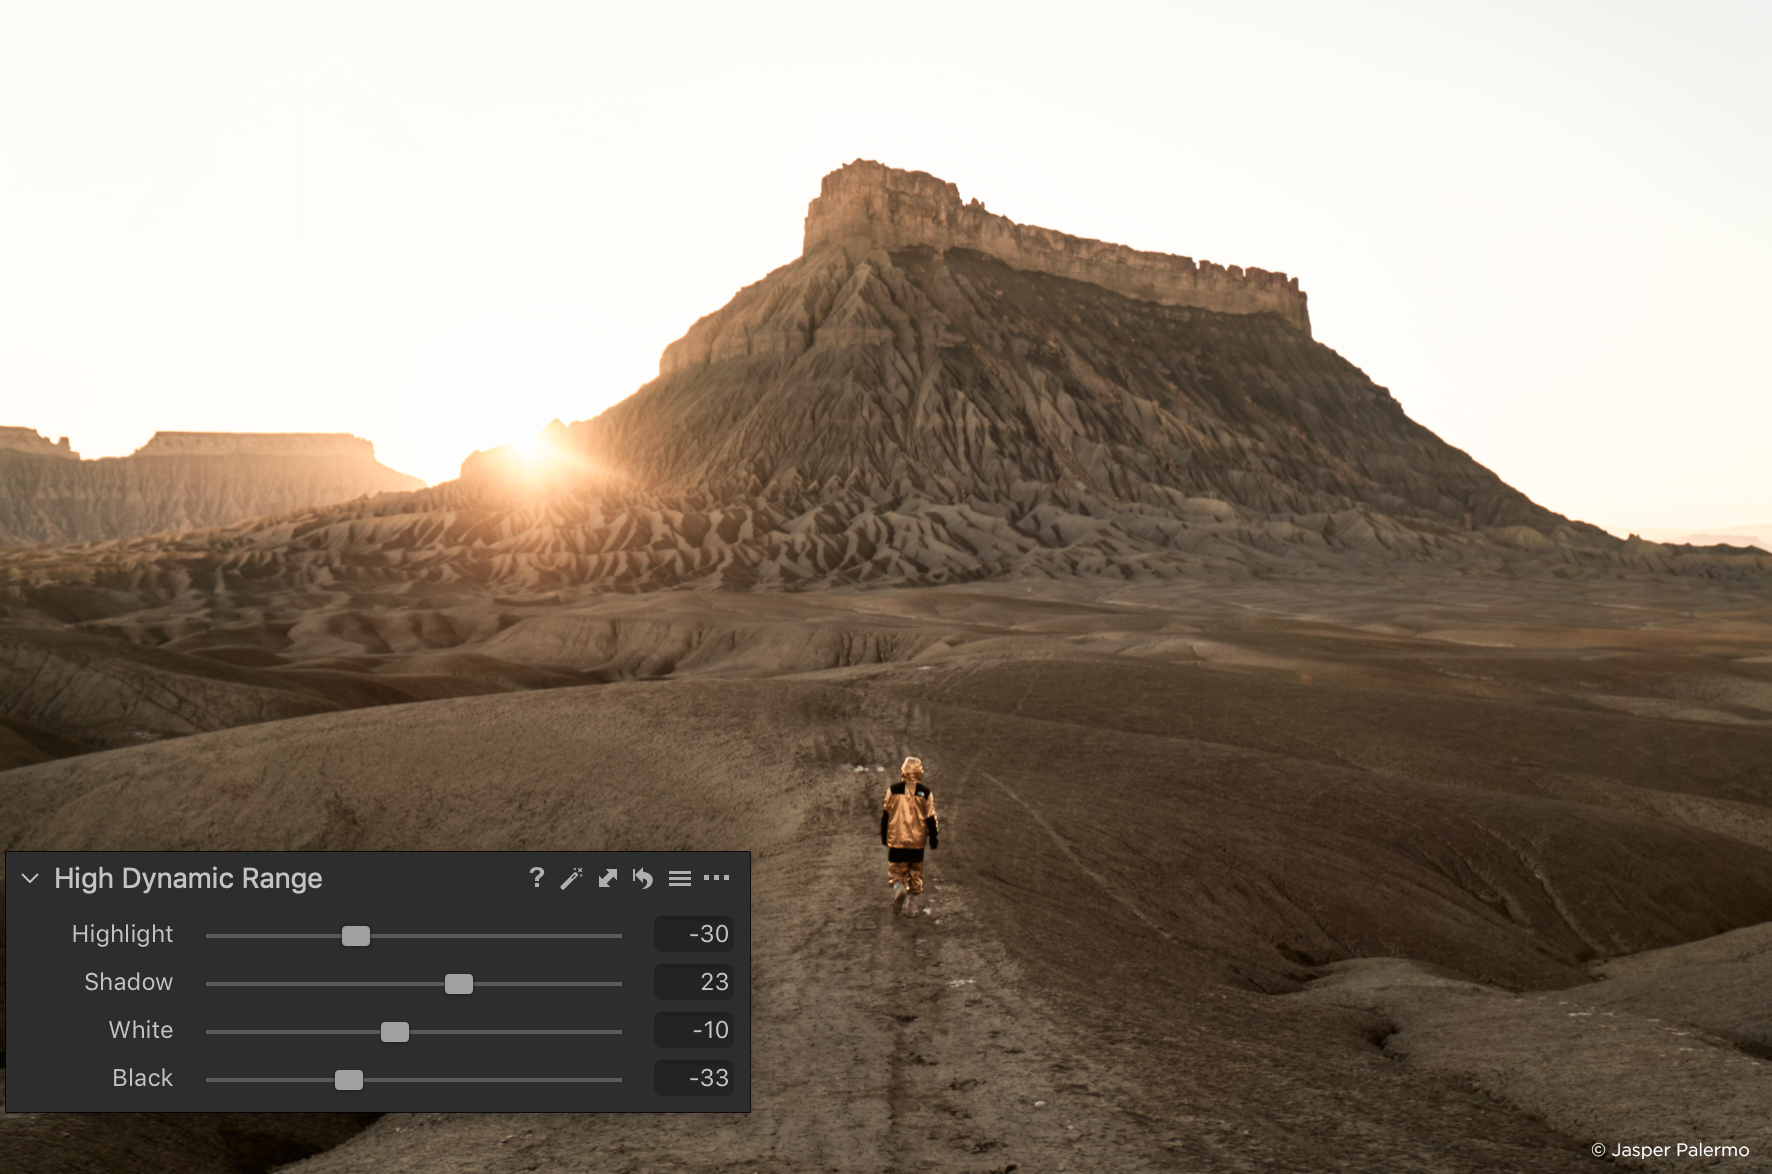
The Highlight and Shadow sliders in the High Dynamic Range Tool work like their counterparts in Lightroom. Although you can’t expect them to have the exact same effect on the images – Shadows tend to brighten the midtones a bit more in Capture One Pro – they do a great job.
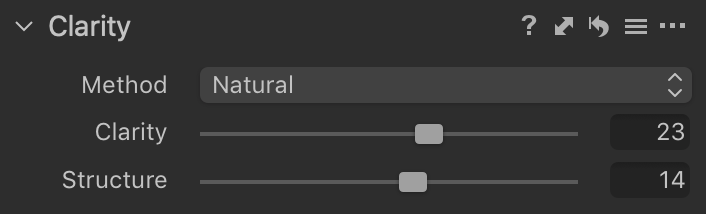 Give your images more punch using Clarity and Structure.
The Clarity feature from Lightroom is split up in two, separate sliders called Clarity and Structure. This is often a big benefit when editing your images. Now you can apply Clarity to a photo without the crunchy look you might get with the equivalent tool in Lightroom, or conversely, add a bit of bite with Structure without adding Clarity. In most circumstances, you want to leave the Method to Natural.
The Curve Tool in Capture One Pro is comparable to the Tone Curve in Lightroom, if you have switched it to Point Curve. It’s obviously also similar to the equivalent tool from Photoshop, but it has one very cool feature that you absolutely need to know about.
Working with both RGB and Luma Curve to affect or preserve colors
You can either use Curve to work in the RGB mode, where colors will be affected by any changes to the curve, or in Luma mode where you are only affecting the luminosity levels. The Luma curve is the perfect choice when you are working on subtle tones like a skin tone, where you don’t want the colors to shift. It is also a powerful choice when working on product shots where delicate or specific colors are not allowed to change.
Lens corrections and sharpening
The Tools used to apply lens corrections, sharpening and noise reduction are straightforward to use when you are coming from Lightroom. There are a couple of notable differences, especially regarding two features in Capture One Pro 20.
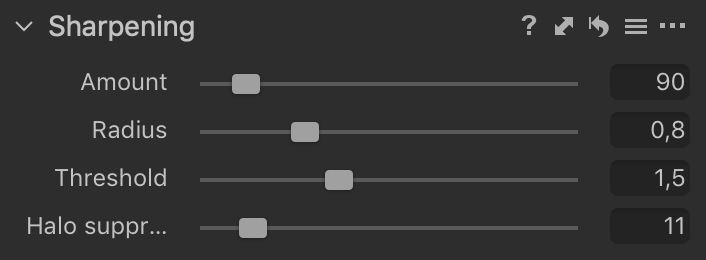 Remove sharpening artifacts with the Halo suppression slider.
You can adjust halo suppression to the Sharpening Tool in order to remove halo artefacts along edges when using a high amount of sharpening. This is similar to lowering the Detail slider in Lightroom below 25. The second new feature is the Diffraction Correction in the Lens Correction Tool.
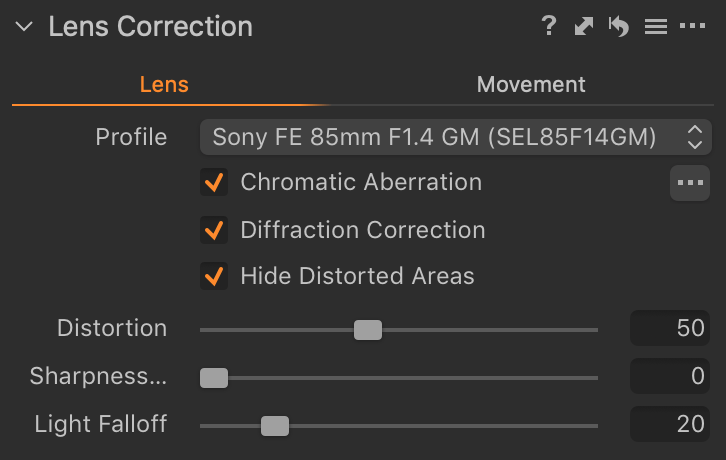 Improve the detail when shooting at small apertures with Diffraction Correction.
This will mitigate the slightly blurry effect that shooting with small apertures like f/16 will have on the image. This deconvolution technique is comparable to setting the Detail slider in Lightroom to 50 or higher.
Another thing you need to know about the Lens Correction Tool is that while Capture One Pro will automatically recognize the lens used if possible, the tool will not always automatically apply a Distortion correction by setting the slider to 100%.
If Capture One evaluates that the lens model has a low distortion, it will keep the slider at 0%. You can obviously change this if need be. The Lens Correction Tool has one additional feature that you should know about. The Sharpness Falloff slider will apply extra sharpening towards the corners, so if your wide angle lens tends to be a bit soft there, you can mitigate that somewhat with this feature.
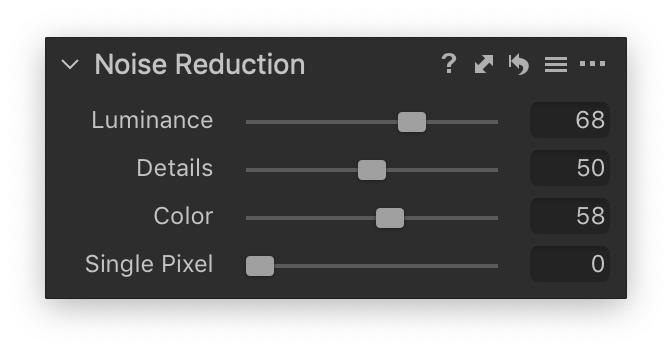
As a new user to Capture One Pro, there is one important change to be aware of with the Noise Reduction Tool. Both the Luminance and Color sliders are by default set at 50, even at very low ISO values. This is different from Lightroom and it does not imply that a hefty dose of noise reduction is applied.
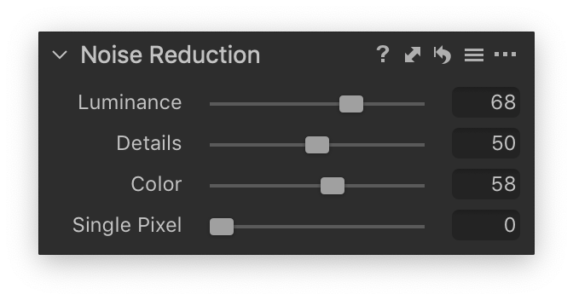
Think of them as sliders that control the balance between detail and noise reduction. When at 50, it merely means that this is what Capture One regards as the best balance for your camera and the ISO used on the selected image. The tool also has a very nice feature called Single Pixel. With this slider, you can remove those nasty, hot pixels that often show up on long exposures, especially during the night.
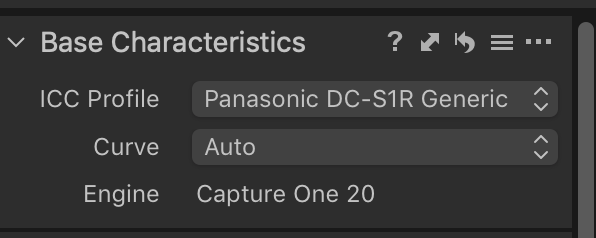
Base Color Profiles
In Lightroom you typically have several different Profiles under the Camera Calibration panel to choose from, and they all render the raw files differently. Capture One has taken another approach. While there are usually just one or two ICC Profiles in the Base Characteristics Tool. The colors have been tweaked to look great on many different subjects captured with the camera. This is one of the reasons why raw files are typically rendered very pleasing with the default settings in Capture One Pro.

Note that you have the option to choose from different Curves in the Base Characteristics Tool. Those mainly affect the light balance, and for most intents and purposes, you should probably just leave it at Auto.
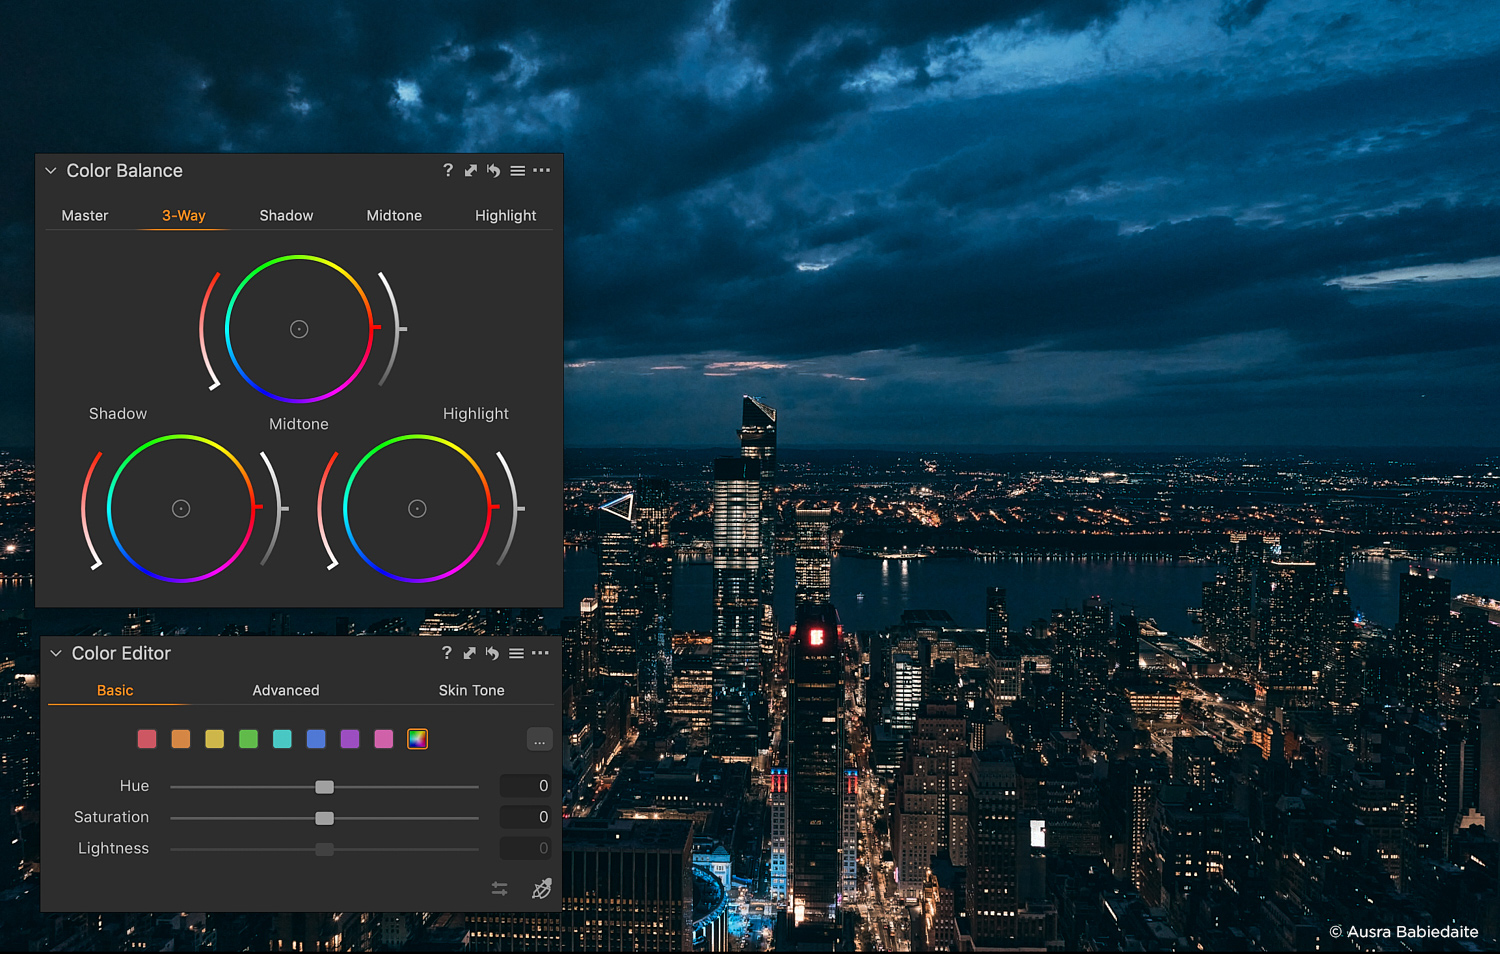
Superior Color Adjustments
The Color Balance Tool is an excellent feature that has no equivalent in Lightroom. It is similar to the Color Grading concept in video editor apps, if you’re familiar with those. The 3-Way option is especially powerful as it makes it possible to adjust the color tint separately in the shadow, midtone and highlight areas.
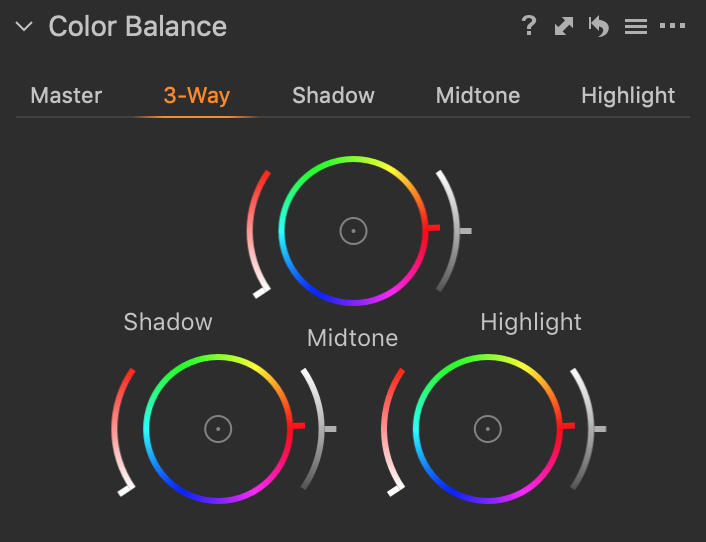 The Color Balance Tool is as a fantastic way to add a creative style and look to your images.
Note the color wheels have two additional sliders that let you adjust the saturation and the lightness of each of the three tonal ranges. It’s a brilliant way to add a creative color style, so don’t forget to play with it.
The Color Editor Tool is arguably one of Capture One Pro’s strongest advantages. Where Lightroom limits you to eight colors within the HSL panel to work on, with Capture One Pro, you have full freedom to choose a specific color to affect. Just remember to select the Advanced tab first. Then click with the Pick Color picker in the image to choose the color that you want to adjust. You can then fine tune the affected color range on the color wheel and adjust Hue, Saturation and Lightness as you are used to in Lightroom.
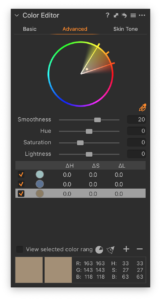 Note that the advanced Color Editor is a Pro feature, and not included
in the Express version
A useful feature is the ability to invert your color selection by clicking on the Invert Slide icon, and then, for example, reduce the saturation or lightness.
The fun doesn’t stop there. You get some additional, powerful features when you choose the Skin Tone tab in the Color Editor. Once you have selected a certain color range, you can even out any differences in the Hue, Saturation and Lightness within that area. This is done with the sliders under Uniformity.
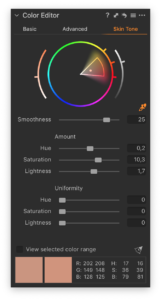
Not surprisingly, it is perfect to get cleaner, more even skin tones, but it works equally well if you want to smooth out other colors like a blue sky. There is one power-user trick you should know about. Any color selection that you make with the Color Editor Tool can be converted into a mask and is automatically saved as a new Local Adjustments layer. This is done by clicking on the three-dot icon and selecting Create Masked Layer from Selection.
This is a very powerful feature because it allows you to use a lot of different image adjustments on the masked area with familiar tools like White Balance, Curve, Sharpening, Clarity and even the Color Editor.
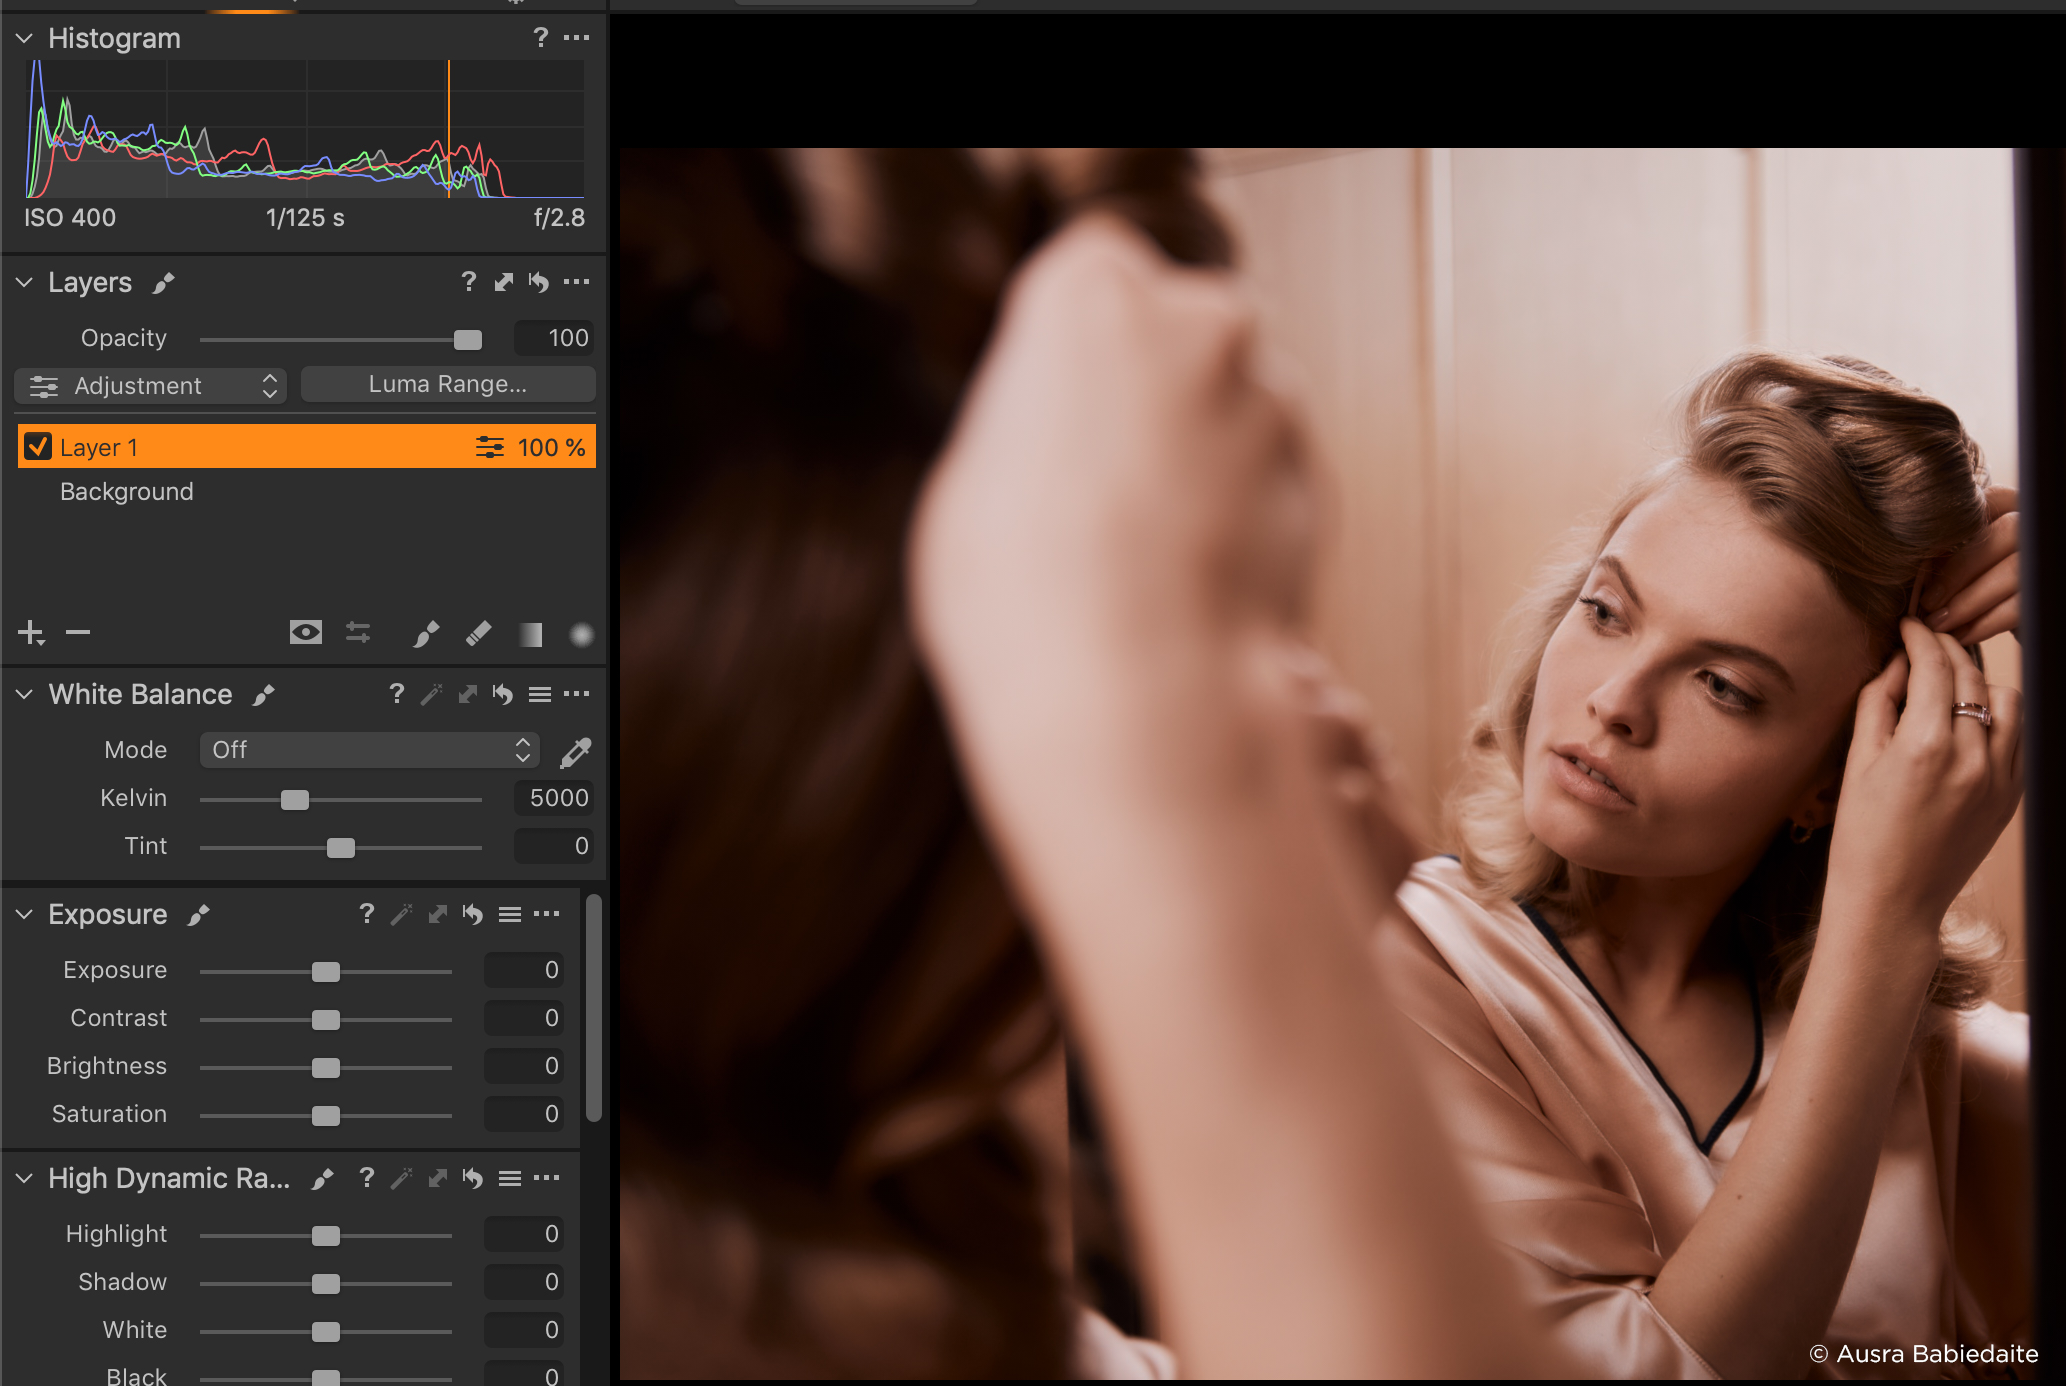
Local Adjustments
Working with local adjustments is a bit different than in Lightroom and more similar to working with layers in Photoshop. Pressing the “+” icon or add a new Layer in the Layer menu, you will see the layer stack on top and all the possible Tools preloaded below it.
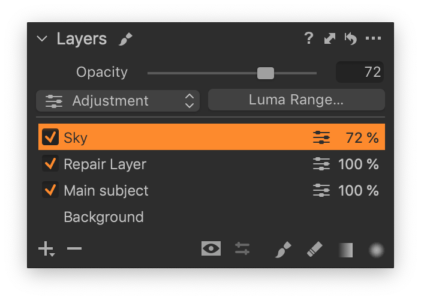 You can change the Opacity of the image with the Opacity slider and toggle the visibility on and off by clicking the visibility box.
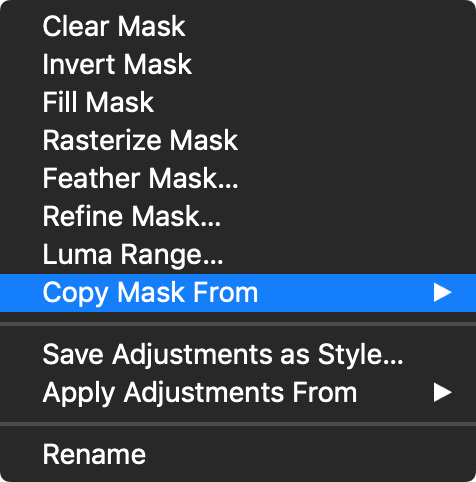
A layer in Capture One Pro can contain either adjustments, cloning or healing, so remember to choose the appropriate type. To use a Local Adjustment, you simply draw a mask with either a brush or a gradient. Press M to toggle the visibility of the Mask on and off as an overlay.
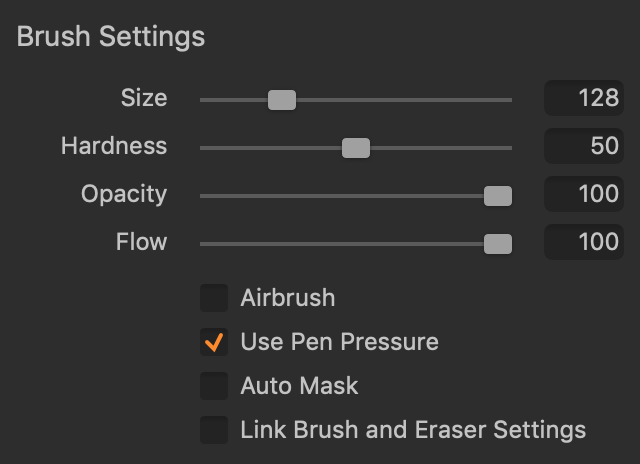
If you right-click on the image, you can change the size, hardness and opacity of the brush and enable, for example, the Auto-mask feature. Once a mask is drawn, you can use any of the Tools to adjust the selected area. A very neat trick is that you can copy a mask from one layer to another layer and invert it. This is done by right-clicking on a layer.
One of the most powerful advantages on the Local Adjustments in Capture One Pro is the ability to combine a mask with the color selection features of the Color Editor Tool. When combined, they allow you to select a certain range of colors that you want to adjust. You can also further narrow down the affected area by adding a mask. One of the most useful examples is to make a rough mask over the face of a person, and then using the Skin Tone feature, you can even out the skin tones without affecting similar hues in the image.
It is also worth mentioning that switching to Capture One Pro from Lightroom gives you the flexibility of using the Curve Tool on a layer as well as applying sharpening that you can fine-tune to taste.
One final thing that is important to pay attention to when working with Local Adjustments is the little brush icon next to the name of the Tool. When it is visible, you are working on a layer, otherwise you are making the adjustments on the background. You can toggle between those by clicking on the option icon and turn Adjust Selected Layer on and off.
Advanced Export
A powerful part of Capture One Pro that needs a brief introduction is the comprehensive export features under the Output Tab. Here you will find the Process Recipes Tool. These Process Recipes contain everything from image format, ICC Profile and resolution over output locations to renaming during the export.
The primary advantage of those in Capture One Pro is that you can enable several of these Process Recipes simultaneously and have them all exported at once. In other words, you can have full resolution TIFF-images exported to certain folders and web optimize versions in JPEG to others.
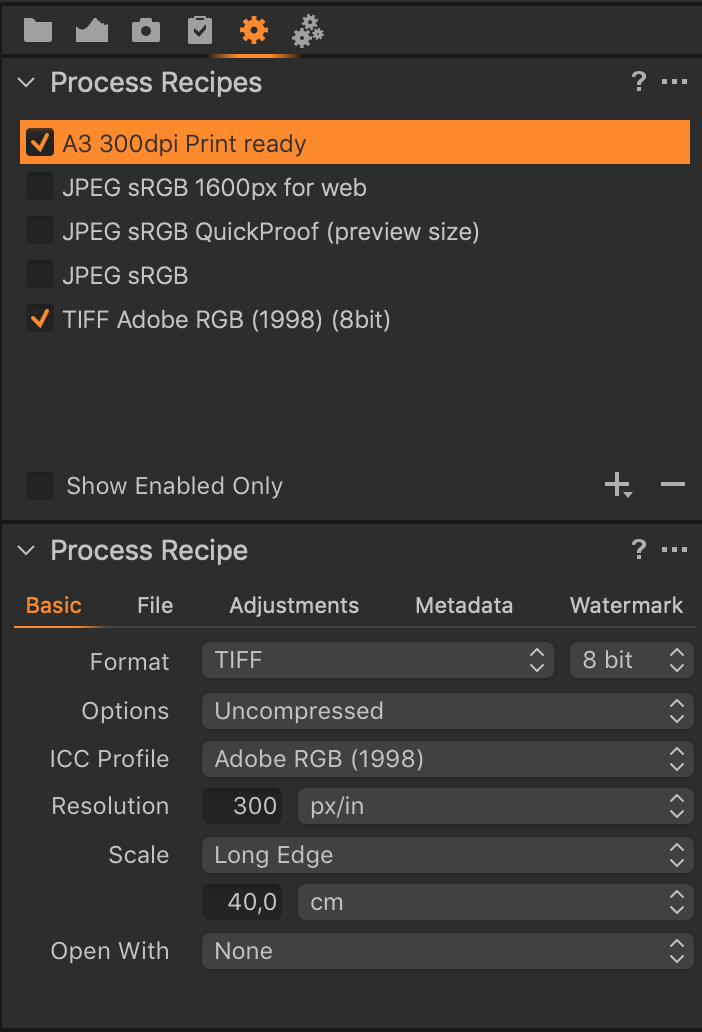 Process recipes gives you the ability to save file export options for later use, save different file formats. At the same time, keep track on your asset management amongst other things.
While it goes beyond the scope of this Guide, it should be noted that you have vast possibilities to automatically create both folder and file names during export based on a long list of options from (primarily) metadata. Just click on the small rectangle with three small dots inside, and choose from the many options, called Tokens. Just like in Lightroom, you can apply output sharpening during export. Select the Adjustments sub-tab in the Process Recipe Tool. Choose either Output Sharpening for Print or Output Sharpening for Screen.
A very cool new feature of Capture One Pro 20 is that you can check the final applied sharpening directly in the program by selecting View > Show Recipe Proofing. This is especially useful when you are going to resize an image for the web. You won’t need to export it to Photoshop first in order to evaluate the final sharpening. With the Recipe Proofing feature, you get what you see, including resized resolution, JPEG compression and the ICC Profile.
There are many more image adjustment tools in Capture One Pro than are covered in this Guide. Hopefully it has provided you with a valuable insight to the most important differences coming from Lightroom. There are a lot of new, powerful image editing features waiting for you to enjoy, so have fun!