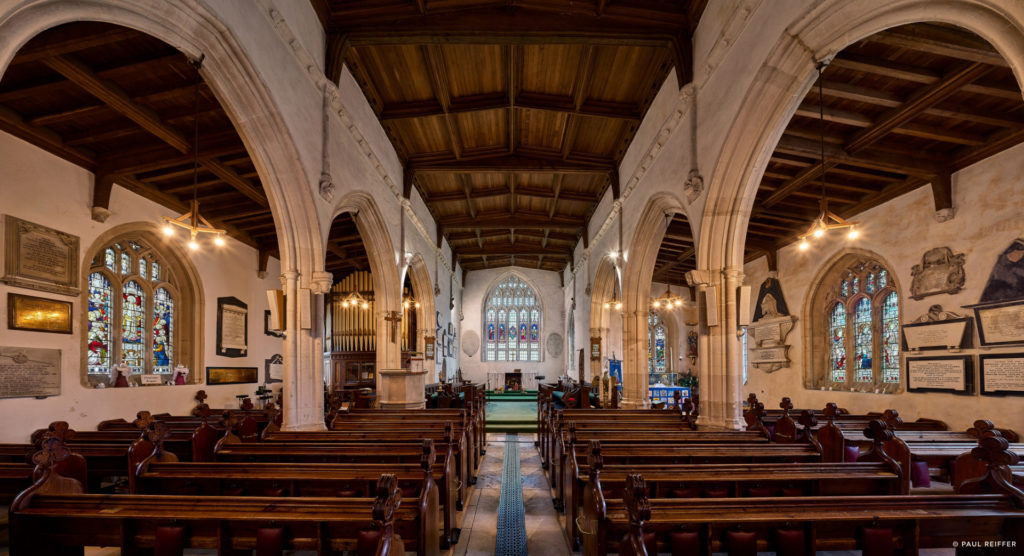
While blending or merging several exposures into one final High Dynamic Range (HDR) image remains a popular creative option for landscape photographers over the years, its use in architectural and commercial shoots has some big benefits that are unique to the challenges of shooting these genres.
In many scenarios, especially outdoors, photographers can normally rely on graduated filters to balance a scene by blocking large parts of the frame with a neutral density layer – evening up the brightness from the shadows to the highlights. But while this works well on large, sweeping horizons and foregrounds (i.e., landscape shooting), when it comes to making that process work for odd-shaped buildings and structures with various hotspots and dark areas, we’re often unable to use the same approach.
And where using a filter isn’t an option, or where the sheer amount of “fill light” you’d need to balance the scene becomes prohibitive, that’s where Capture One’s HDR Merge function can now deliver the results you need.
How It’s Used
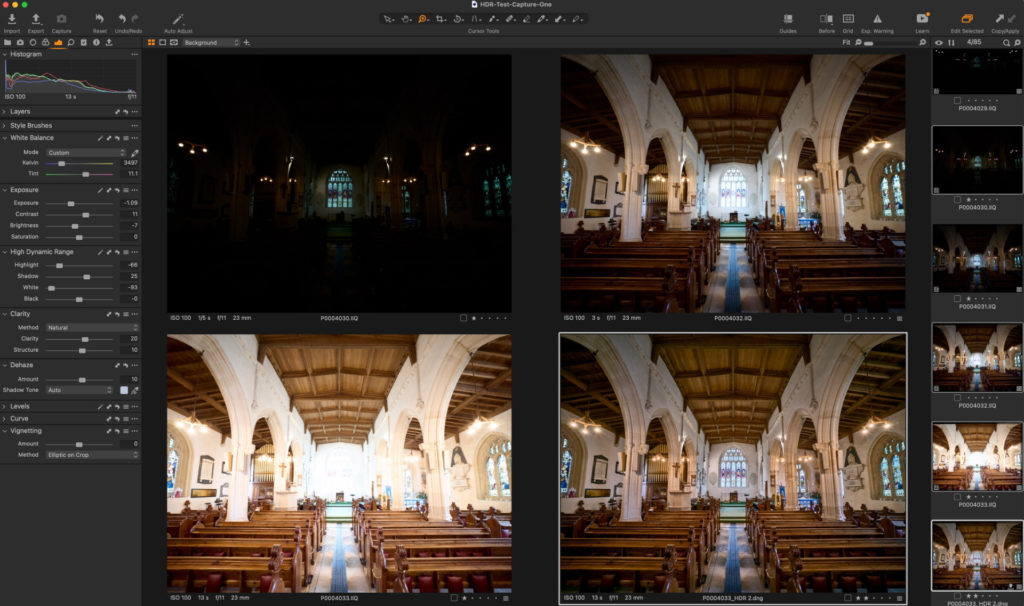
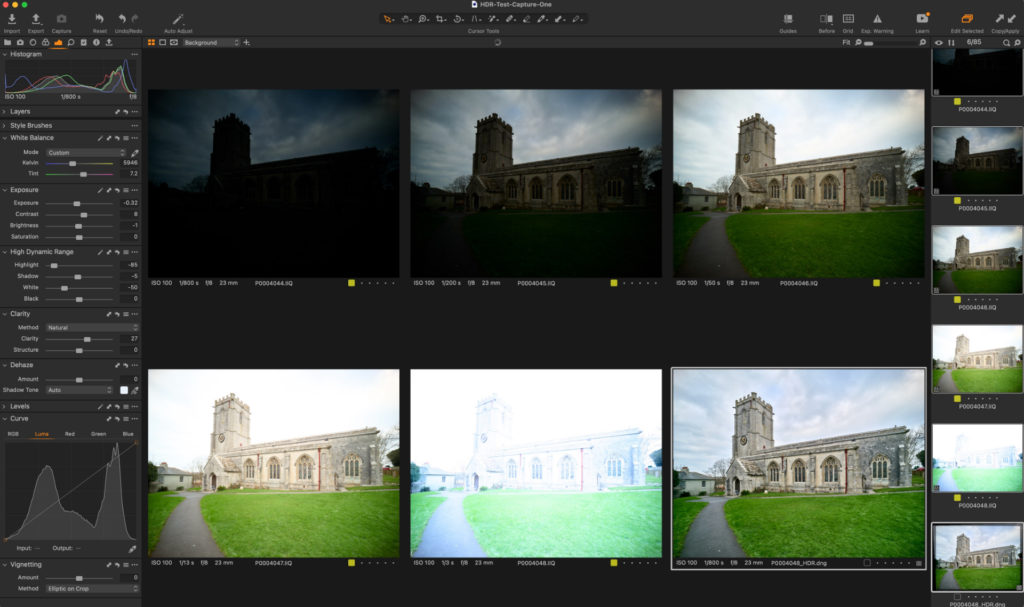
HDR Merge relies on you capturing two or more images (ideally three), at differing exposures – allowing one frame to overexpose (and so, display the shadow detail), another to underexpose (and therefore keep all the detail in the highlights) and one frames in-between as “base” exposures.
Capture One then takes these individual frames and merges the relevant parts of each of them into one, final, raw DNG file that can be further edited just like any other image from your camera.

The result?
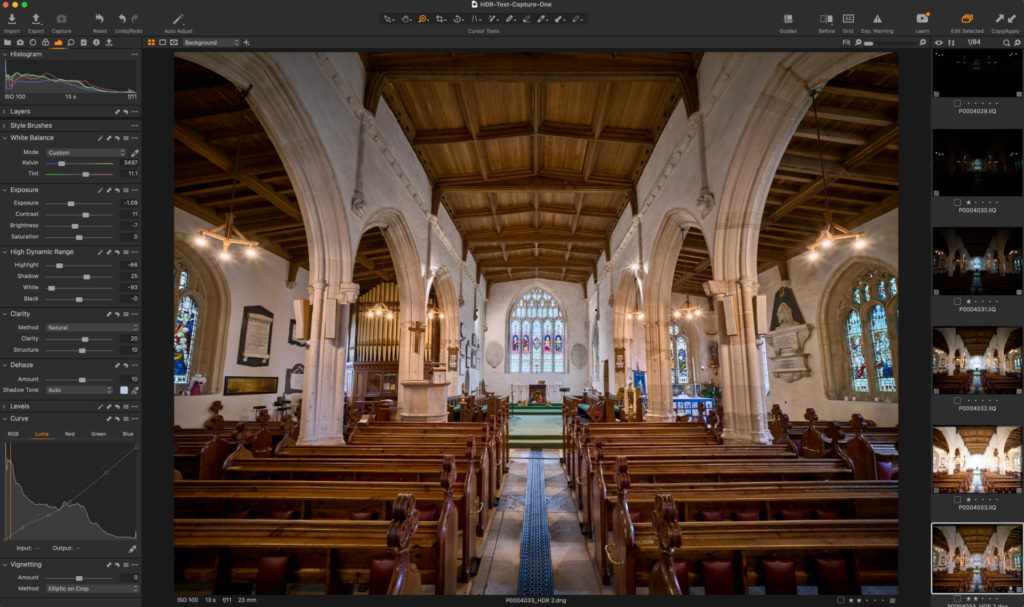
If captured correctly – preferably on a tripod, with fixed focus point, focal length, aperture, and ISO – Capture One then delivers a single file with a much greater dynamic range than your original files, able to recover and see all highlight detail, clean shadow content, and everything in between.
The challenge that many see against blending bracketed exposures into an HDR image, is the relative ease with which Capture One allows us to recover a single shot’s shadows and highlights using our existing software tools – and as such, some don’t necessarily see the HDR tool as a benefit to their workflow.
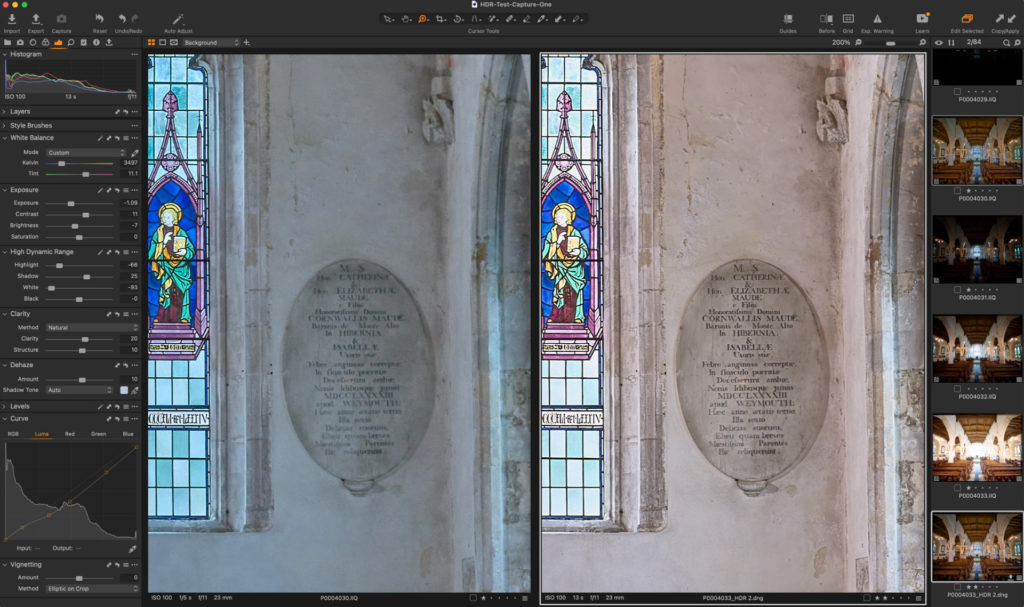
Of course, it’s possible to recover the highlight detail and shadow information from our single shot (on the left) using Capture One’s White, Black, Shadow and Highlight sliders to deliver a very similar result to that of the 4-shot merged single HDR output on the right:
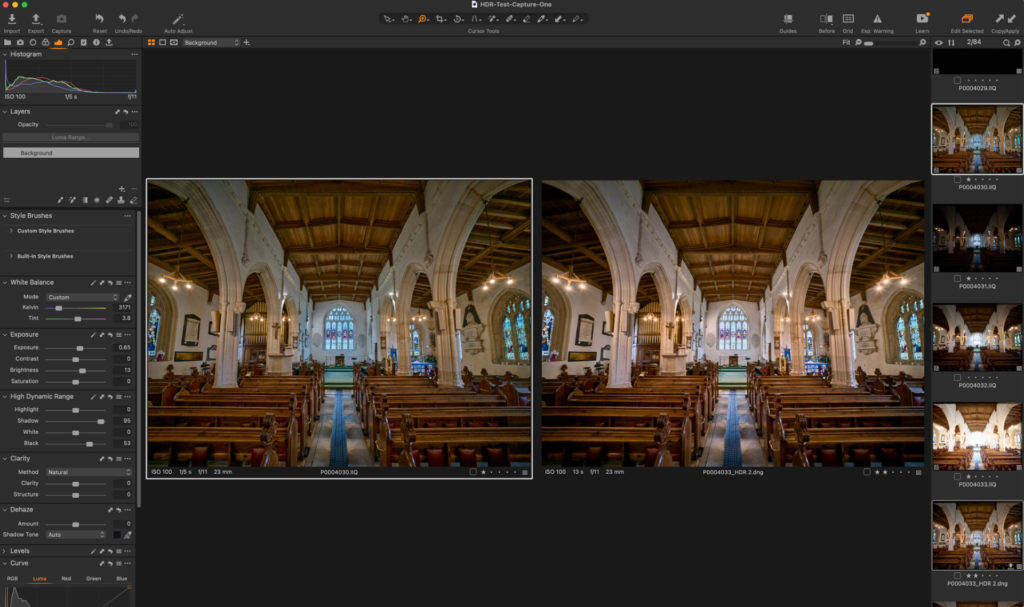
That is, until we look closer – at the much cleaner noise in the shadows…
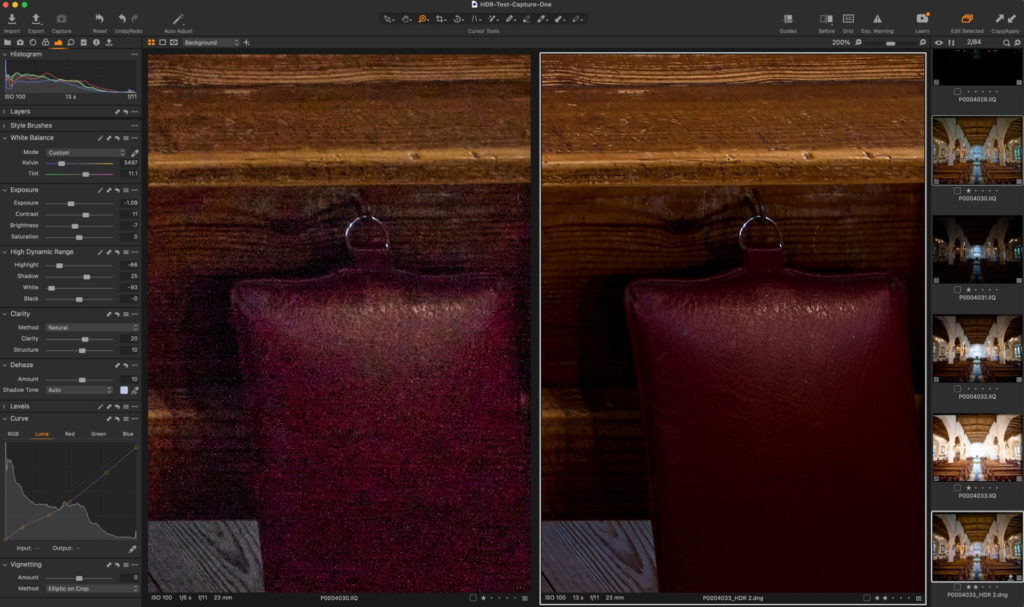
At the increased detail in the wooden textures…
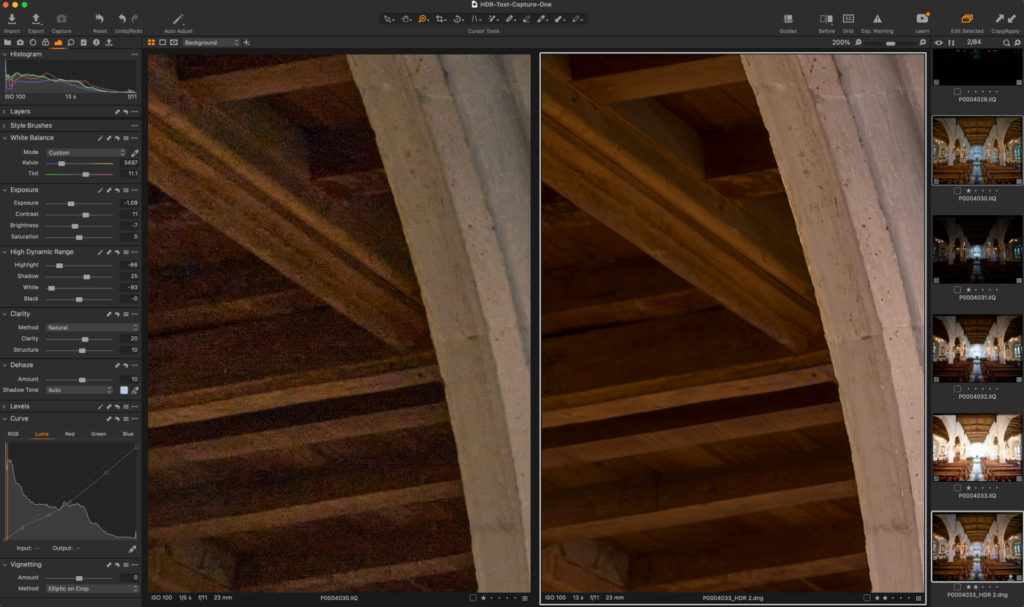
And at the improved sharpness of objects across the scene…
Why HDR Creates Cleaner Results
When it comes to “impossible shapes” of lighting, we can sometimes feel that we’ve been forced into using HDR to capture all the details we want. Yet, there are huge benefits that can help even a standard image, regardless of whether a filter or fill-flash could have been used instead.
If we consider what the merge process is actually doing, it’s taking content from 2, 3, 4+ frames and blending the best exposed pixels.
Given that noise is random and more pronounced in underexposed shadows – the process of blending several frames together, including those which have a better signal-to-noise ratio in their own right, means that our output is the best possible mix of all of the details we want, with none of the artefacts that distract us from the overall image.
Using HDR in Everyday Shots of Architecture and Structures
Let’s take this Golden Gate Bridge example at sunrise, and think how we could capture the detail of the sun itself, while not losing the colour and content of the bridge which is currently in silhouette.
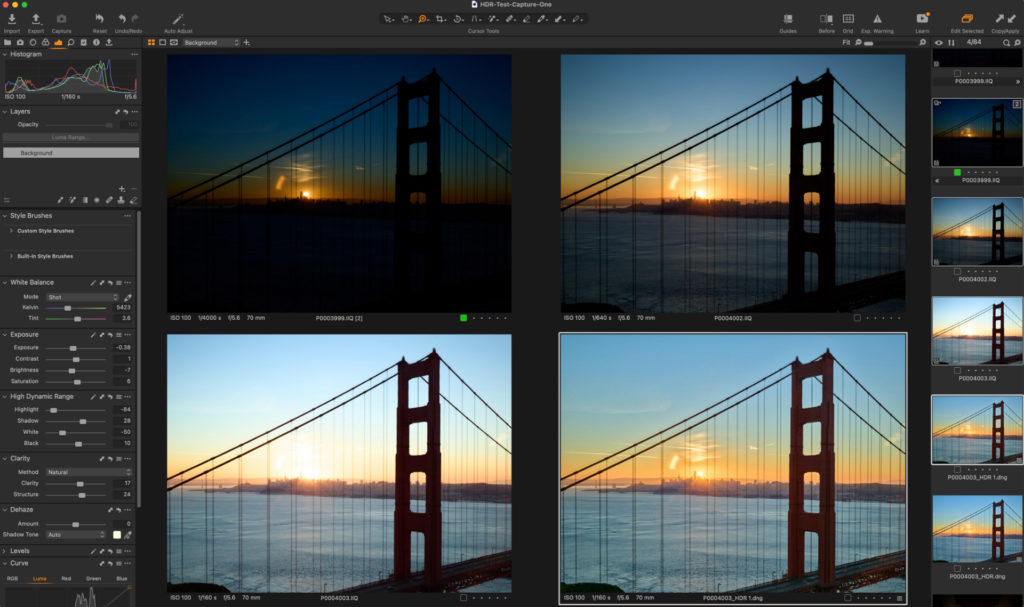
Now, we could use a standard “graduated neutral density” filter, but where would we align it?
No matter where we place that filter in front of the lens, we’ll be unintentionally cutting off and darkening some part of the bridge as well as the sun that we’d meant to in the first place. Without a custom filter designed for this exact viewpoint, on this exact camera with that exact lens – there’s not much we can do.
We’re stuck with either a sun that is overexposed or a bridge that is permanently in detail-less shadow.
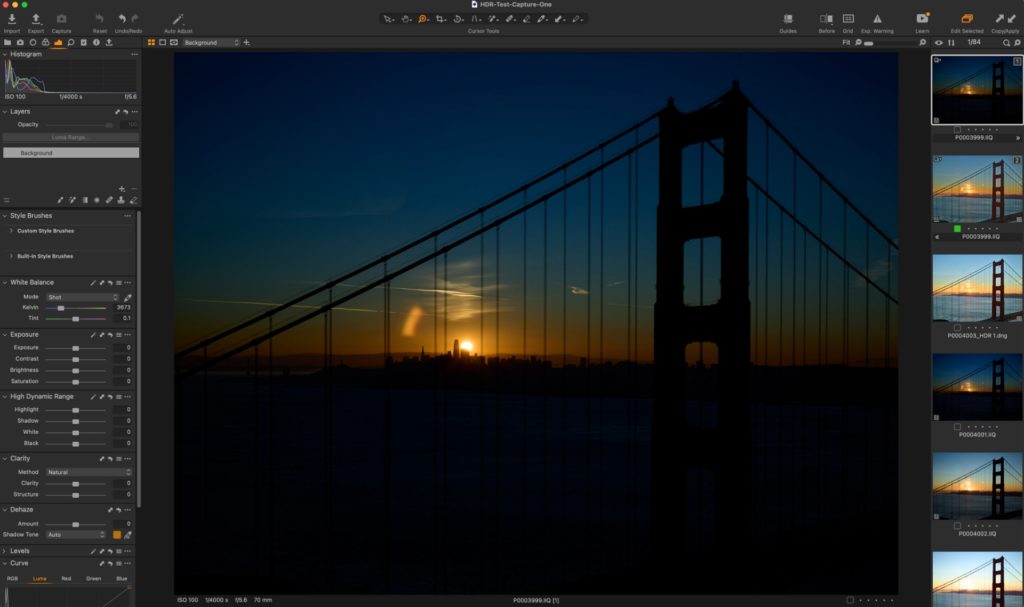
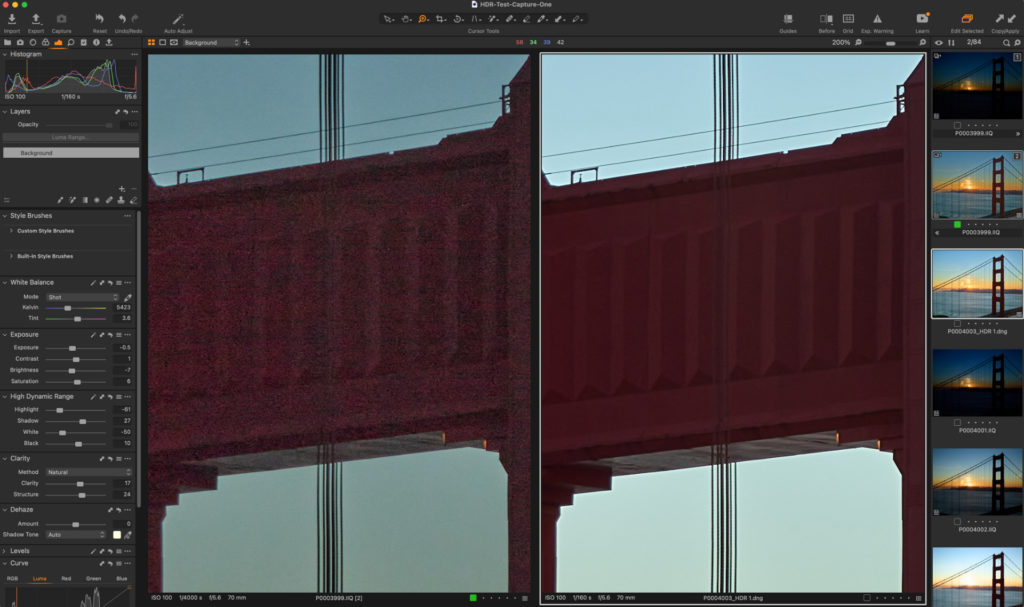
But with an HDR approach, we can use the details of the three individual frames with varying exposures to merge all that content into a final shot (just as before) which is almost noise-free when I lift the shadows of the bridge itself up high.
Our blended image has the full range of detail in the highlights of the sun, the shadows of the bridge, and everything in between. But even better, it also has sharp, noise-free, content throughout – no matter how much I lift or recover the shadows and highlights as I edit.
If we compare the merged HDR output (on the right) to the result of “lifting” the shadows of a single frame that was correctly exposed for the sun (and therefore, underexposed), the difference is quite staggering.
Considerations for Shooting
To get the best out of Capture One’s HDR Merge tool in terms of architecture and structural photography, there are a few considerations to bear in mind:
- Always use a firm, sturdy, solid tripod and never move the camera once in position.
- Lock in your aperture, white balance, ISO, focus and focal length (on a zoom lens).
- Shoot at a low enough ISO to keep your base exposure “clean” of noise – and don’t worry about your underexposed image, we won’t be using those shadows anyway; only its highlight detail.
- You are ONLY going to adjust your shutter speed between shots – many cameras have an automatic function for this, but if yours doesn’t, aim to shoot three frames, three stops apart. No other setting should be changed.
- Be careful with any form of moving object – pay particular attention to moving parts of a structure, people, traffic, things being blown by the wind, clock faces(!) and more – and check they were merged in the way you expected once the process is complete.
Editing Your Merged HDR Image
When using Capture One’s HDR Merge function (after selecting the exposures you’d like it to use), it presents you with just two simple choices before it gets to work:
Auto-Adjust : Capture One will adjust the sliders in the adjustment panel to deliver a blended HDR output with adjustments already made to the DNG in order to give a good start at getting the most from the captured range.
Auto-Align : While helpful for emergencies, or for handheld shooters, if you’re taking this type of photography seriously, you shouldn’t need this Capture One “helper”. Instead of relying on this option to “fix” any issues, your images should all be perfectly aligned at the point of capture having used a tripod. If they’re not, Capture One can attempt to lay them out correctly before you, before blending instead.
It’s worth performing your basic lens corrections on each individual frame before blending – such as diffraction correction, light falloff, purple fringing, etc.
However, for shots that require a keystone correction or rotation to happen, make sure you only do this to the final DNG output – tiny variations between frames can really throw the process out and lead to “ghosts” and mismatches in the image.
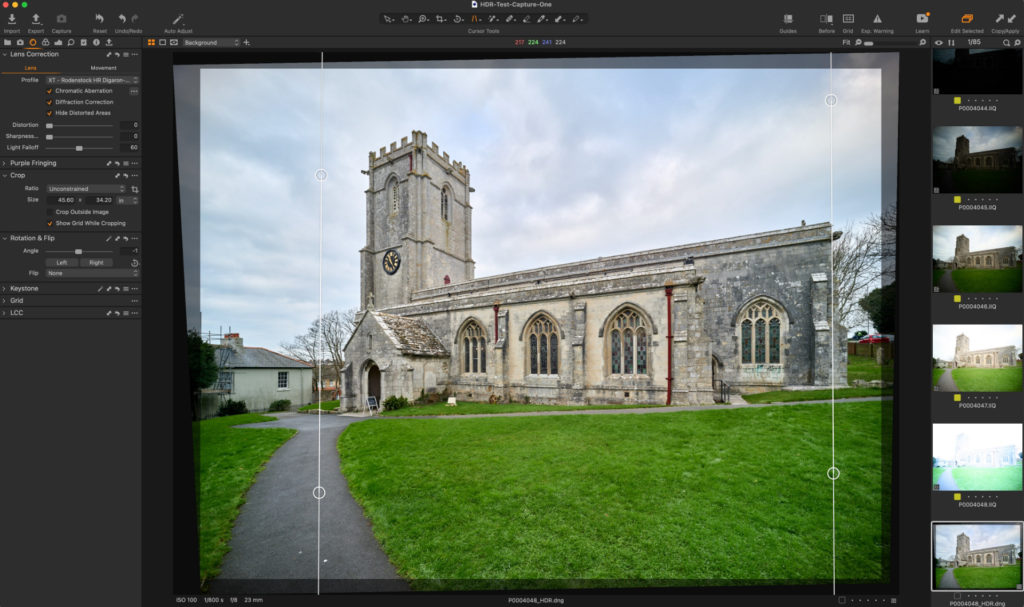
Instead, once merged, apply any rotation, keystone correction and aspect ratio changes as a finishing touch.
HDR as a Powerful Tool
As with all photography, less is often more – but when it comes to capturing the full detail of a tricky scene, whether indoors or outside, the HDR Merge tool within Capture One 22 can be a lifesaver.
With noise-free shadows, sharp details, the ability to see a much greater range of content in one scene without needing to resort to a rig of 50 lights from every angle, and a fully-editable raw DNG file as an output; – the HDR toolkit really is a powerful addition to your workflow that can save a tricky shot in many situations.
One Final Thought
Don’t forget, the HDR Merge function is just one of the new features that can help photographers capture complex structures and buildings at their best. Combined with the new Panoramic Stitching feature, and you’ll find you can create tack-sharp, noise-free, ultra-wide perspective projections of places and spaces with ease.

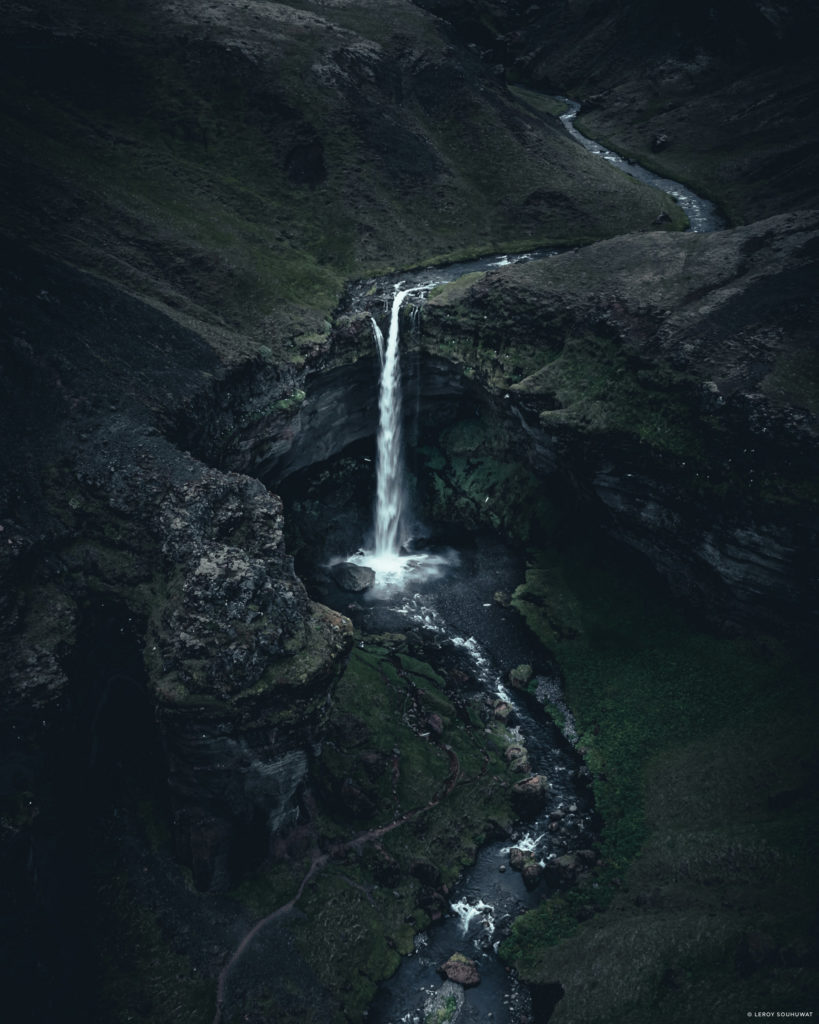
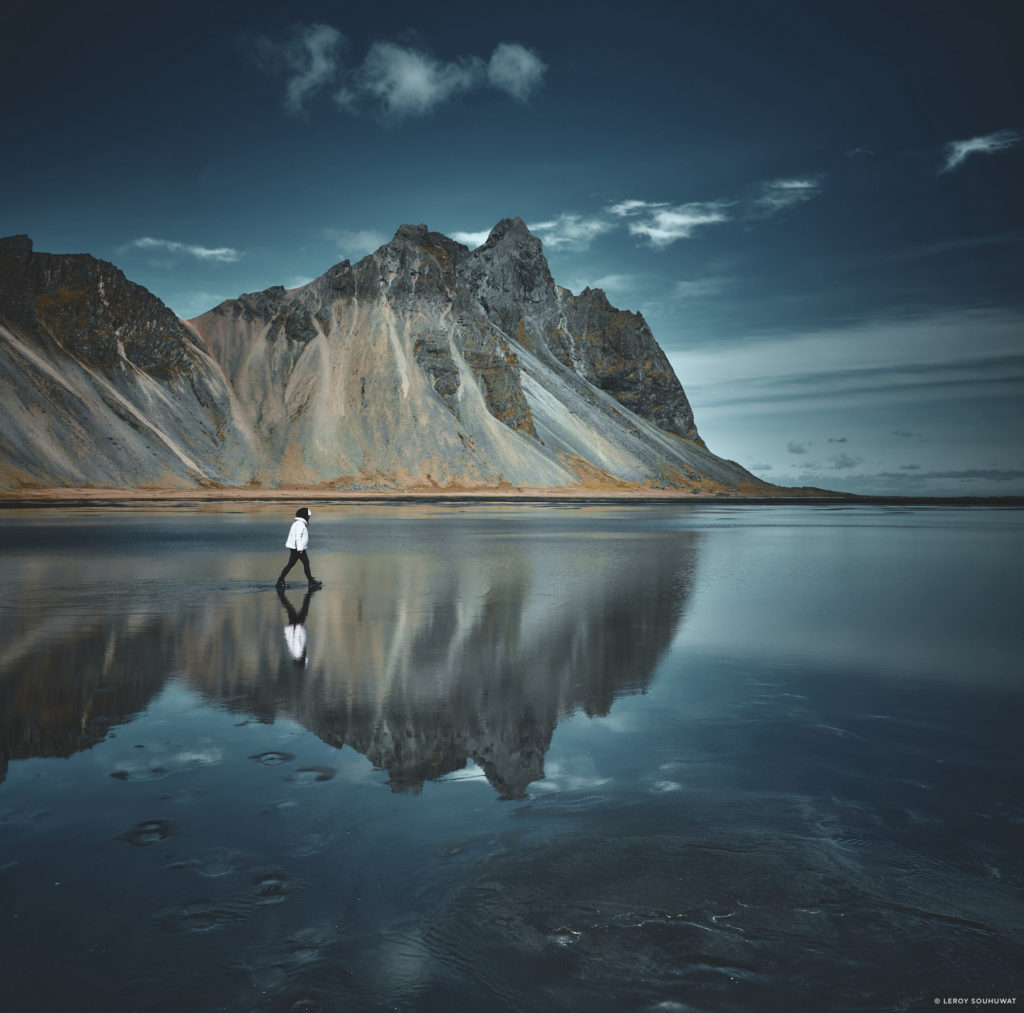
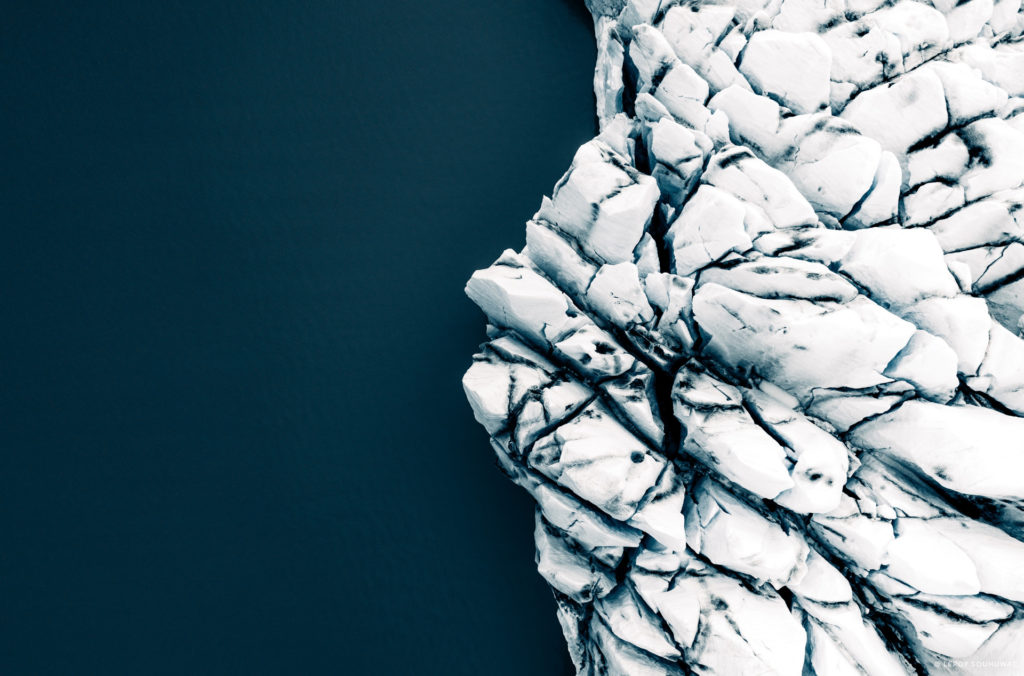
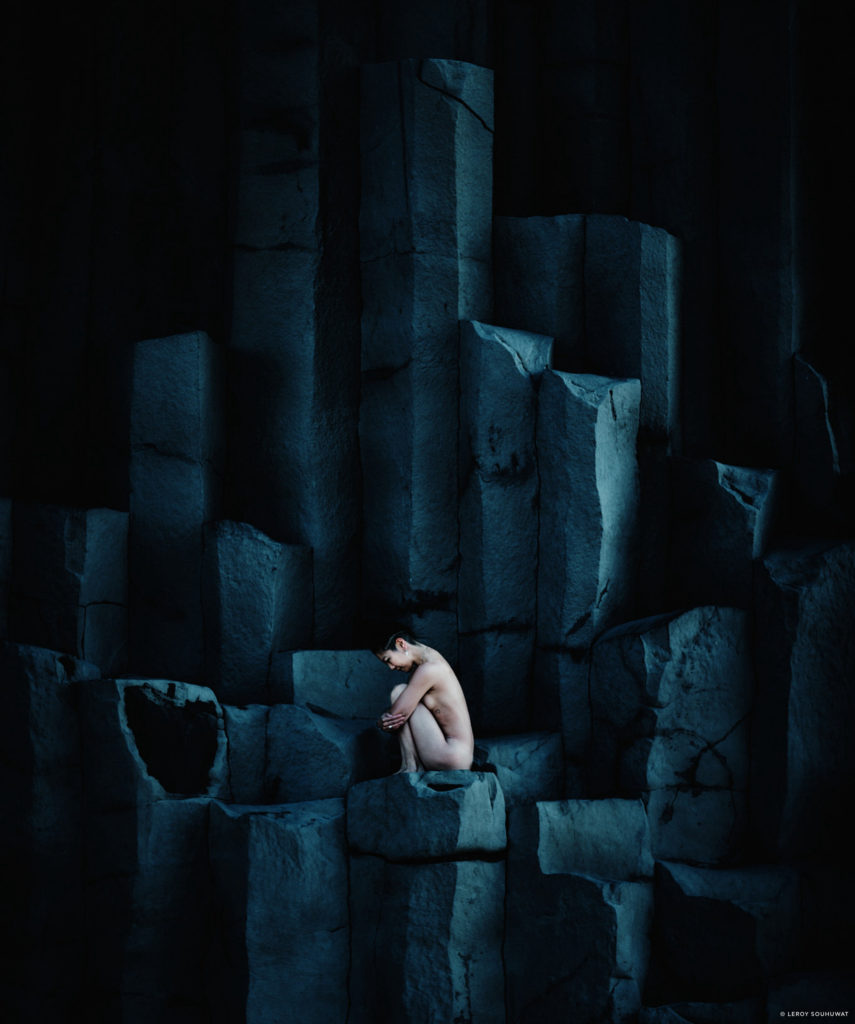
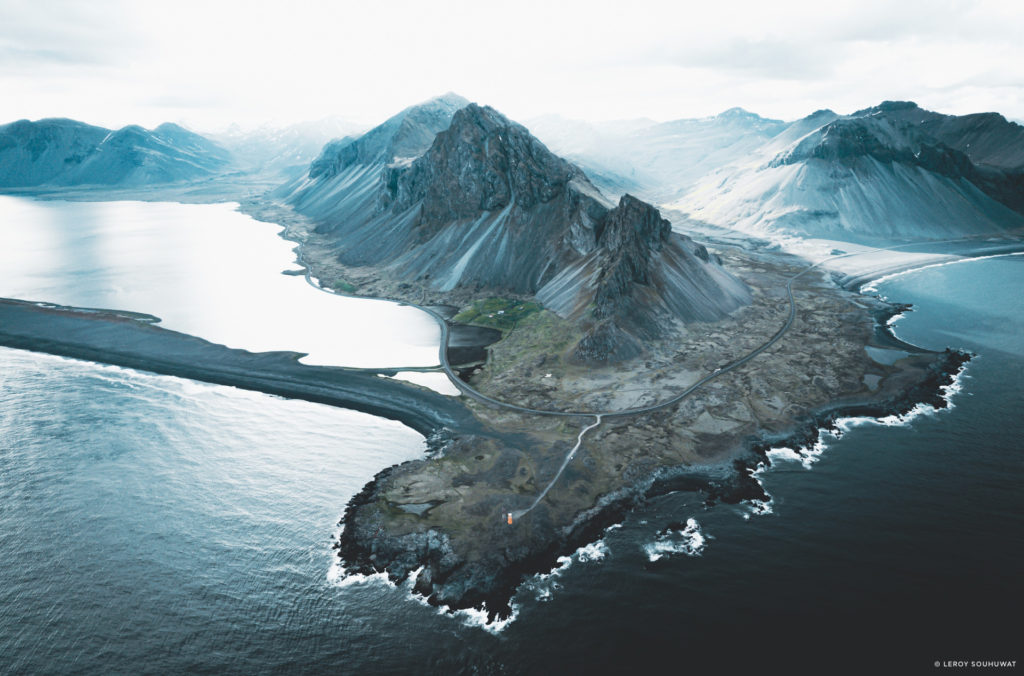 Hailing from the Netherlands and with roots in South Maluku, Iceland-based nature and landscape photographer Leroy Souhuwat brings an exploratory passion and a worldly perspective to his images, which are punctuated by raw, powerful landscapes – and the odd adorable puffin or two. Leroy’s work aims to inspire humans to reconsider their relationship with nature, particularly when confronted with its enormity and unpredictability. We spoke with Leroy about his photography journey and how the untamed landscapes of his new home, along with the support and encouragement of the wider photographic community, have inspired his creative endeavors.