Latest Posts

Managing Multiple Headshots

NOTE: This article discusses an outdated version of Capture One. To learn more about our latest version, click here.

When shooting corporate headshots, or other portraits of many individuals, time is often an important factor. You don’t get many minutes per person, and after several days of shooting, you often end up with a huge number of images.  Managing an entire company’s batch of headshots can be complicated, but it doesn’t have to be time consuming or difficult. Capture One is a super powerful tool to help with this task.

Here is a quick description of the job solved in this blogpost; shoot a bunch of headshots, select two different headshots of each person, mass-edit for a similar look and white background, and finally, export the images with correct naming to print, web and in full resolution as a backup. This blog post has quite a lot of content, but if you ever shoot portraits like this, it’s worth the read. It might double the speed of your workflow. Grab a cup of coffee and settle in!

You might want to follow along in Capture One as you read through. Download a free 30-day trial of Capture One if you don’t already own it.

Table of contents

  1. Setting up your Session (Use Tokens for location and naming)
  2. Instant adjustments (Utilize the power of Capture One Tethered Capture)
  3. Selecting the good stuff (Capture Pilot, rating, color tagging)
  4. Intelligent filtering (Smart Albums, Filters)
  5. Mass-editing your images (Copy/Apply, using Curves to whiten background)
  6. Exporting to perfection (Process recipes, output sharpening, Tokens)

The number one tip for a successful portrait session is to shoot directly into a computer (shooting tethered). This gives you numerous advantages, with the two most important being: 1) instant preview of the image with adjustments on an actual monitor, and 2) instant sorting and correct naming of the files.

1. Setting up the Session

The two most important factors in setting up the Session are location and naming. First, create a new Session and call it something related to the shoot, for example, ‘Headshots_July2017’.

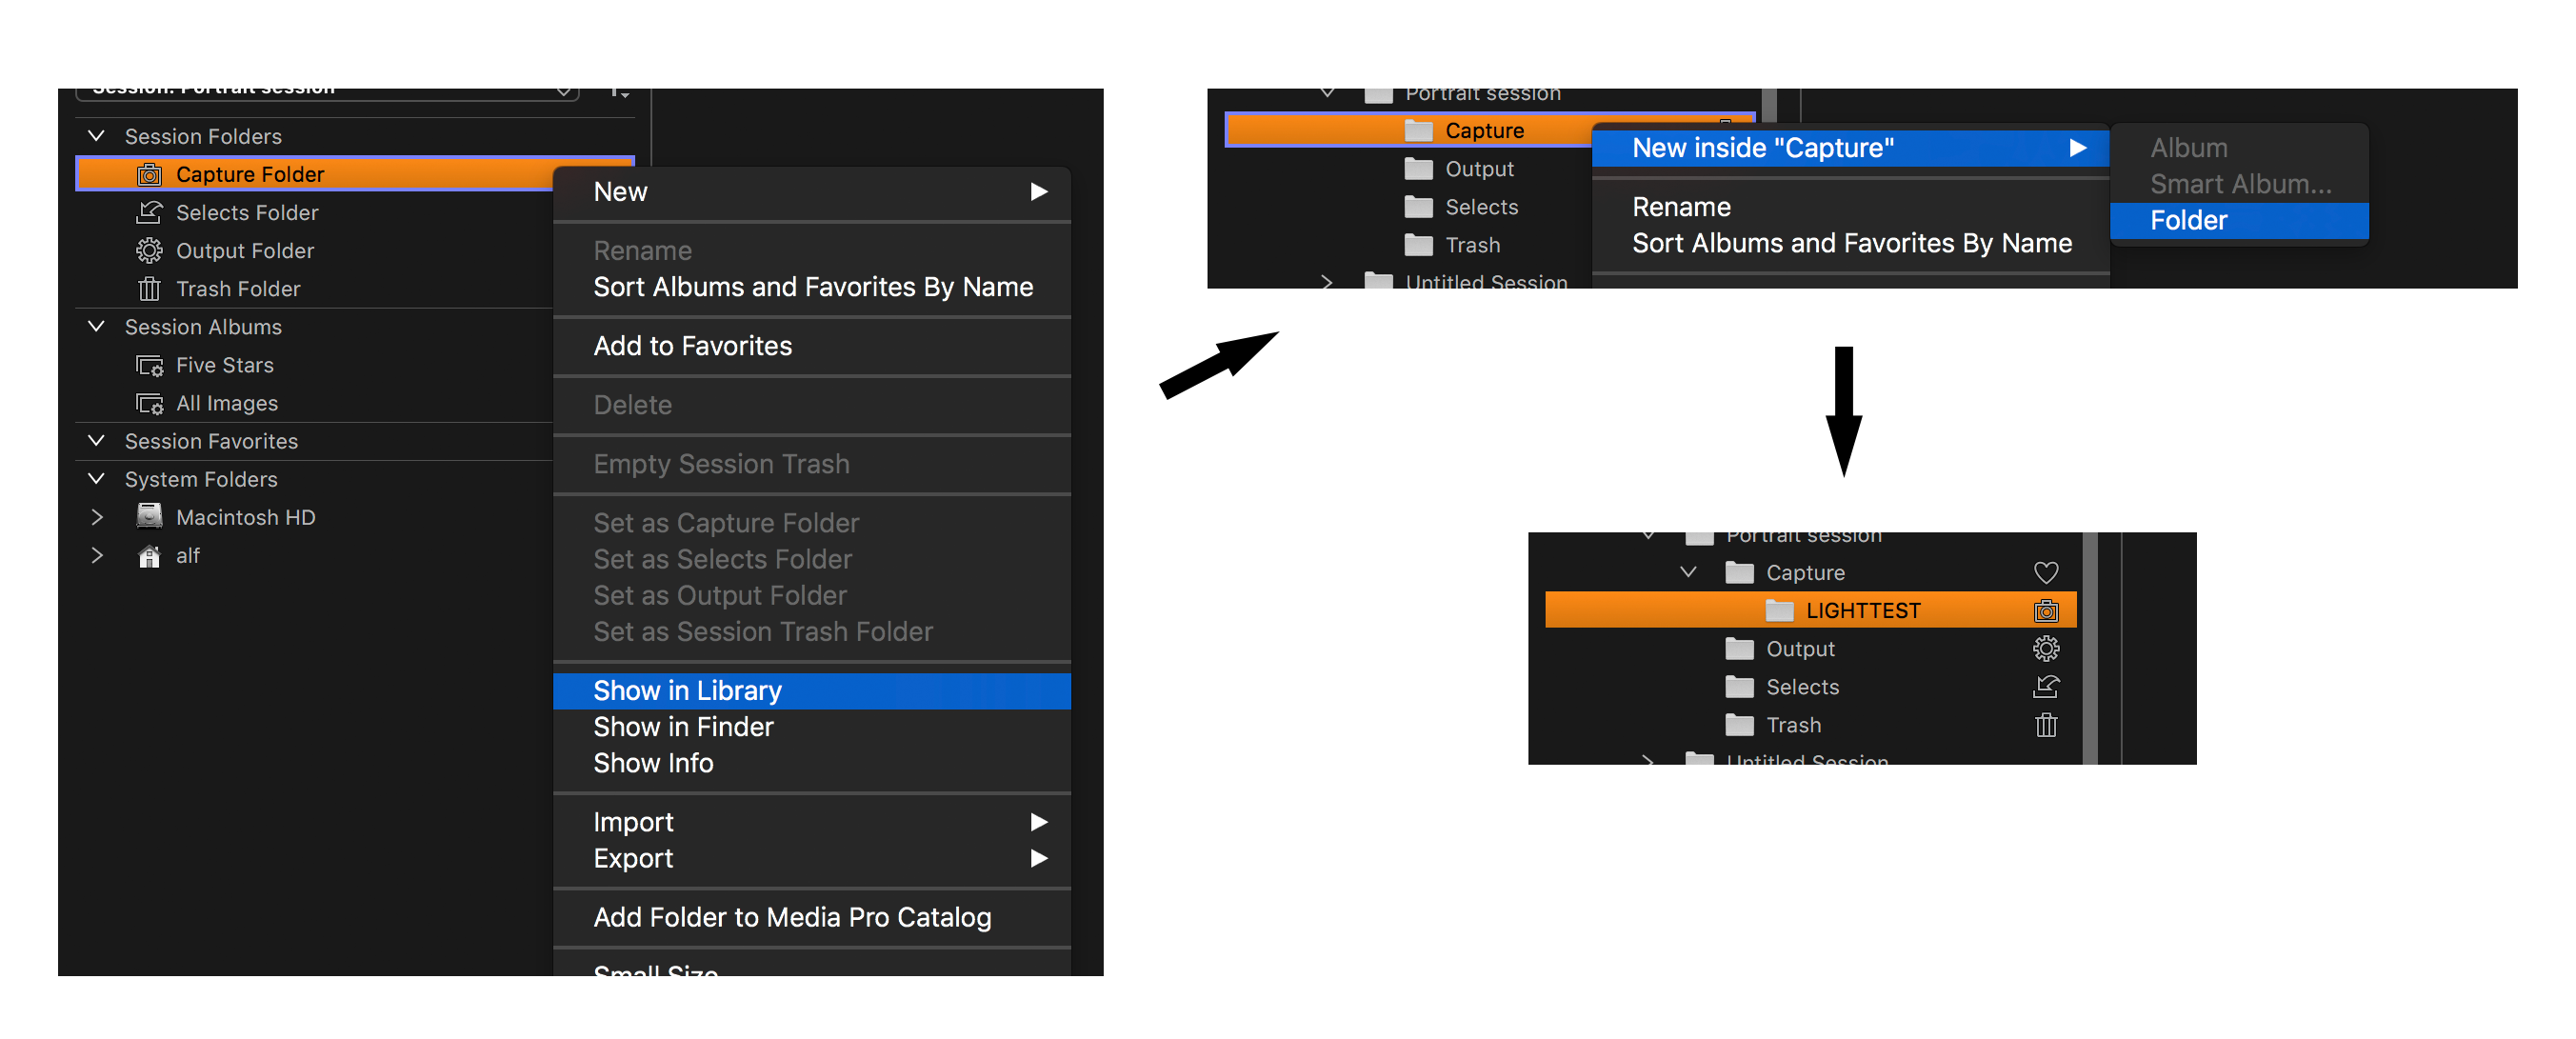
You want to divide each person into their own Capture Folder within the Session. This ensures an organized storage of the images for later use, which I will get back to. I recommend creating sub folders within the Capture Folder of the Session. To locate your Capture Folder within the Library Tool of Capture One, right click on the Capture Folder and click ‘Show in Library’. This will expand the System Folders and highlight the current Capture Folder, being the default Session Capture Folder. Right click on that folder and select ‘New Inside “Capture” > Folder’. Since you are in the preparation phase, call it ‘LIGHTTEST’. Right click on this folder and select ‘Set as Capture Folder’. When Capture One asks: ‘Would like to remember the previous Capture Folder as a Favorite?’, make sure to click Yes. This sub folder is now the Capture Folder to which your images will be saved.

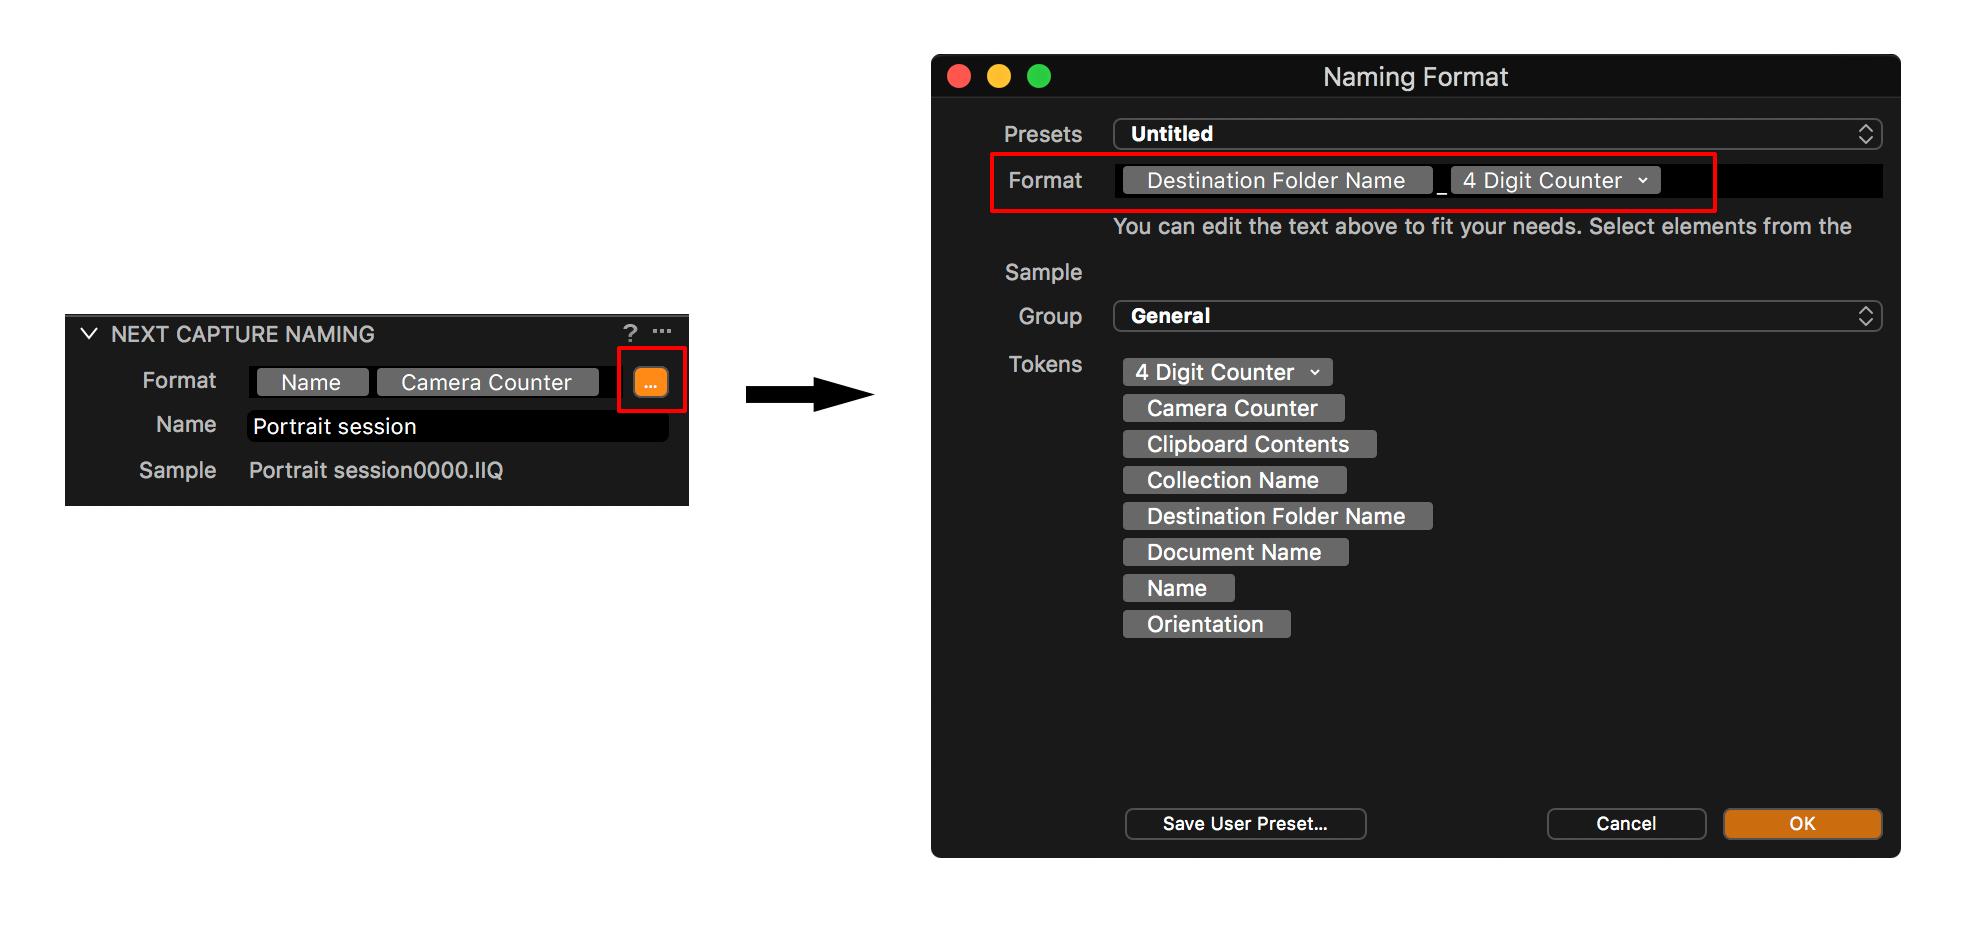
Next, you want the images to be named correctly. Go to the Capture Tab and locate Next Capture Naming. In the Format field, the default is “[Name][Camera Counter]”. Change this by clicking the tiny icon with three dots to the right of the field, and select the tokens “[Destination Folder Name]_[4 Digit Counter]”. Remember the underscore between the tokens. Since you are still using LIGHTTEST as your Capture Folder, new images will be named ‘LIGHTTEST_0001’, ‘LIGHTTEST_0002’ and so on.

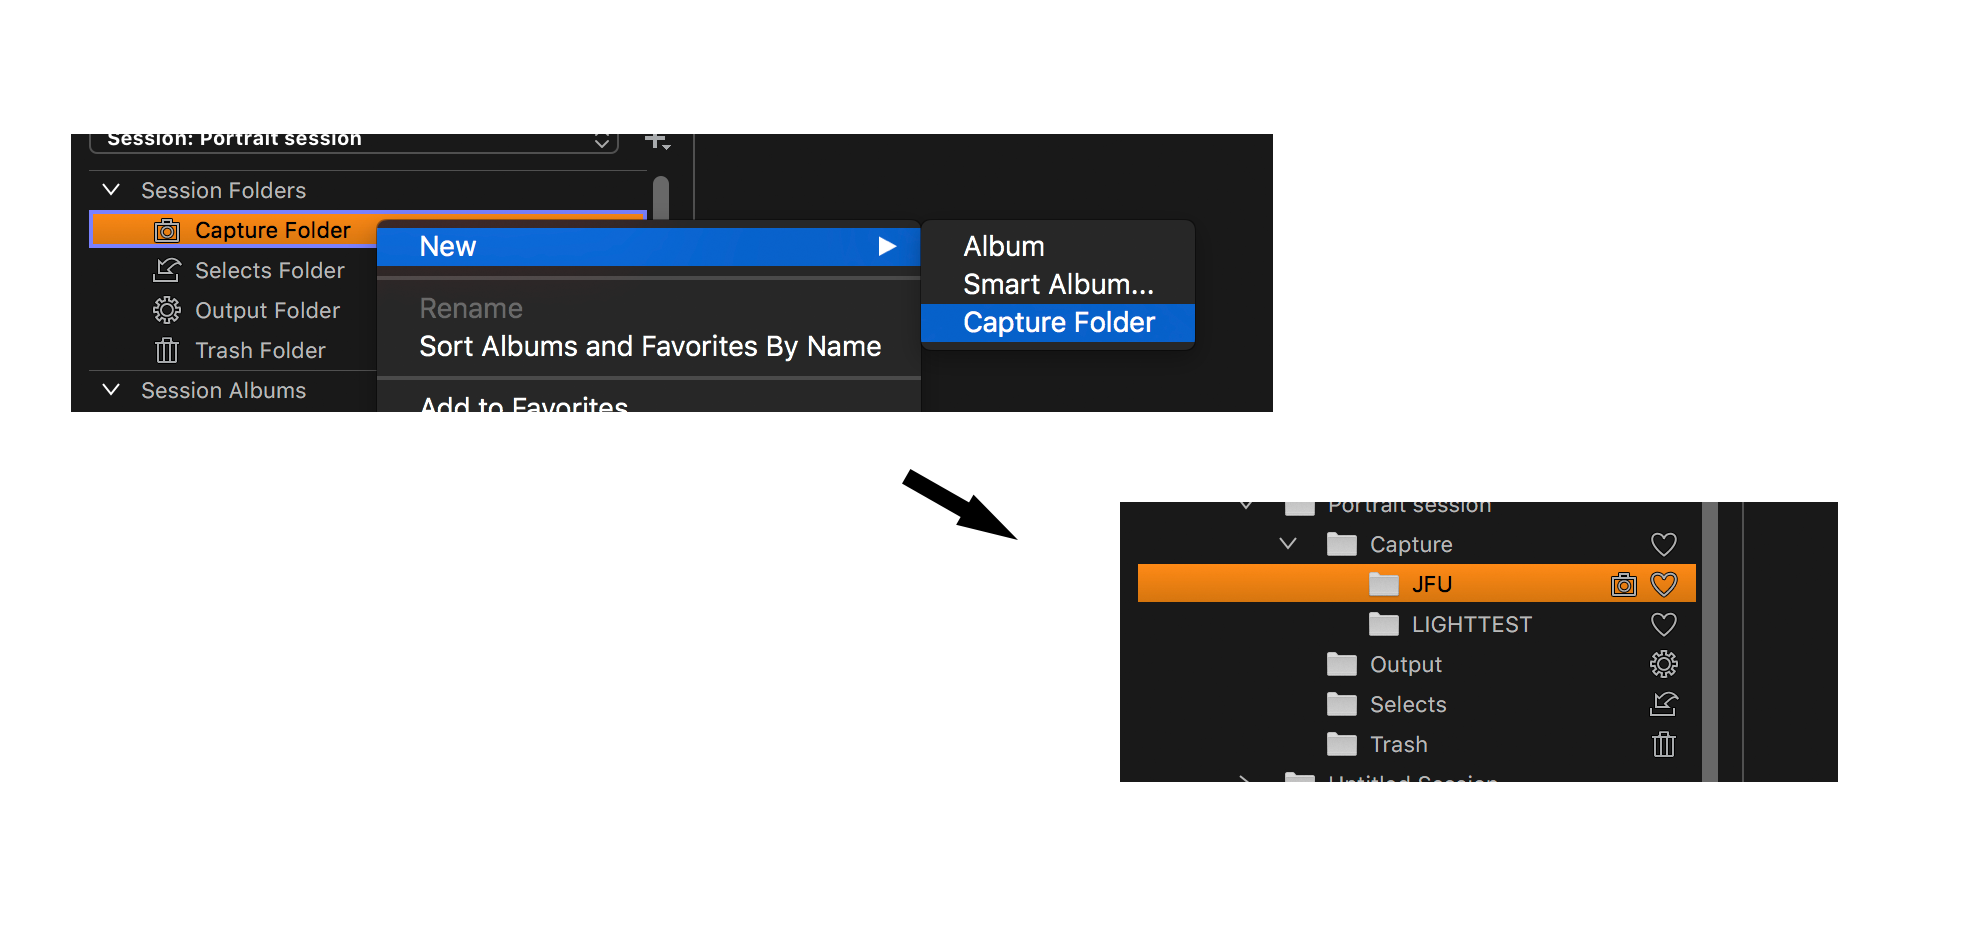
The power of this setup is that you are now able to simply right click the Capture Folder in the top of the Library Tool, select ‘New > Capture Folder’ and name it the initials of the next person, for example, JFU. The images will now automatically be stored in a folder called JFU as well as named accordingly, ‘JFU_xxxx’. If you make sure to create a new Capture Folder this way for each person, your images will automatically be correctly sorted and named, leaving you very little organizational work after the shoot.

2. Instant adjustments

Capture One has a default setting to copy the adjustments of the newest image onto the next image when shooting tethered. This is the setting ‘All Other > Copy from last’ within Next Capture Adjustments. This is beneficial as you can tweak your adjustments continuously throughout the shoot and have new images match the adjustments automatically. You can of course always reset the image to remove all adjustments.

Spend a couple of seconds correcting the first image you shoot, for example with black and white and a little contrast, and the rest of your images will instantly look finished in the eye of your model. (Us photographers, of course, know they need a bit of fine-tuning). The experience of seeing an adjusted image pop up on a computer screen compared to browsing a tiny LCD screen on the back of a camera should make the choice of tethered capture a no-brainer.

3. Selecting the good stuff

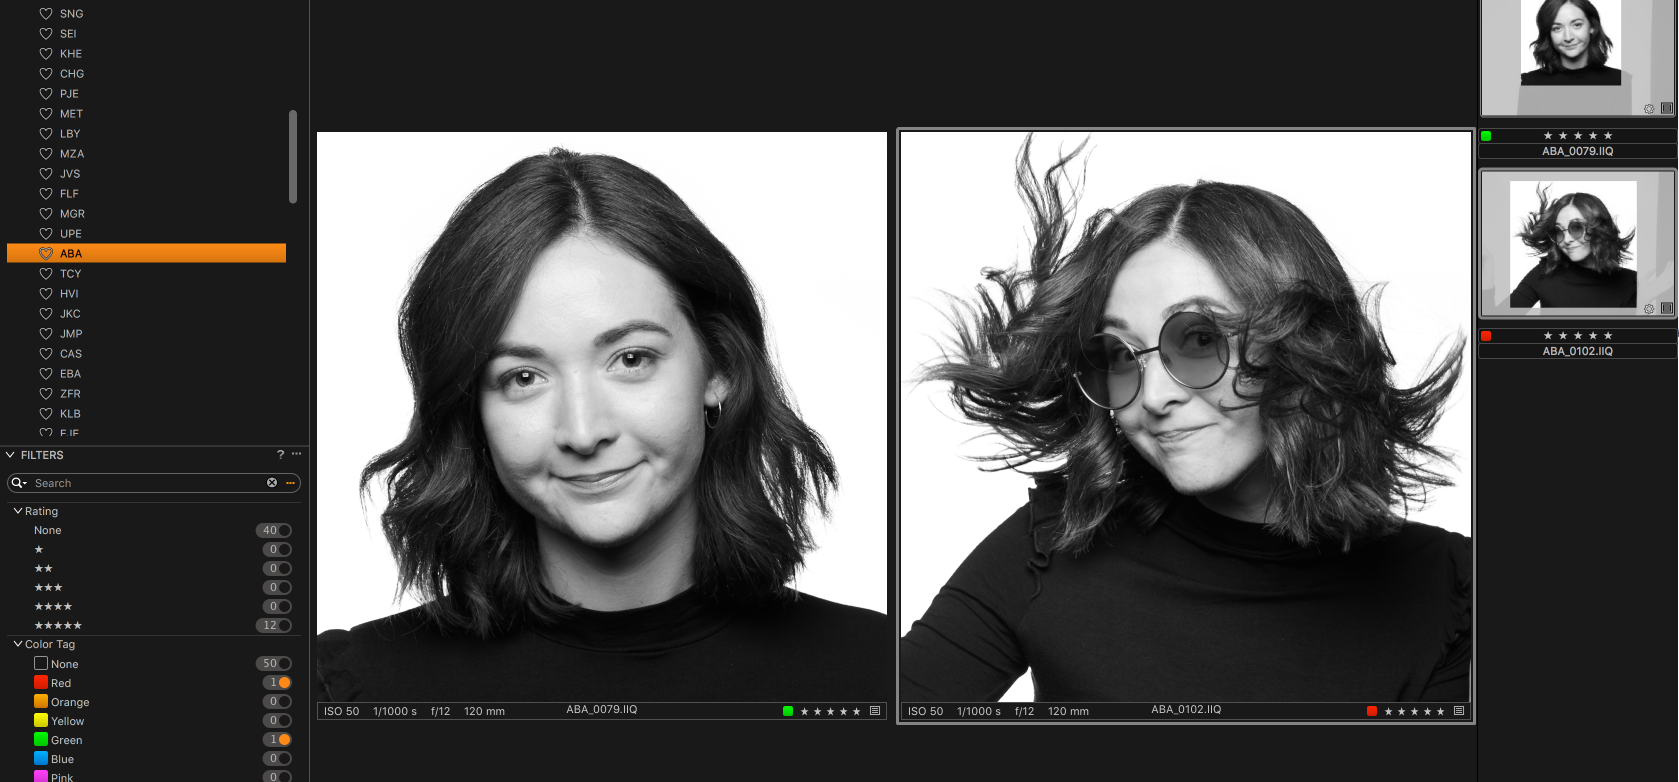
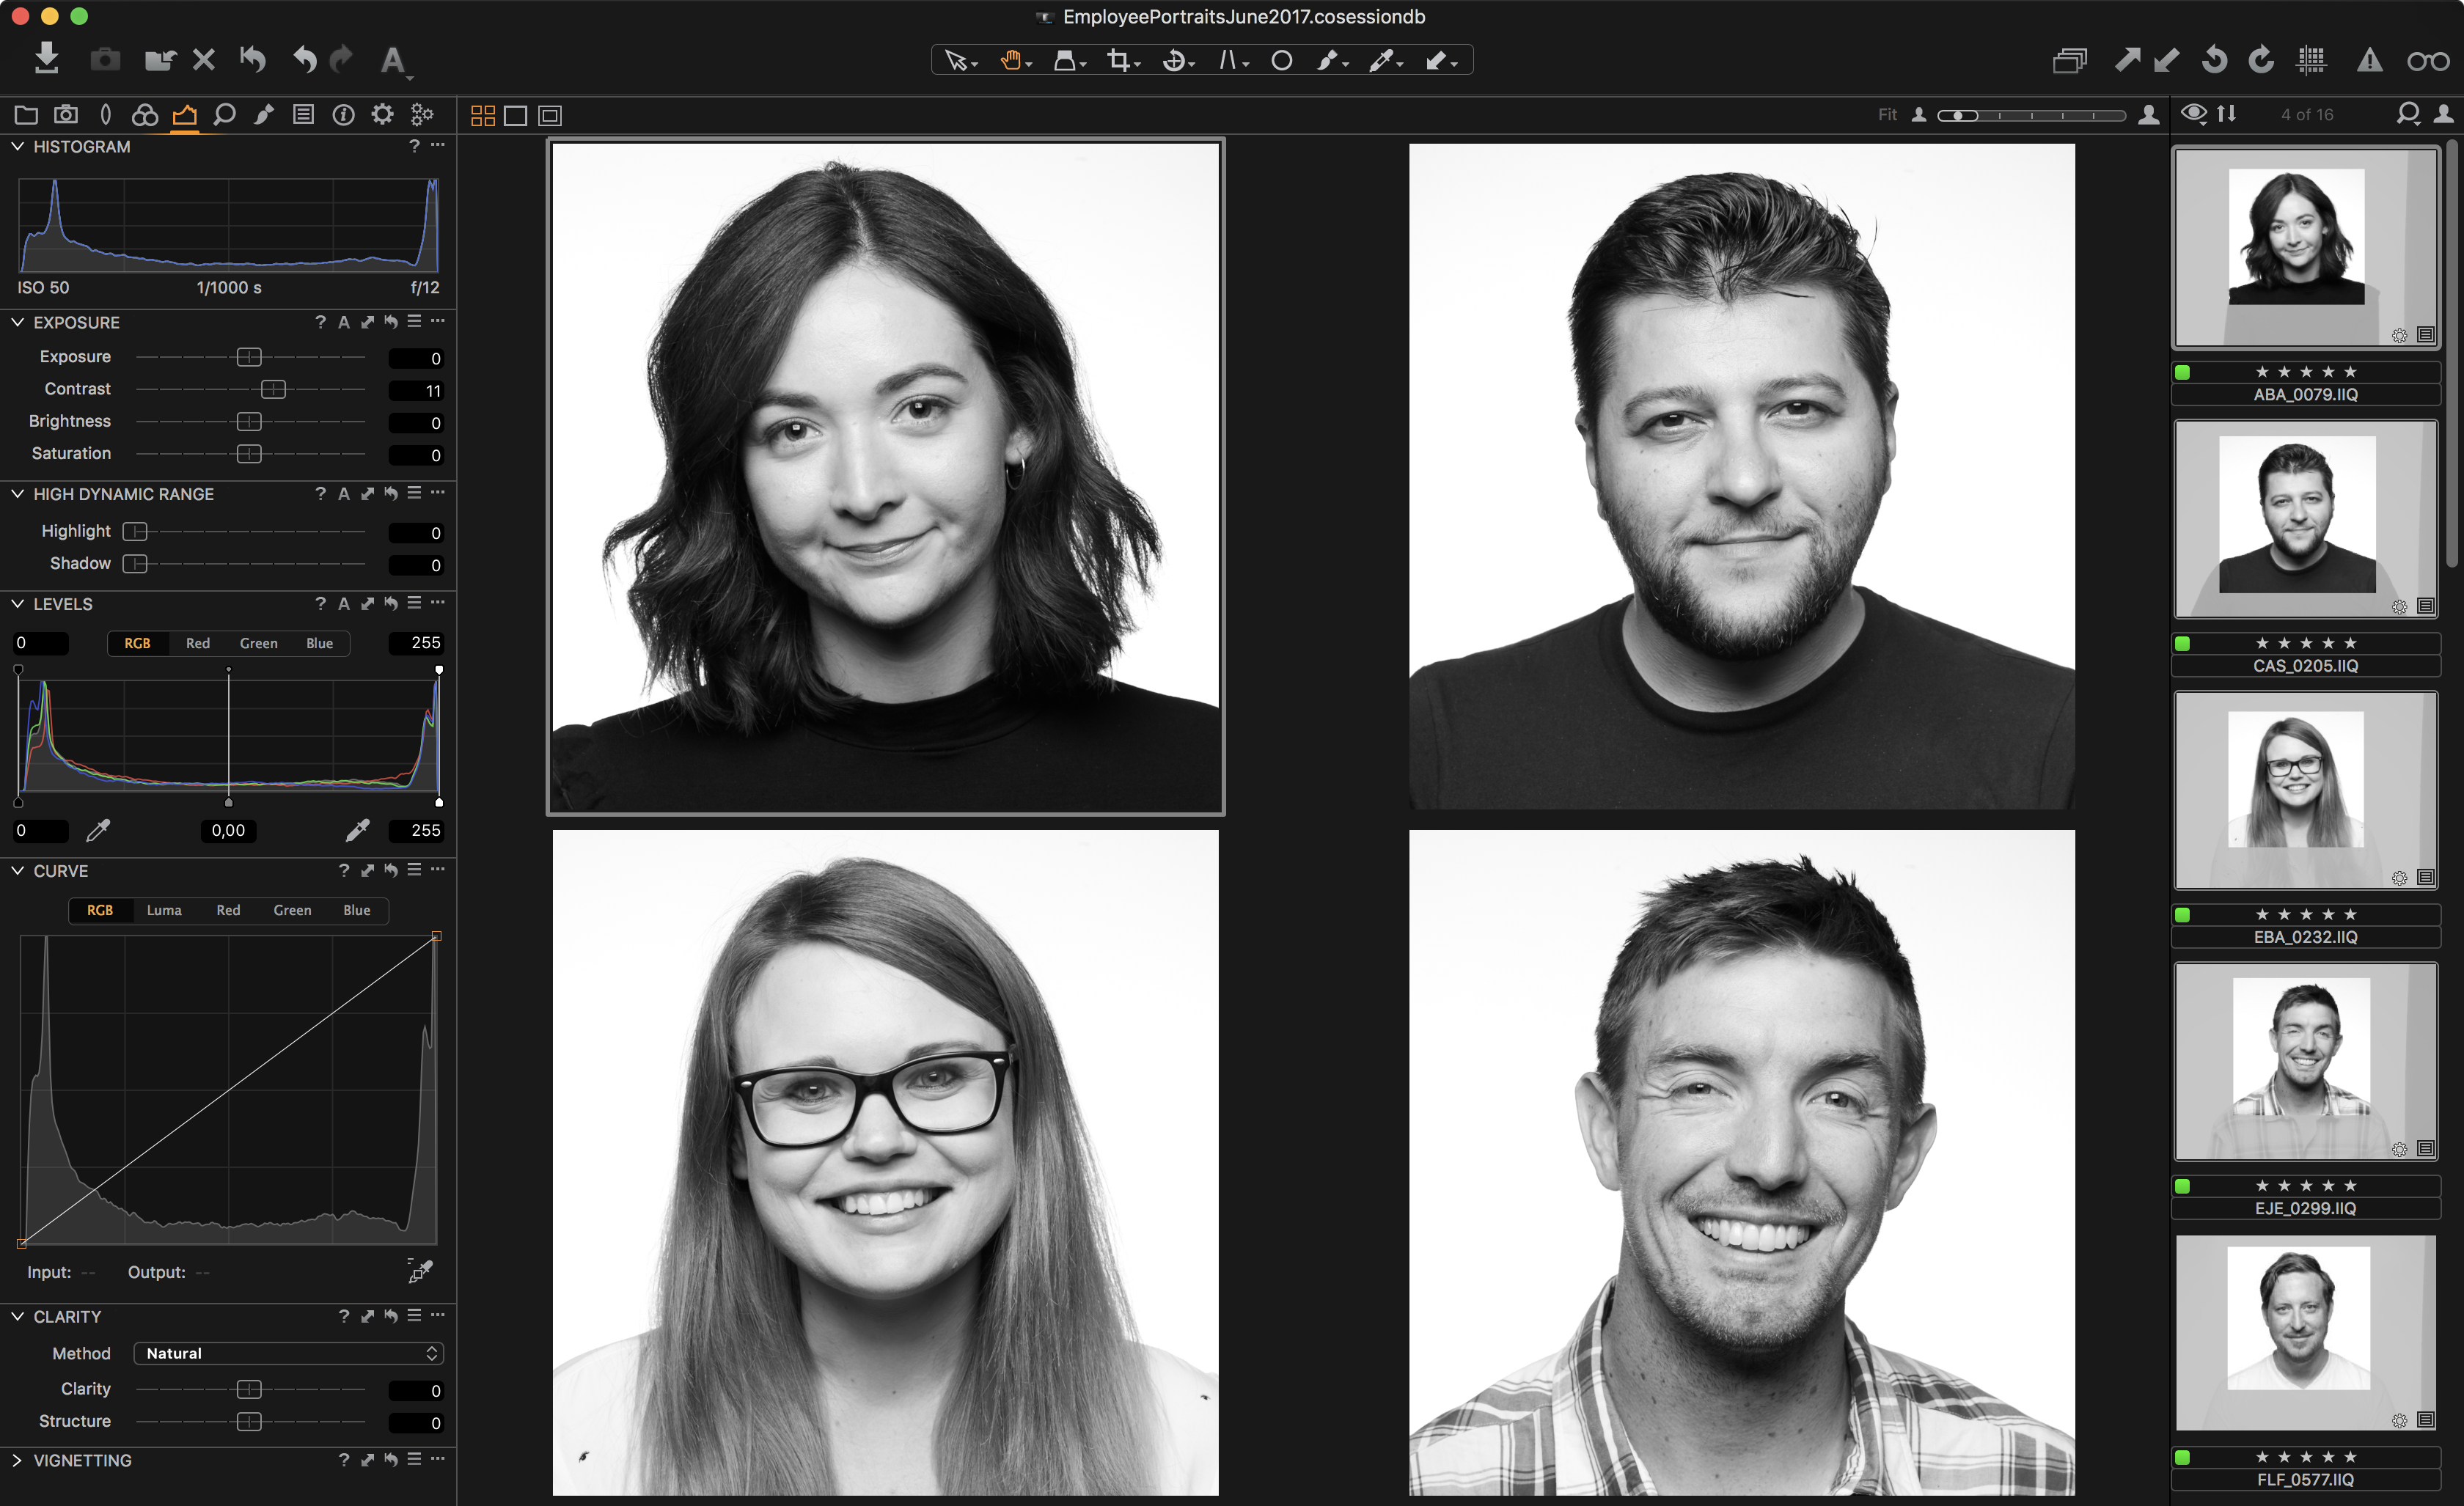
I usually make sure to have everyone select their picks straight away. This is purely to minimize my work, but people are naturally curious after a shoot, so it’s a win-win. Selecting the favorites (rating, flagging, culling, picking, whatever we should call it) can be done in numerous ways in Capture One. If you have time, I recommend quickly browsing the portraits with each person and give your input to which images are the good ones. All the candidates get a five-star rating, and the final picks get a color tag. I usually provide two types of images; a serious one and a fun/smiling, maybe even laughing one. The serious one gets a green color tag (shortcut: ‘+’) and the funny one gets a red color tag (shortcut: ‘-‘).

If you don’t have time to go through the images yourself, you can utilize Capture Pilot. This way you can show the images to each person on an iPad or iPhone and have them rate and color tag their own images, while you move on to shooting the next person. You can read more about how Capture Pilot works in this blogpost.

The reason for using both rating and color tagging is to get more freedom when filtering and exporting later in the process.

4. Intelligent filtering

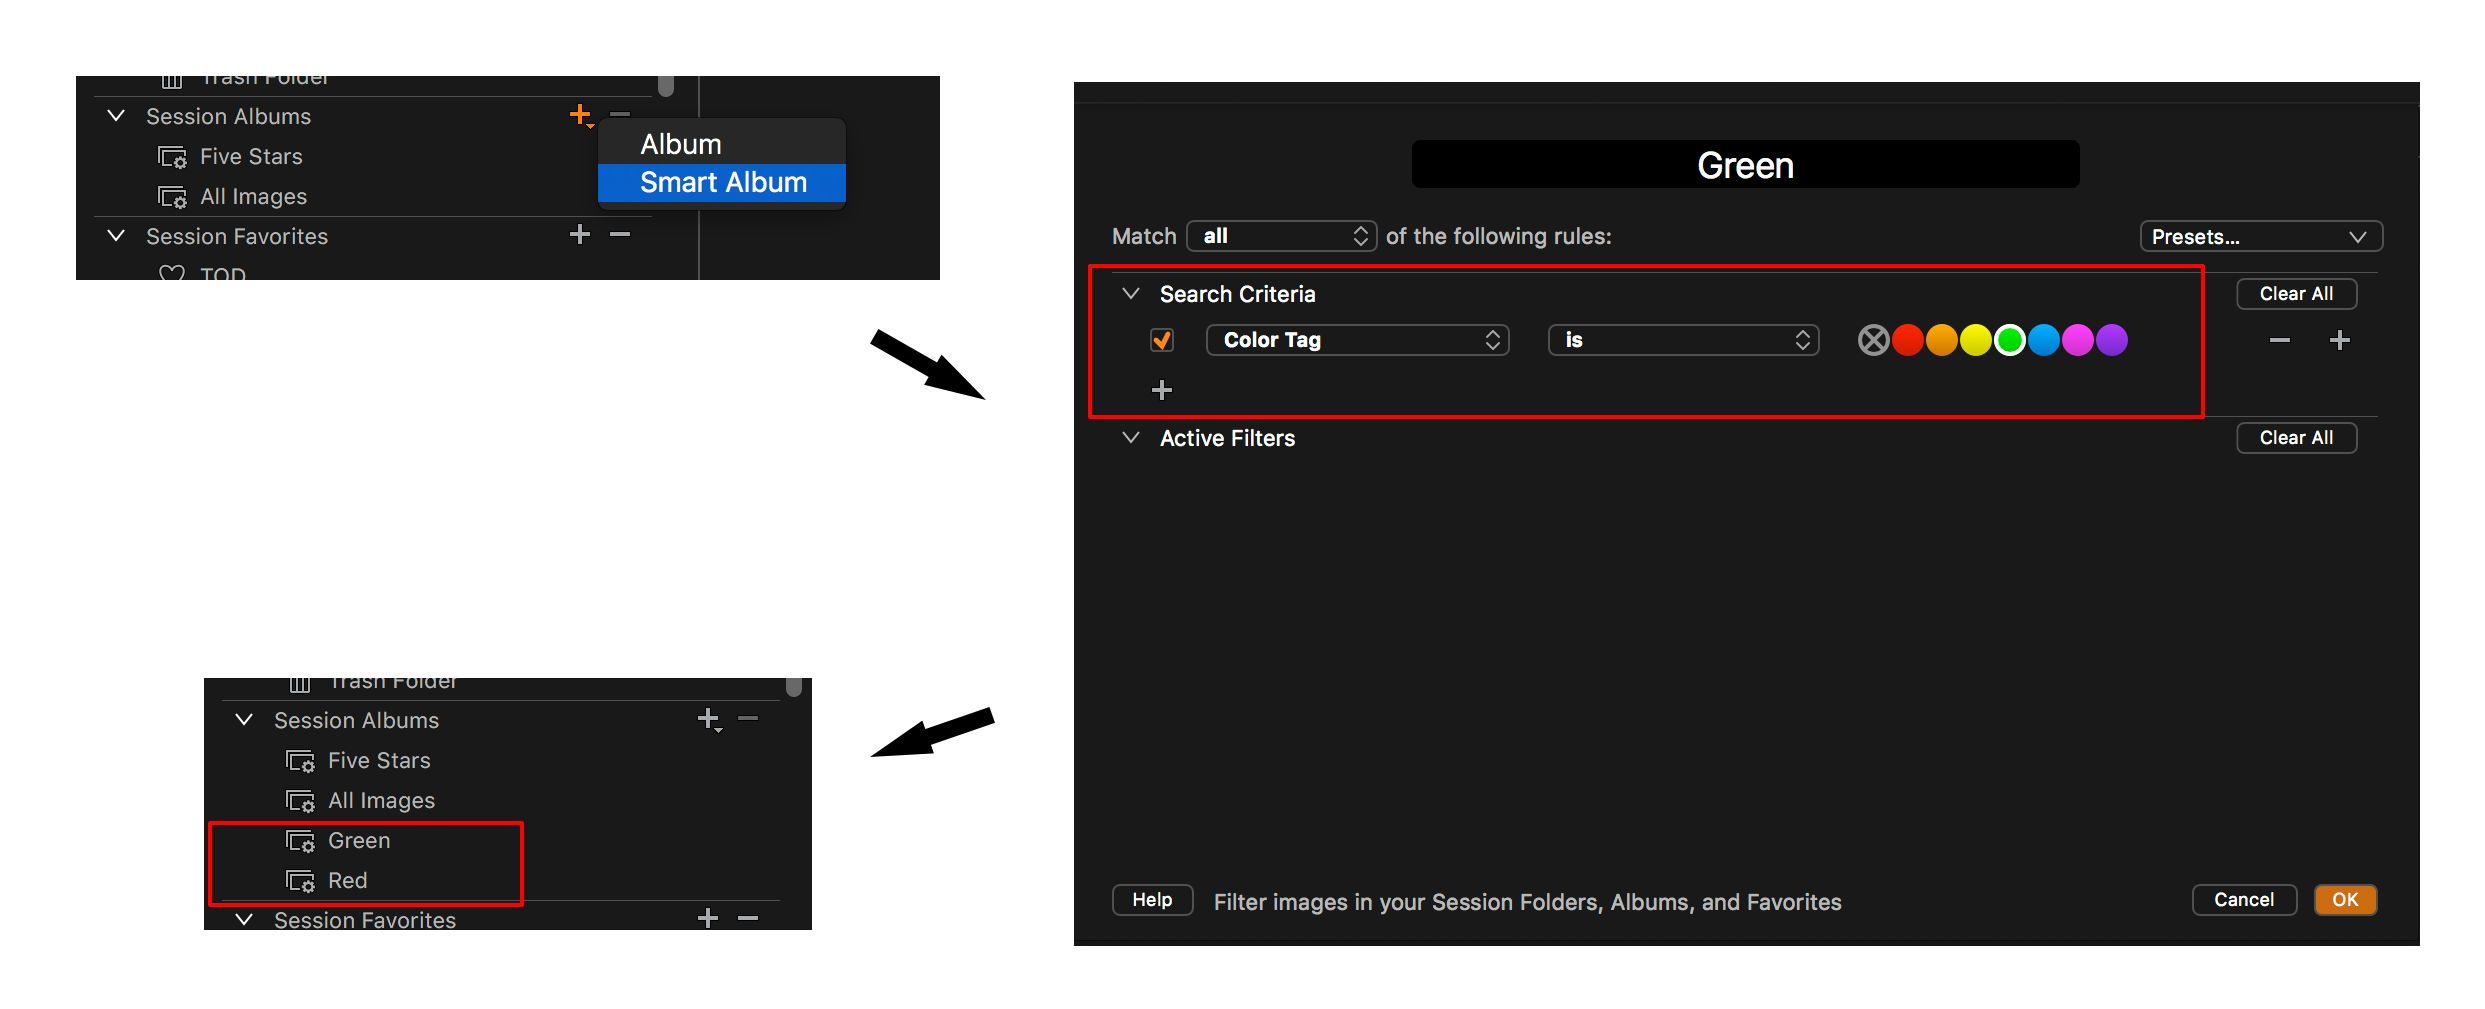
Capture One has a feature called Smart Albums. In short, Smart Albums are virtual albums inside your Session or Catalog which can use multiple criteria when filtering the images. If your shoot was spread across several days and you want to find the green-tagged images from a specific day, you can create a new Smart Album and use ‘Date’ and ‘Color Tag’ as criteria.

N.B.: Smart Albums only include images from Session Favorites or the current Session Folders; Capture Folder and Selects Folder. Make sure you have your desired folders added as Favorites.

‘Five Stars’ is a default Smart Album, which includes all images with a five-star rating. I recommend creating two simple Smart Albums, “Green” and “Red”. This way you can quickly access the two types of images across all folders added as favorites.

You can also use the Filters Tool to filter by rating, color tag or other criteria. Remember that multiple criteria can be selected if you hold down ctrl/cmd while clicking them. The downside of the Filters Tool is that it only filters the current album you’re in and not all images included in the Session (unless you’re in the album ‘All Images’).

5. Mass-editing your images

When editing corporate headshots, it’s important to keep a similar look. Black and white is a big advantage towards uniformity. These specific headshots need a pure white background as well.

Achieve a similar look by first correcting one image to your liking, then copying and applying these settings onto the rest of the images. This can be done with shortcuts (cmd / ctrl + shift + C, cmd / ctrl + shift + V) or using the arrow icons. Make sure to deselect tools you don’t want copied from the Adjustments Tool Tab before applying – for example, if you don’t want to copy the crop. Read more in-depth about copy/applying adjustments in this blogpost.

Usually, the images require a bit of individual tweaking, and this is where Sets come in as a useful feature. Whenever multiple images are selected in Capture One, they automatically become a ‘Set’ for as long as they are selected. Utilize this feature by selecting four images at a time and tweaking them individually. This way you continuously compare the images to each other to maintain a similar look. To select the next Set, simply use the default shortcut ‘Alt + right arrow’ (left arrow for the previous Set).

When selecting multiple images but only editing one at a time, make sure to deselect ‘Edit > Edit All Selected Variants…’.

White background

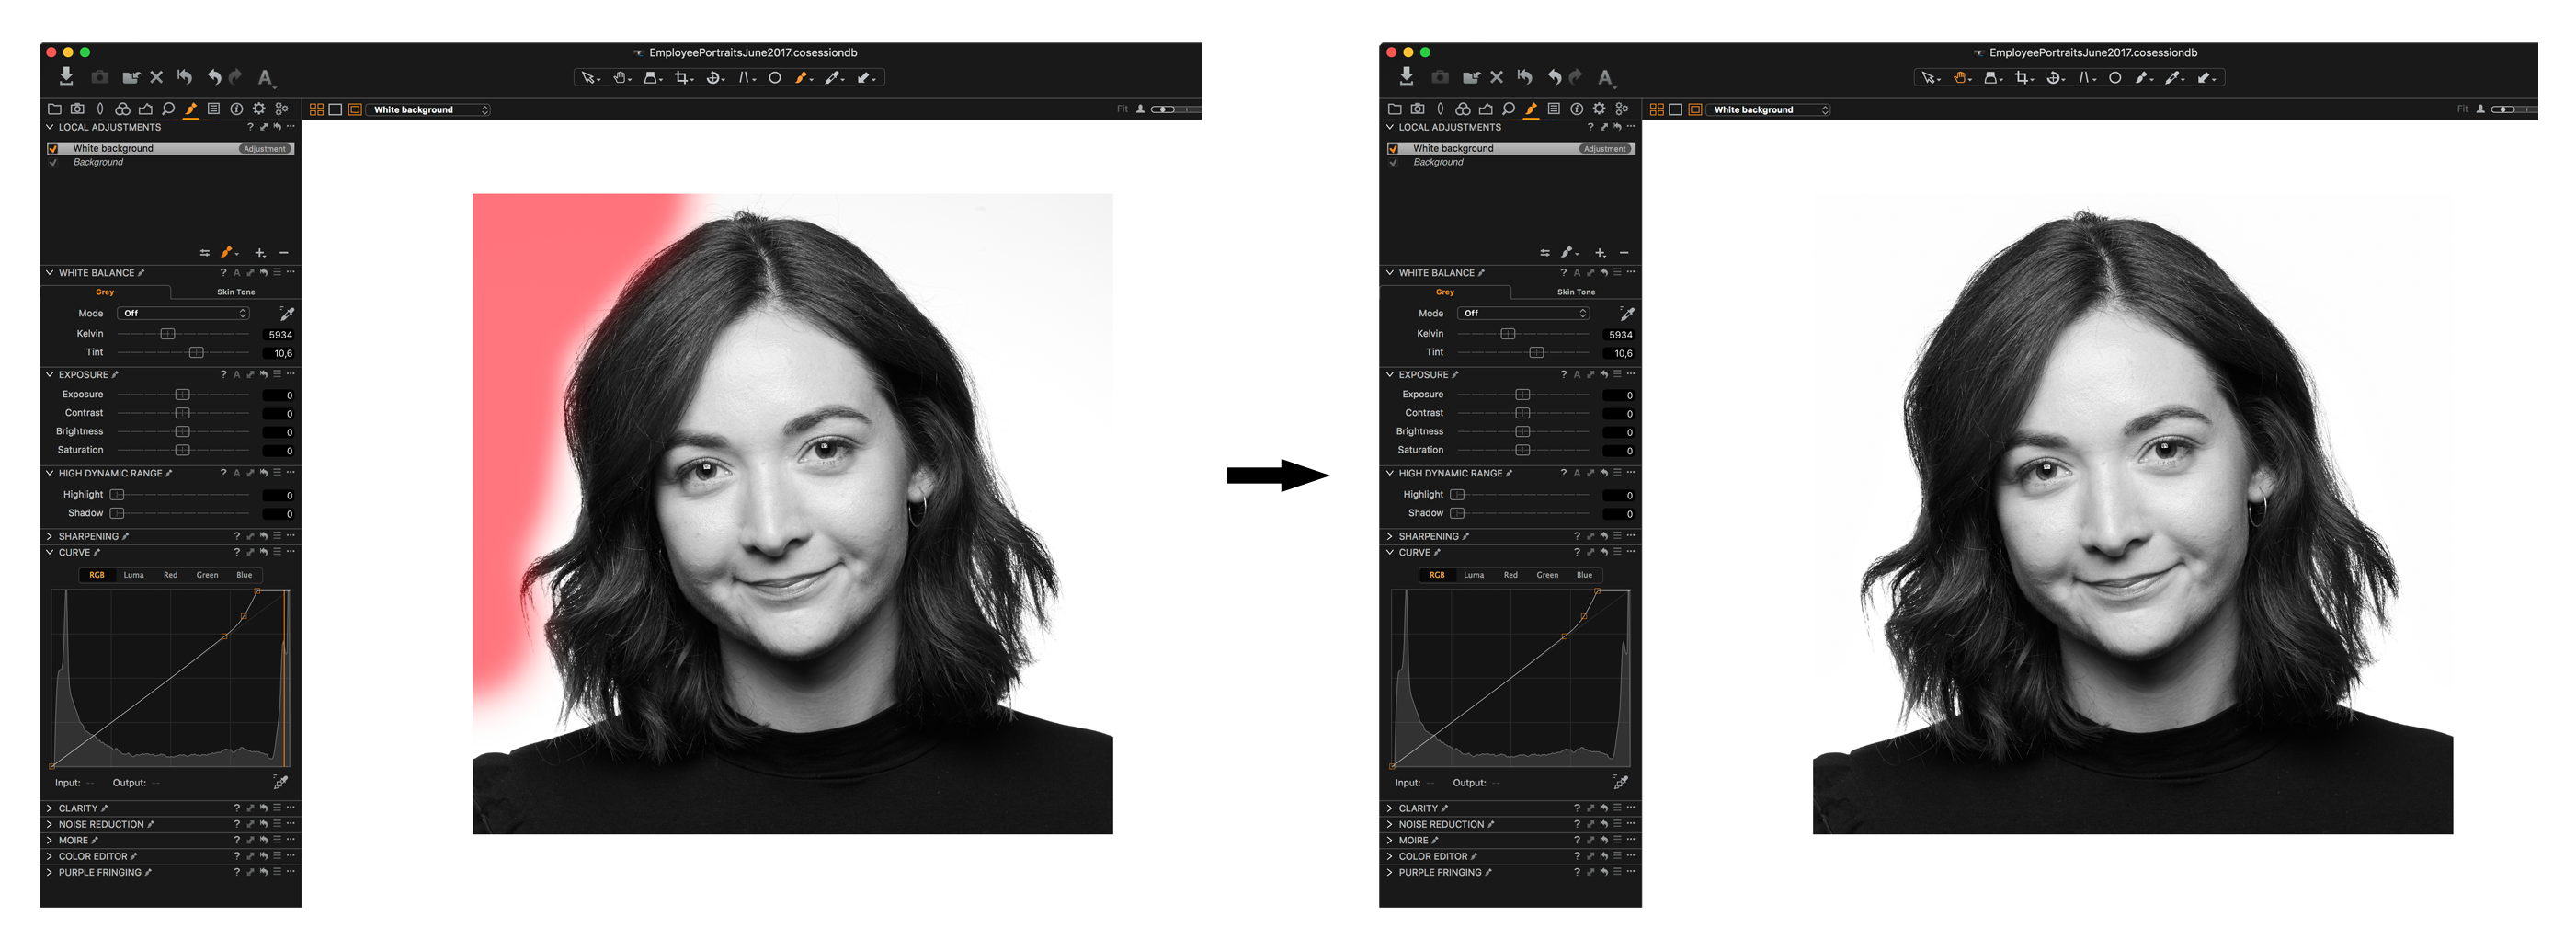
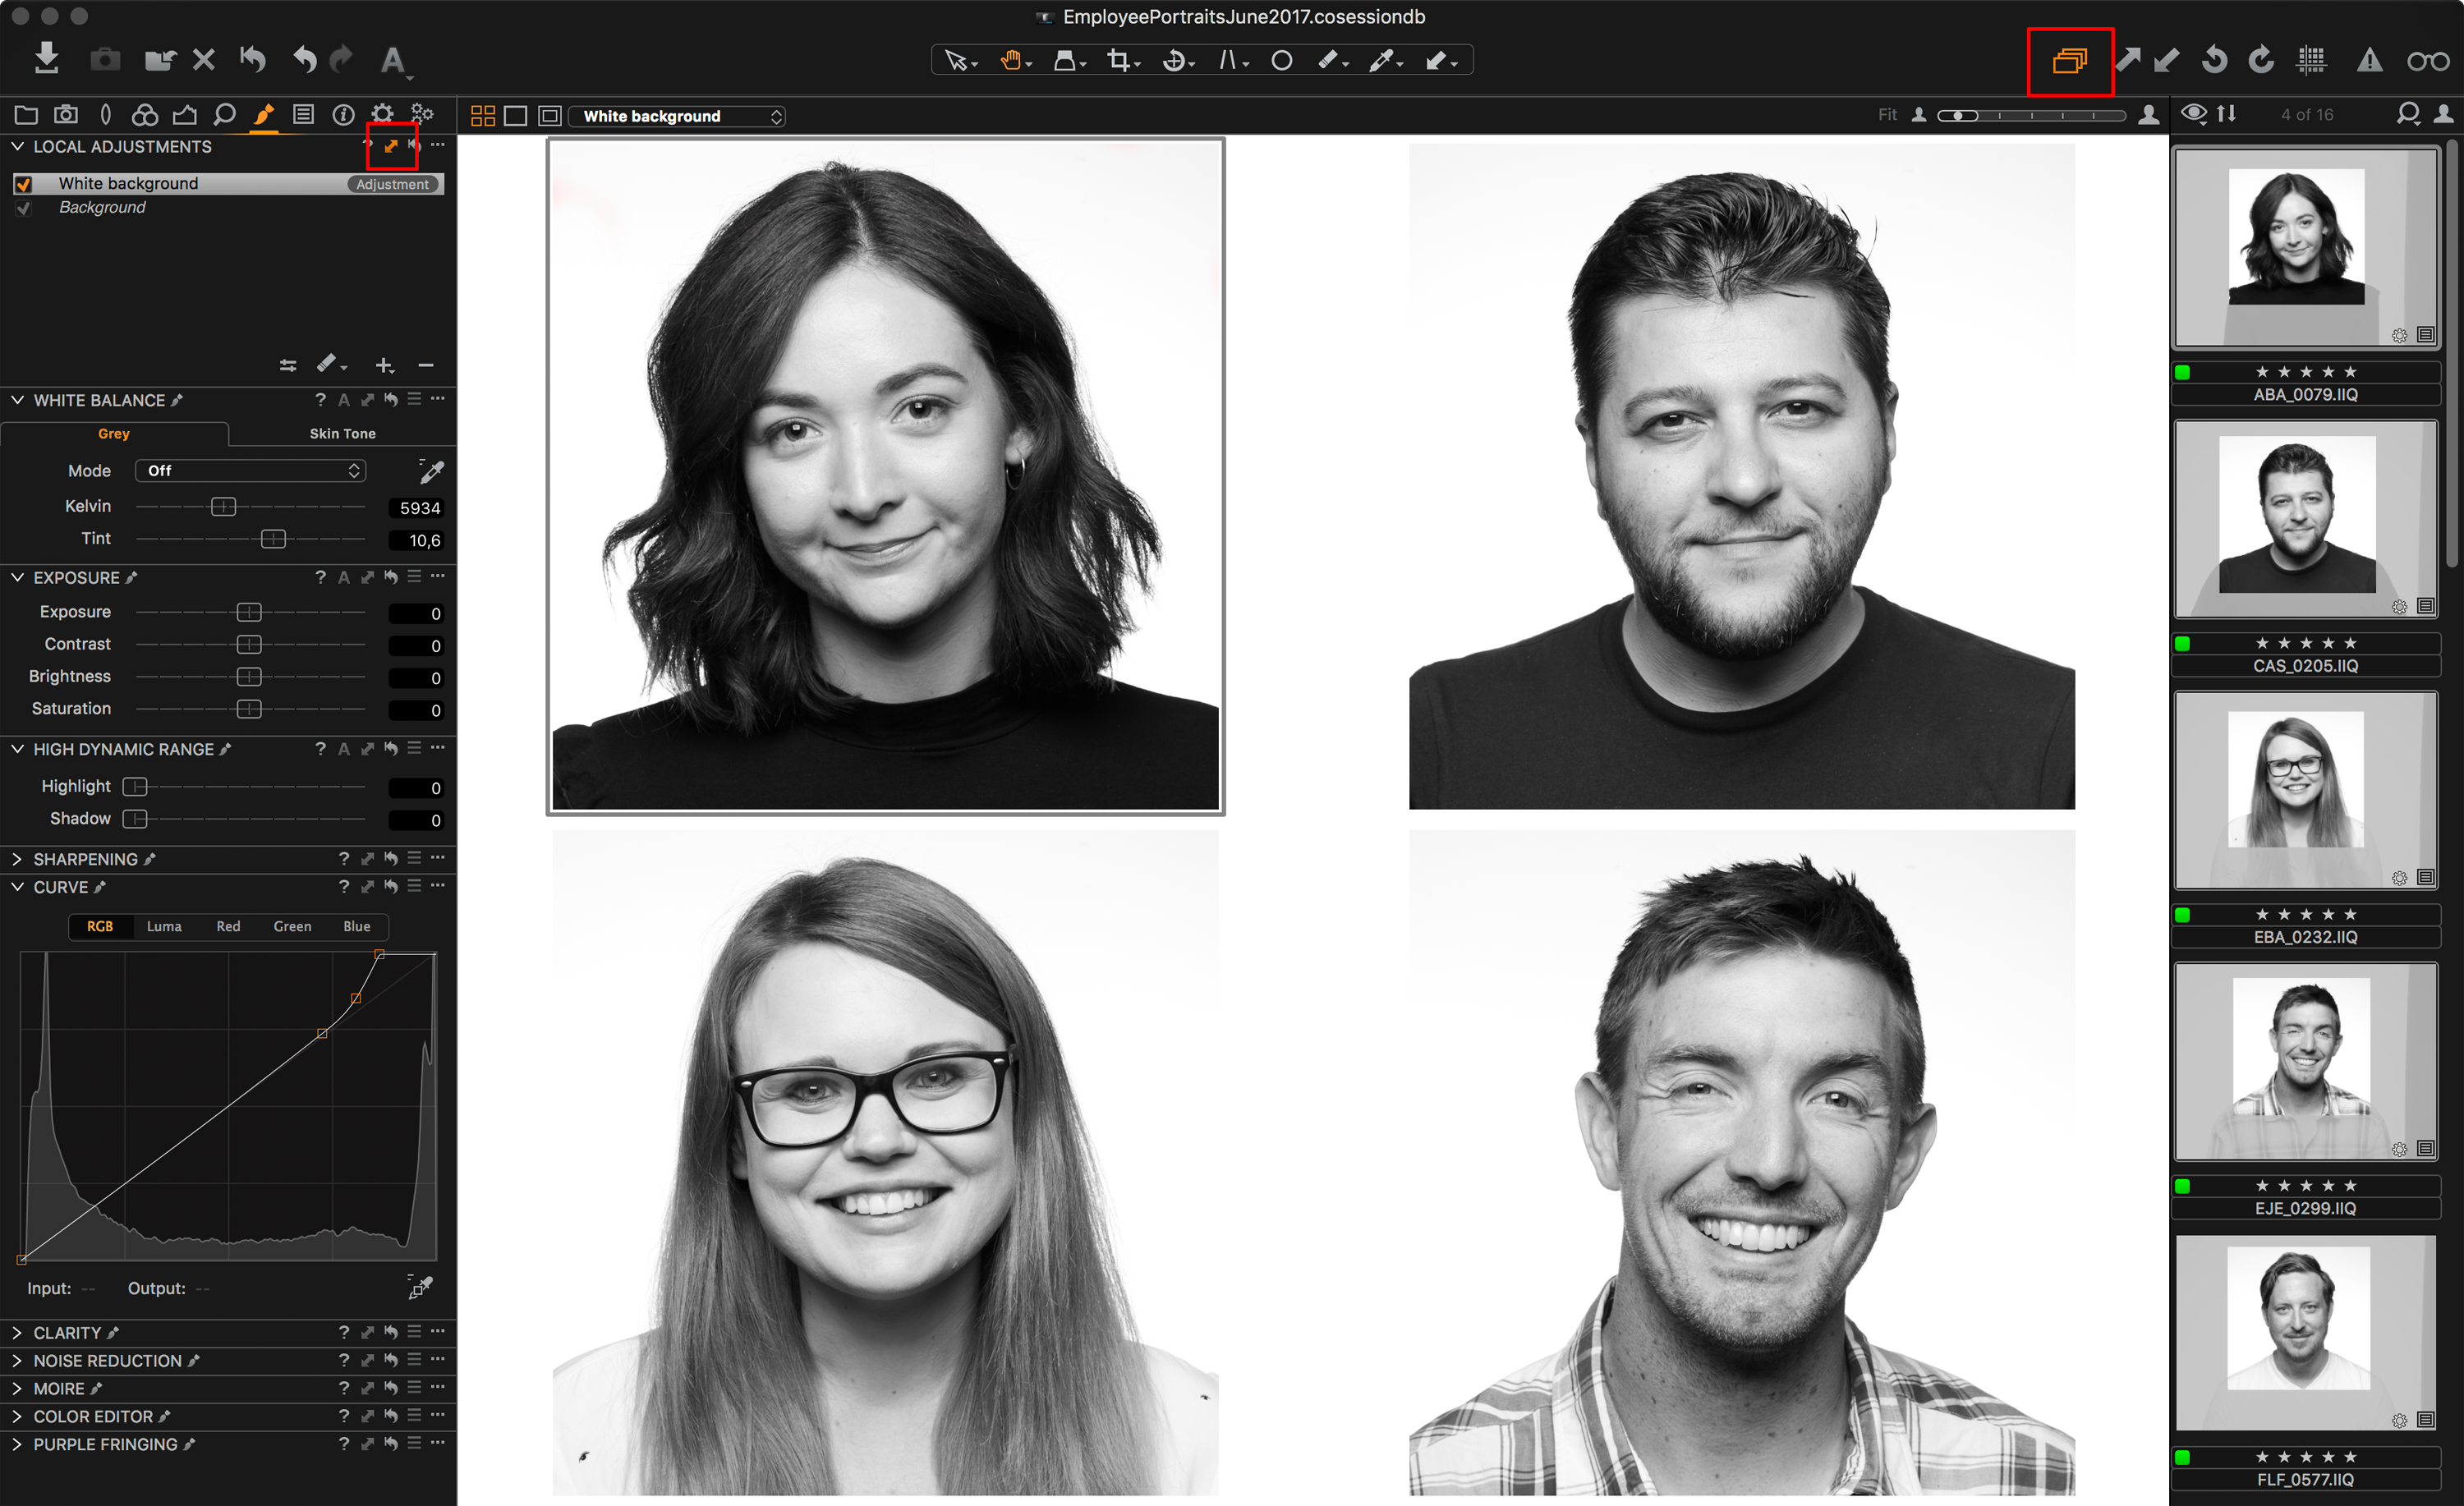
A quick way of making an almost-white background completely white is using Curves locally. It’s efficient and can be applied to many images in a few minutes. It takes a bit of practice and preparation, but once you’ve tried it, you don’t want to use any other method for whitening a background.

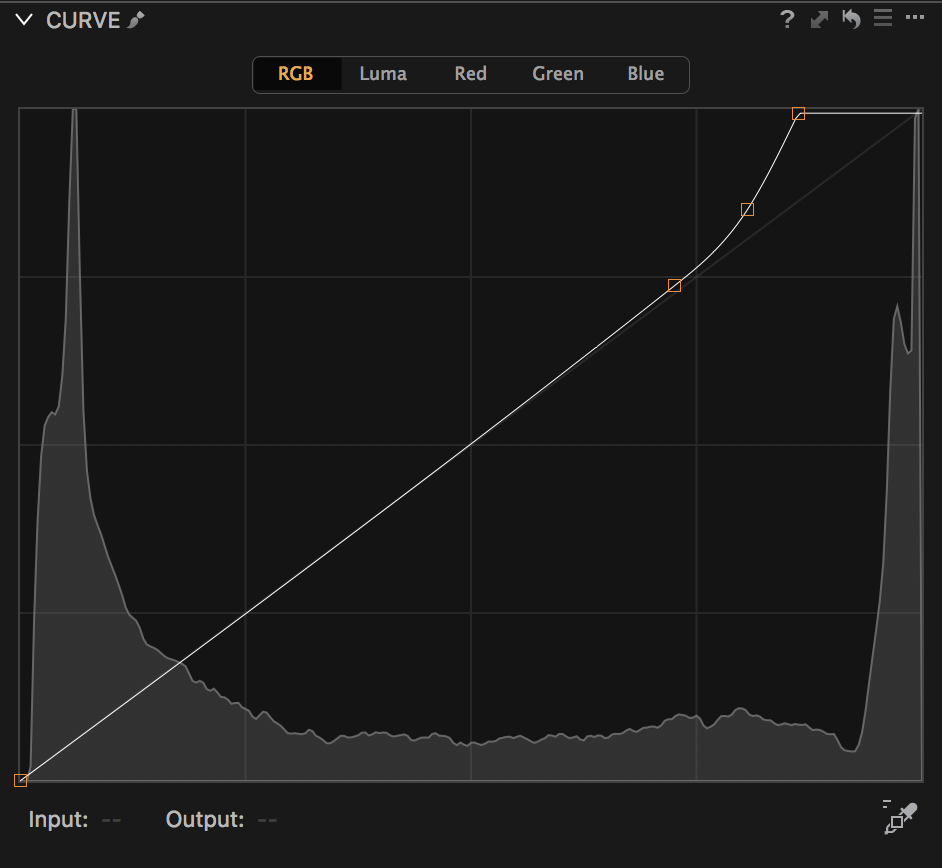
The first step is to make a new local adjustment layer. Next, you want to create a curve in the RGB channel like this:

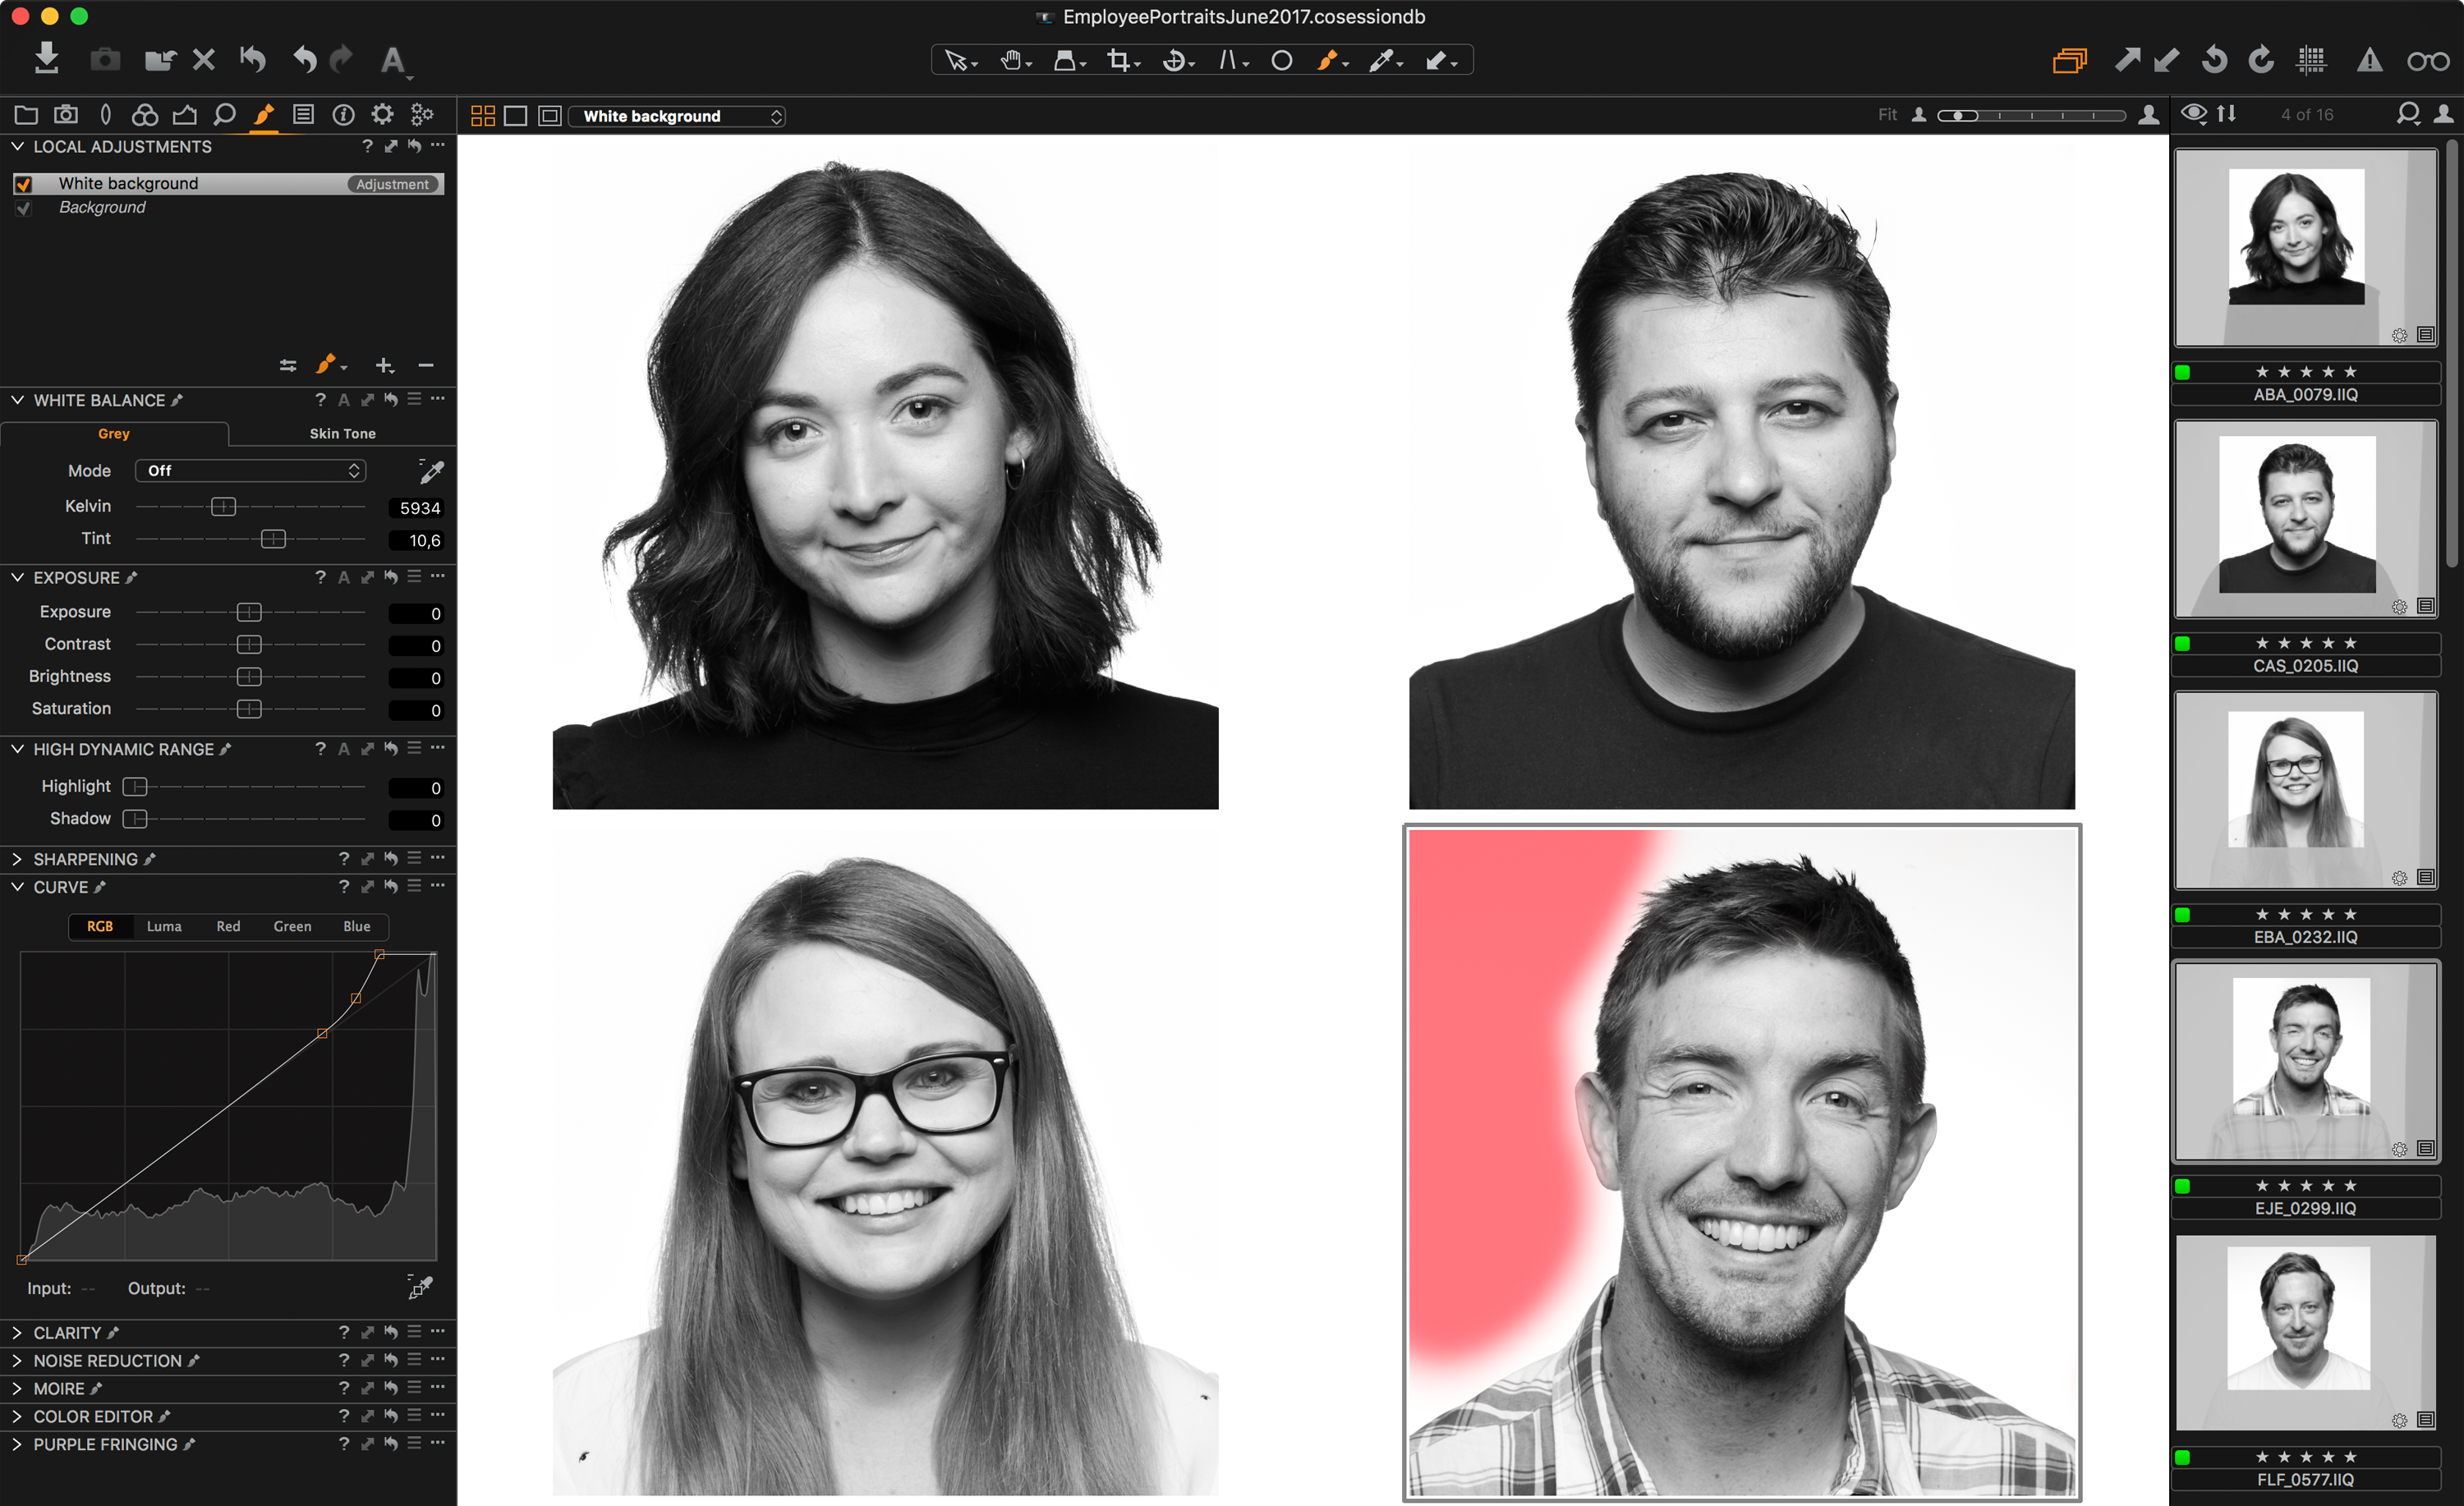
The actual curve might differ from time to time, but the point is to take everything almost-white and change it to pure white. With the lowest part of the curve untouched, it will do minimal to no change to the clothing, hair, skin, etc. Now it’s time to test the curve. Pick a large brush and simply paint the background around the person. Pro tip: Make the Viewer Background white within Preferences to have a pure white reference. You can also use the exposure warning and change the high level to 255. Pure white will then highlight as red when enabled.

When you’re satisfied with the Curve, erase the mask from the layer but keep the layer with the Curve adjustment. This enables you to copy the empty mask with a ready-to-use Curve onto the rest of your images. Do this by selecting all your target images, including the one with the Curve layer (let’s call it the ‘donor-image’) and highlight the donor-image. Make sure to enable ‘Edit > Edit All Selected Variants…’. Then, while holding down shift, click the copy/apply icon in the Local Adjustments Tool. You’re now ready to mask the background on all your images.

Select the first set of images and brush the background. If the curve is correctly made, it shouldn’t affect the person too much if you accidentally brush over them. Select next set (Alt + right arrow) and repeat. After getting used to this workflow, it shouldn’t take more than 10-15 seconds per image to whiten the background. If an image needs a bit more light in the corners, you can change the curve or add a second layer with additional exposure.

6. Exporting to perfection

Now it’s time to utilize process recipes. You want to export a high-resolution jpg of both versions and match the output file of the serious one for a company intranet, and the funny one for a specific print size. This requires three recipes:

High-resolution jpg

The physical factors of the file in the Basic Tab are set to jpg, 90% quality, 300 dpi, sRGB and 3000 px long edge. The location of the file is set to Output Location, which by default will use the Output folder of your session. For this recipe, the images are put into a subfolder called ‘Highres’. The Sub Name field uses the token [Image Folder Name]. This is dynamic and will use the name of the physical folder each image is within, like ‘JFU’. Adding ‘_highres’ indicates the file is high resolution. The Adjustments Tab adds a bit of extra sharpening for this exact recipe. You can tweak this on an image using the Output Proofing (glasses icon, top right corner) to fine-tune the amount while having the recipe selected.

Web jpg

This tiny jpg for the company intranet has to be 648×648 pixels. As you already applied square crops to all the images, you simply set Long Edge to 648 pixels. Quality is 80, as the images are going to be presented so small that it doesn’t make any difference. The web images are going in the Output Folder in a sub folder called ‘Web’. The Sub Name is simply the Token [Image Folder Name] as the IT system only recognizes initials so that the result will be like ‘JFU.jpg’. A little extra sharpening is added as well to make the images look crisp.

Print

The images for prints are going to be 14 x 14cm, so remember to input that in Scale using Long Edge. The quality is 100 and profile is Adobe RGB. The print images are going in a sub folder named ‘Print’ within the Output Folder. Just like the highres recipe, you add ‘_print’ to the [Image Folder Name] Token. Again, additional sharpening is added for this recipe.

Important notice: When using the Sub Name field in Process Recipes, you need to add the Token [Sub Name] to the Output Naming further down. In this instance, you need to only have that Token as your Output Naming Input. This makes sure the name is completely determined by each recipe.

With these three process recipes set up (you only have to do this once), you now simply select the Smart Album ‘Green’, make sure the two recipes ‘Highres’ and ‘Web jpg’ are ticked and then hit ‘cmd / ctrl + d’ on your keyboard (shortcut for process). You then select the ‘Red’ Smart Album, make sure only ‘Highres’ and ‘Print’ are ticked, and then process again.

With these two actions, all images are now exported into the formats, sizes, and folders you need with correct naming for easy management. Once you try this workflow and tweak it to your liking, I’m certain you won’t find a better, faster and more stable solution for managing portrait sessions.


Craving expert knowledge? Learn more about the tools and workflows used in this blog post by visiting our User Guide:

Working with Sessions
Tethered Capture
Smart Albums
Process Recipes
Sign up for the webinar

The Secret to Perfect Portraits with Alexander Vinogradov


Our guest photographer, Alexander Vinogradov, gives us his advice on important aspects of portrait photography; from finding the perfect face to editing after the shoot. Read on to get inspired and learn about Alexander’s top tips and tricks that helped earn him the prestigious Sony World Photography Award this year.
Download a free 30-day trial of Capture One.

My name is Alexander Vinogradov. I’m a portrait photographer from Russia. I like to photograph people with interesting and unique features. This gives me inspiration and a burst of energy before every shot.

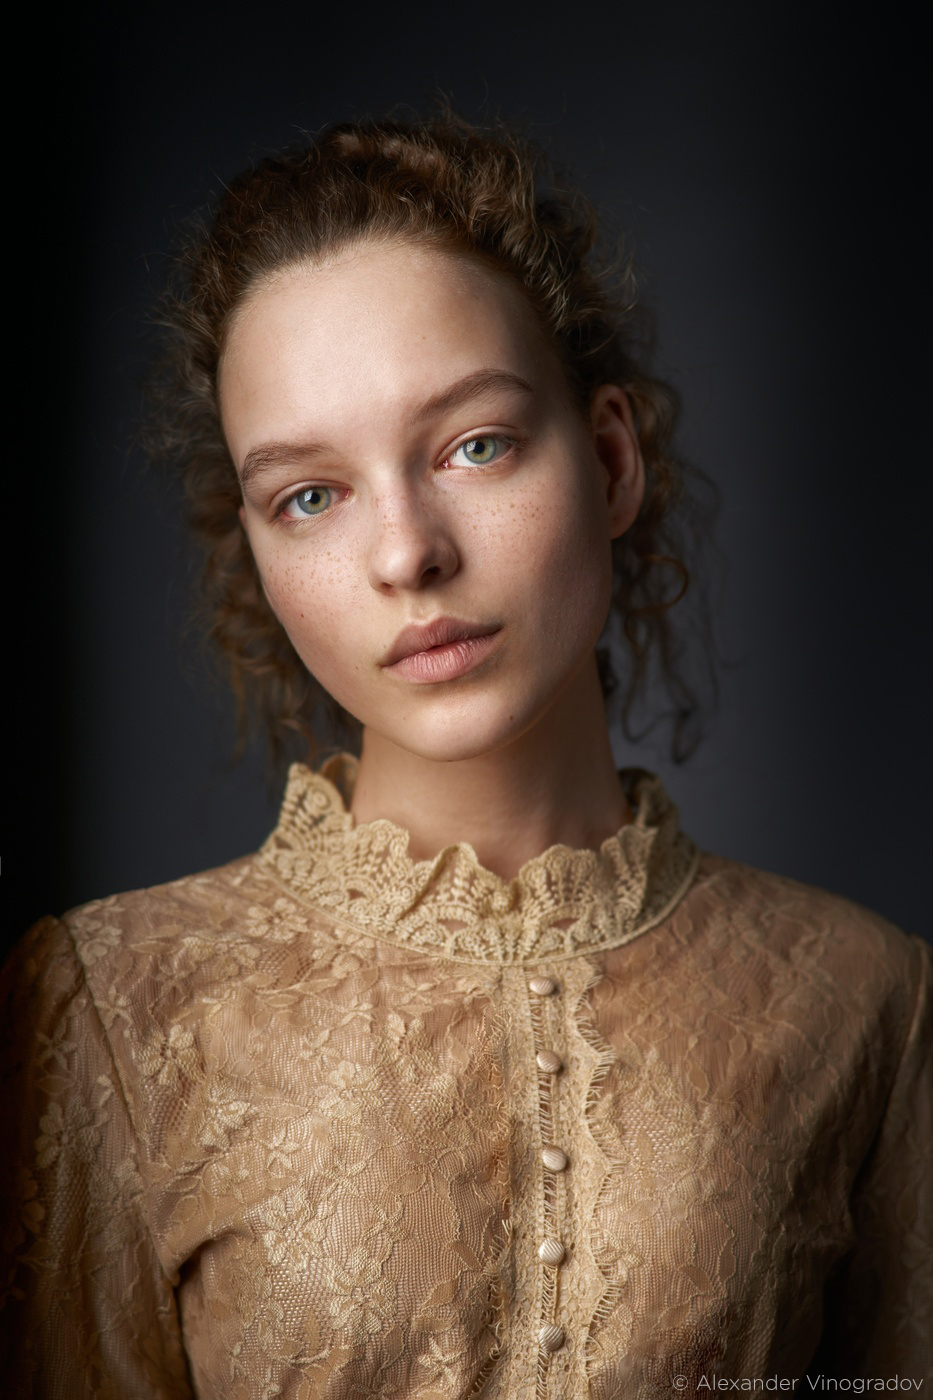
This is a shot of beautiful Lera.  A lace blouse with a collar neck was a perfect fit. The only thing missing was a diadem in the hair and the image of the young princess would be complete. Tip: Choose soft and discreet clothes. Bright colors and prints will only distract the attention from your model. The same goes for jewelry and make up. I prefer a natural and very feminine look.Photo: Alexander Vinogradov  Model: Lera  Equipment: Sony A99, Sony 85/2.8

The formula for my portraits is very simple: an interesting face, soft light, and delicate retouching.

One can easily argue that today is the heyday for photography. With so many people able to take pictures, there is a lot of visual information on the Internet for every taste, so one must try hard to differ from the millions of other photographers.

Therefore, I highly recommend to approach and look for a model very carefully. It should be interesting, unusual, catching. Don’t go for ordinary faces, but look for that muse that will resonate in your heart, and in the soul of the audience.

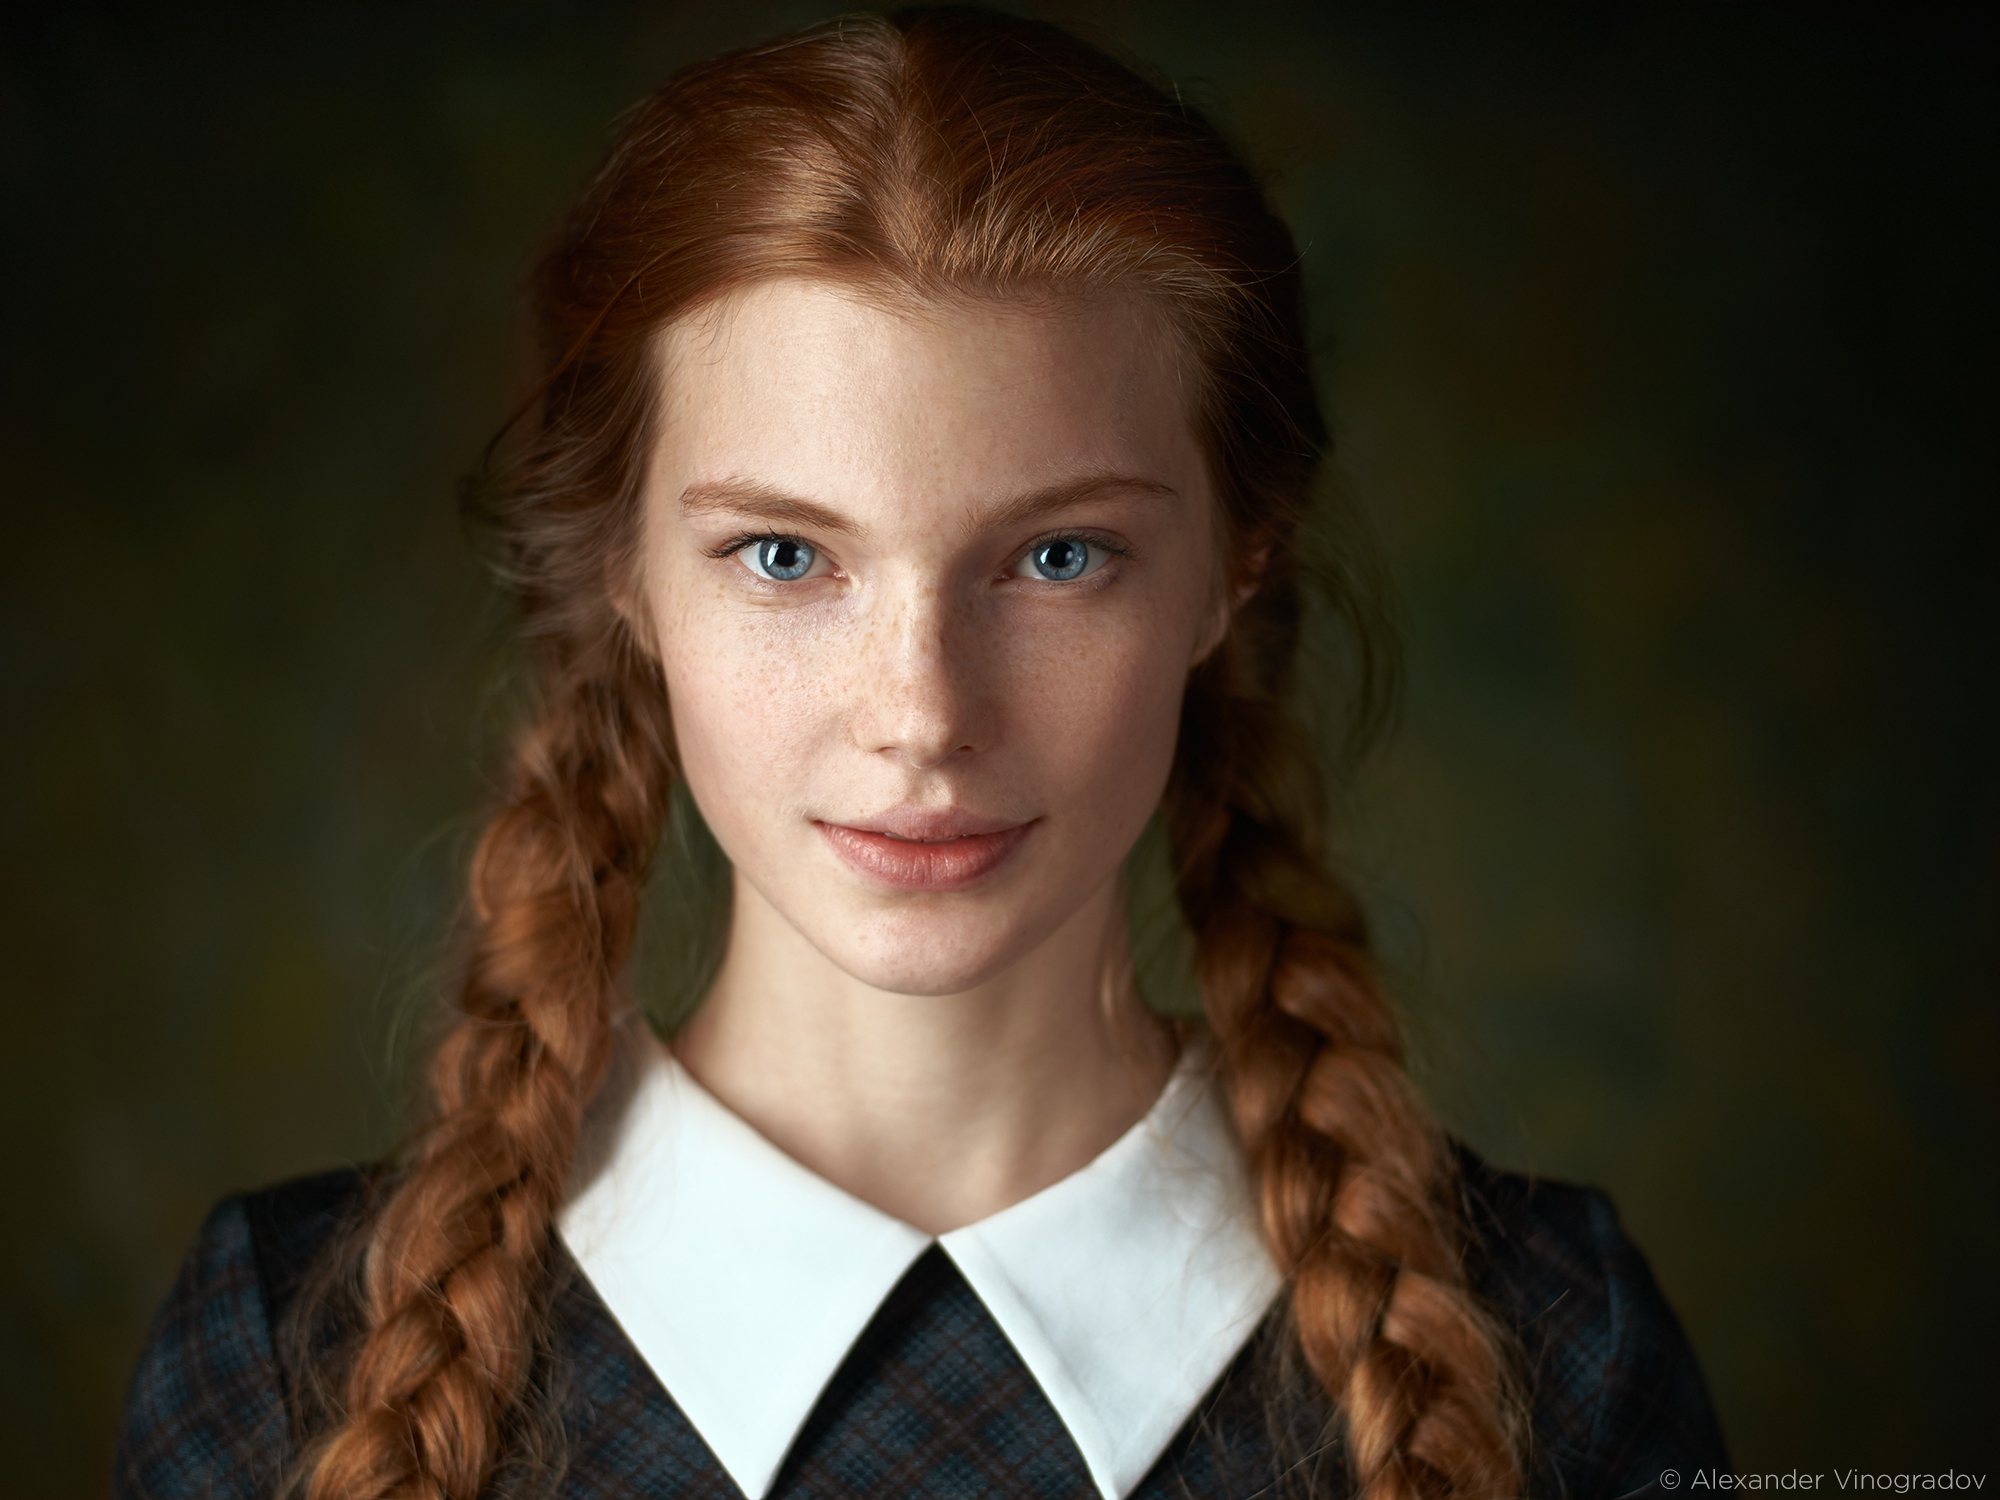
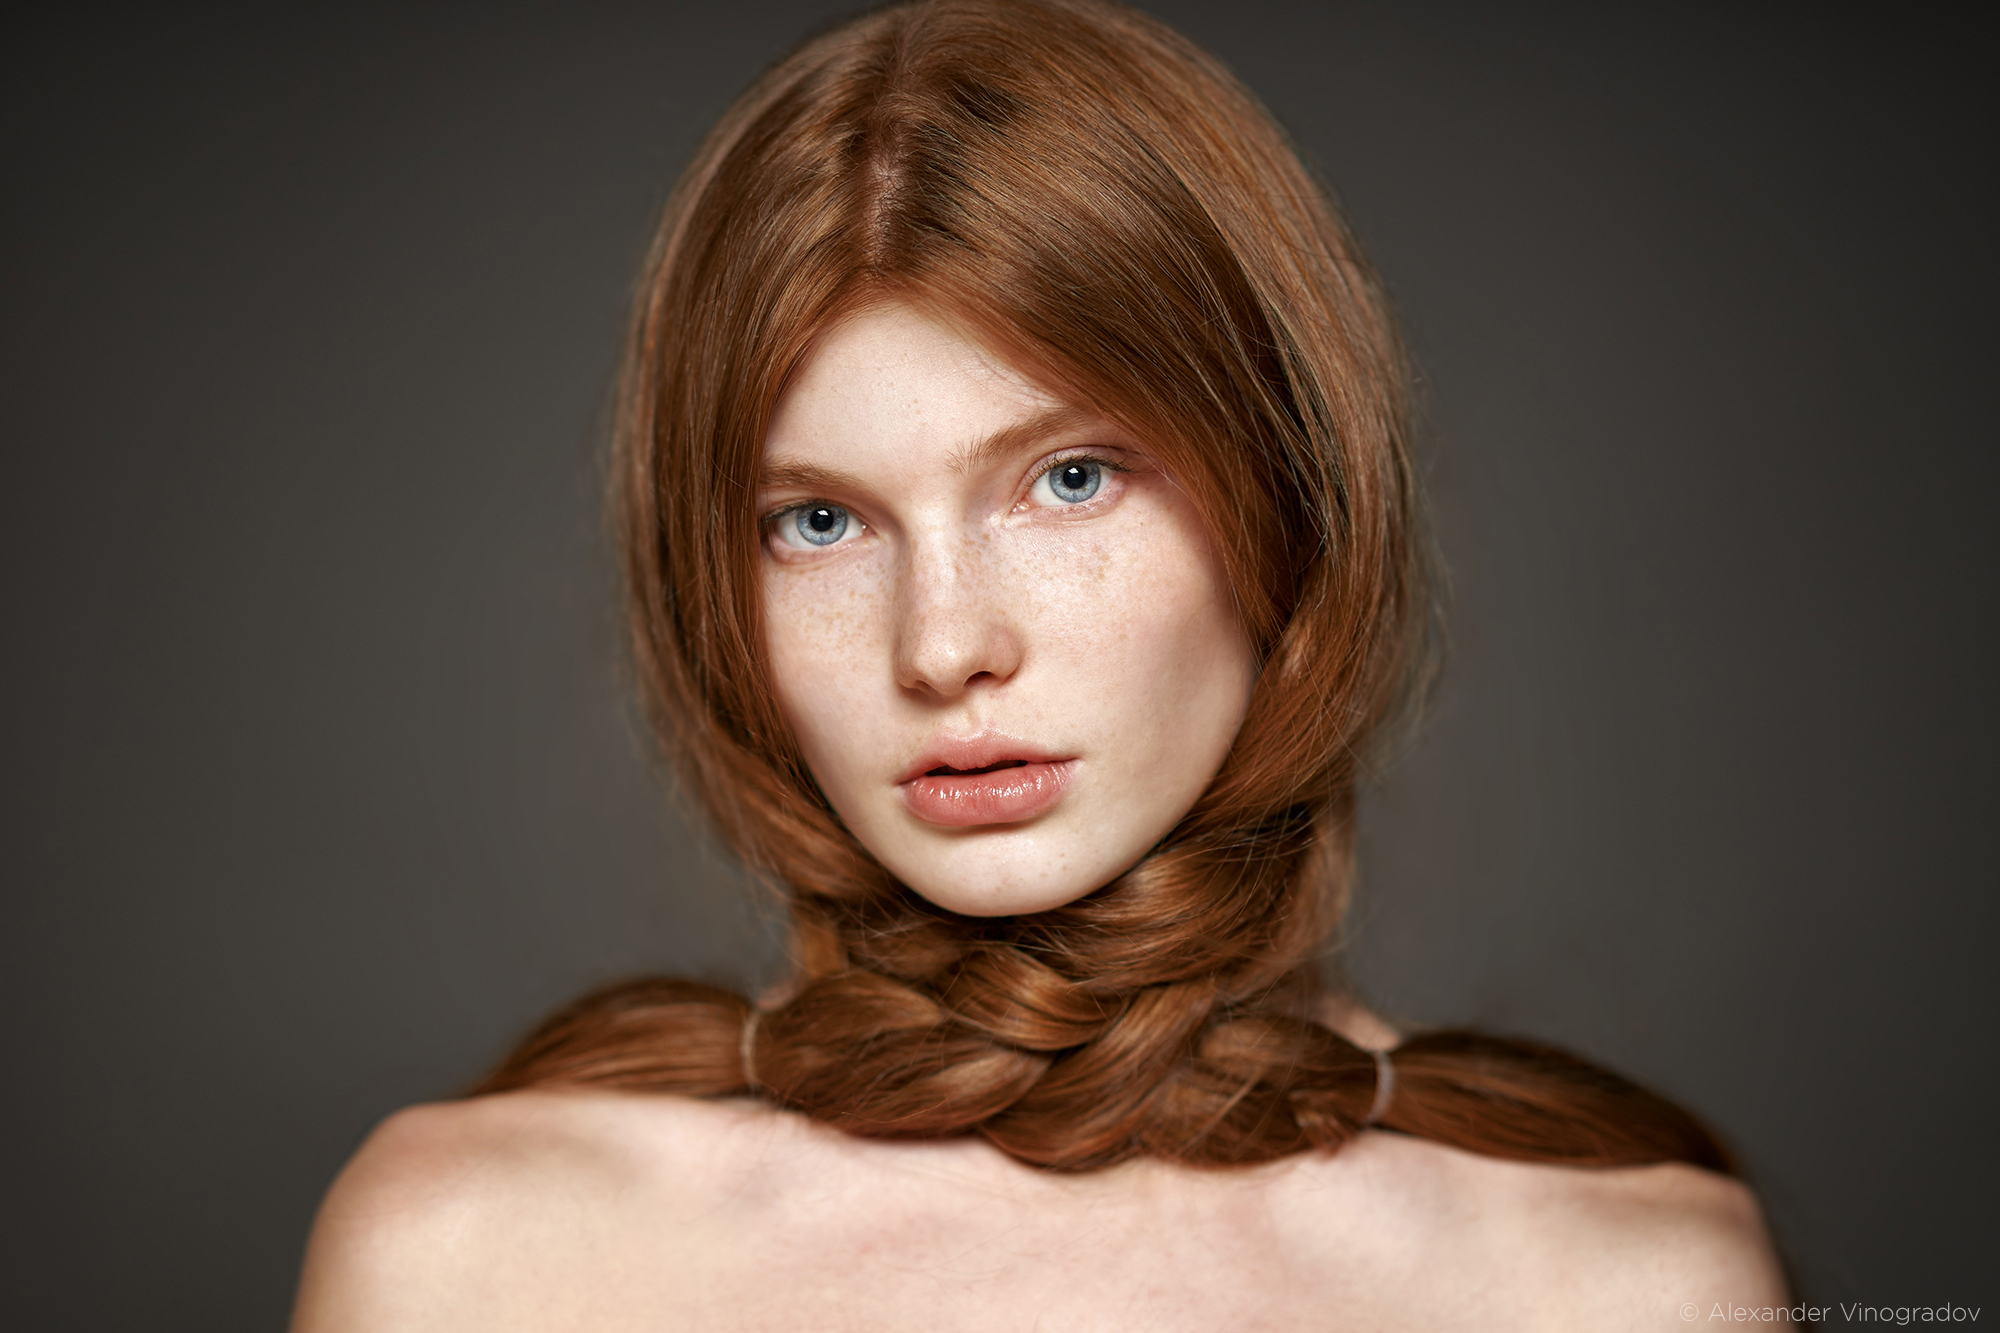
Pure Russian beauty Dasha is one of my favorite models. Red hair and freckles are the perfect combination, which I emphasized with this vintage dress. Tip: The background color for such a portrait is easy to change with the help of a mask in Capture One Pro. Choose harmonious colors. Green background and red hair is a perfect combination. Photo: Alexander Vinogradov  Model: Daria Milky  Equipment: Sony A99, Sony 85/2.8

People often ask where I find my beautiful models and most of them I meet on social media e.g. Instagram and Facebook. Searching by hashtag is very helpful. Street casting is also a good idea – you can also approach interesting looking people on the street. For the most part, these are ordinary girls who do not work in modeling agencies and almost without shooting experience.

The light for my portraits is the simplest – this is a normal window and sometimes a reflector for highlighting shadows. A couple of years ago I started shooting in the studio. There, as a source, I use a soft box and a reflector. A soft box is similar in shape to a window, so the light from it is so similar to natural light. It’s quite easy to shoot with natural light, you do not need to know how to install studio light, and you do not have to pay for renting a studio. Such portraits are possible to achieve at home.

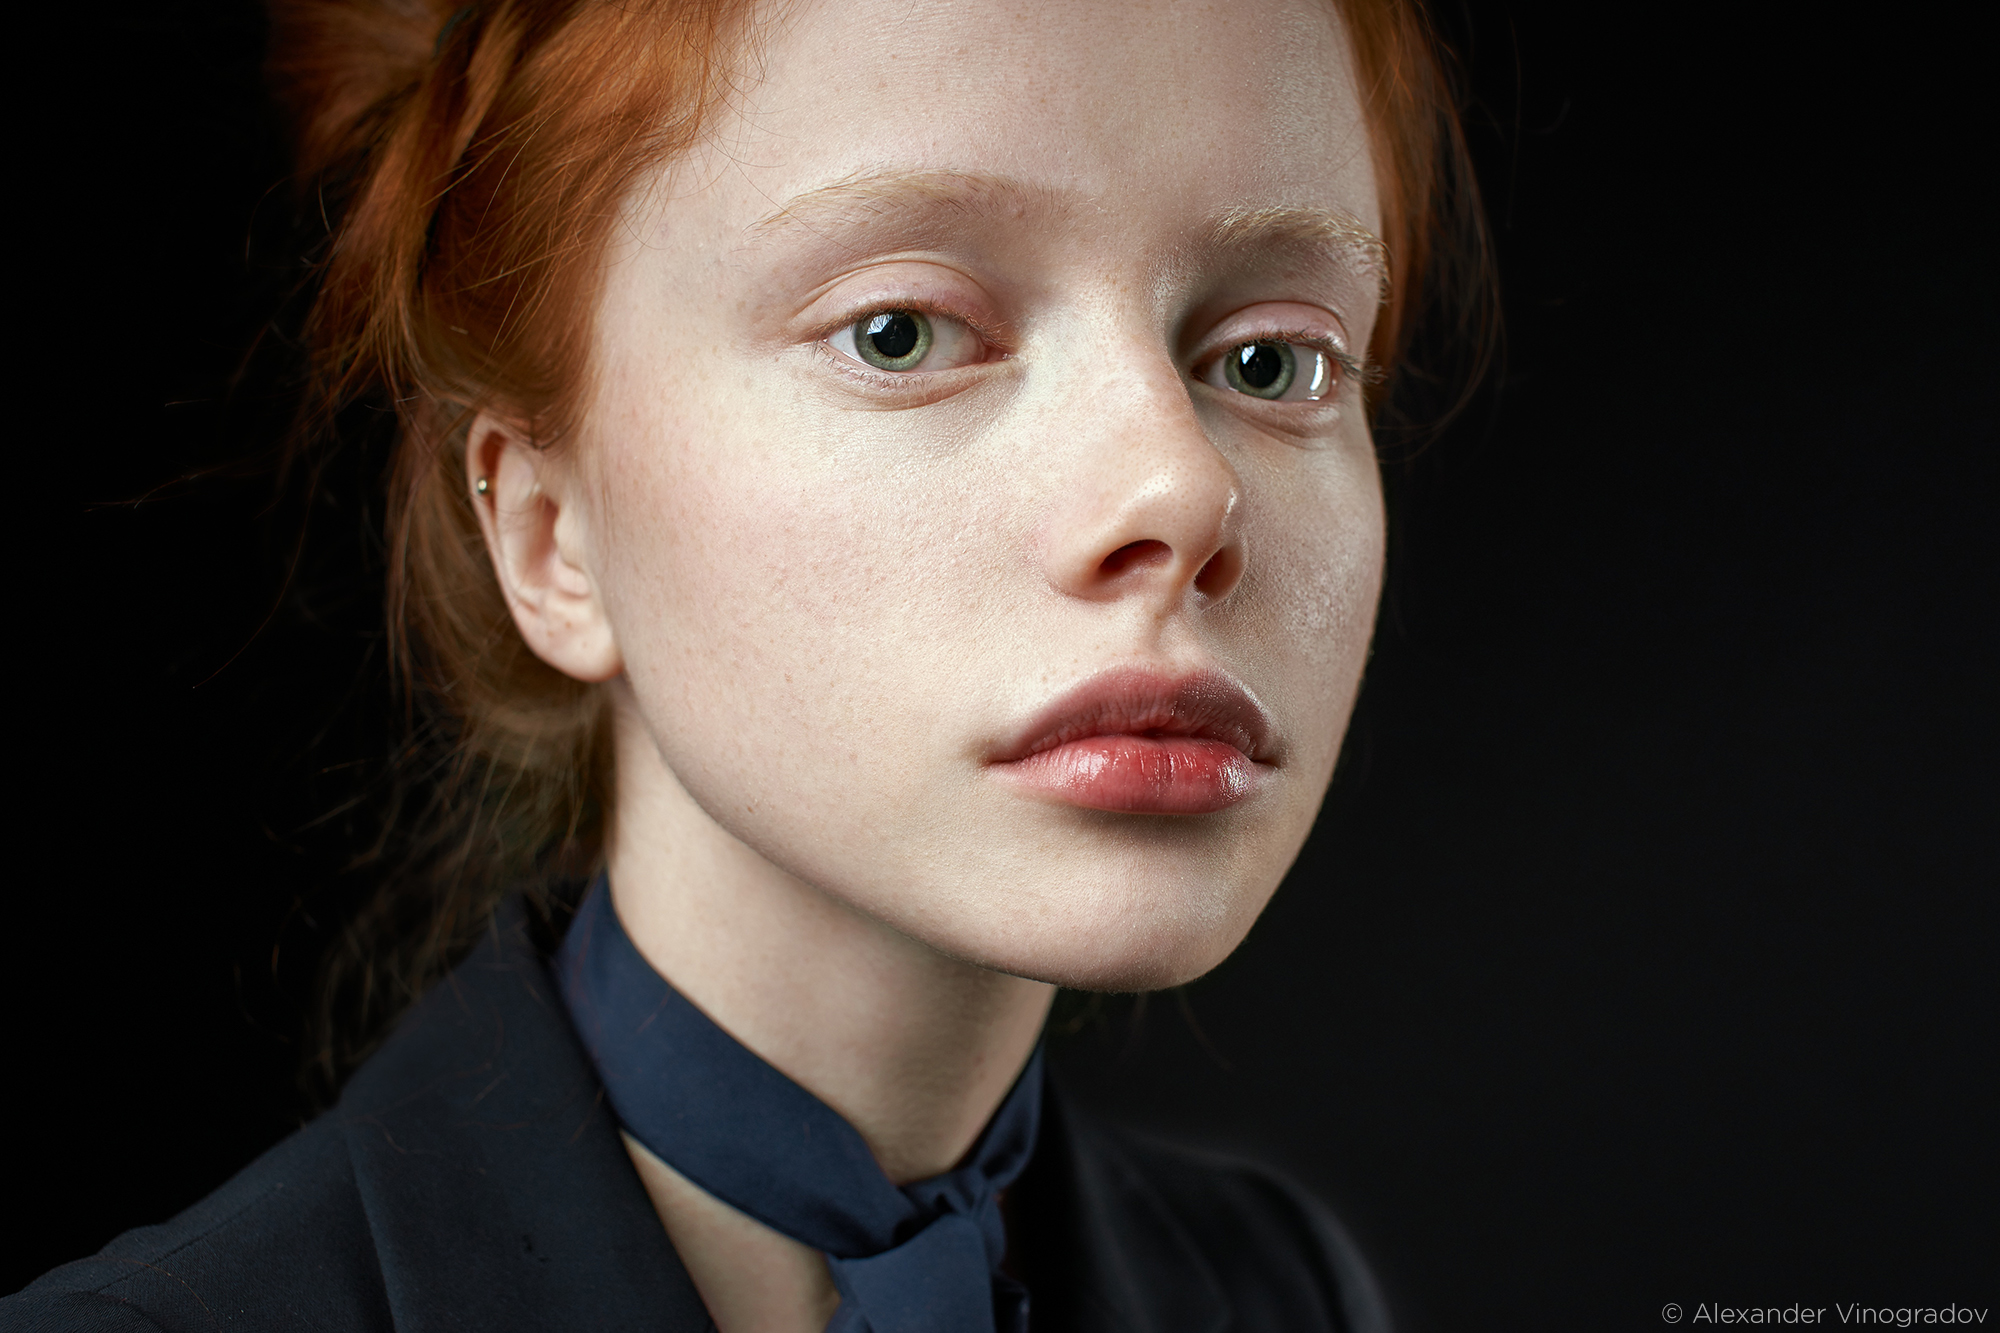
I like to look straight to the model’s eyes. So I often shoot large-scale portraits. I like to get close and look at every detail of those beautiful eyes. Capture One helps to show the right skin tone and makes it very natural. Tip: Remember to include the neck in the frame when shooting headshots. A long neck helps to make it more elegant and graceful.  Photo: Alexander Vinogradov  Model: Katya  Equipment: Sony SLT-A99, Sigma 50 / 1.4, 1/160 c, f / 5.6, ISO 160

The background is important in portrait photography. It emphasizes and highlights your model. Therefore, the selection of the background should be as important as your choice of the model. I like to use the darker background color to emphasize the skin of my model. I also use a smooth or slightly textured background.

One of the significant features of my portraits is light – natural retouching. I believe that retouching should not be a dominant factor in the final picture, but simply emphasize the individuality of your model, hiding everything unnecessary. I do not “smear” the texture of the skin, but only remove some of its flaws: pimples, specks, some wrinkles. The most difficult is a sense of proportion, you need to stop in time, without turning the face into plastic.

Capture One Pro allows you to get excellent skin tone without additional manipulation. It is important to get the correct exposure and white balance, so take pictures in RAW format. To eliminate color reflexes on the skin of the model, do not place your model next to the colored surfaces. Photo: Alexander Vinogradov  Model: Daria Milky  Equipment: Sony SLT A99, Sony 135/1.8

I began using Capture One six or seven years ago because I liked the correct and beautiful skin tone you can obtain without the need for adjustments. By default, the picture from the camera looks very good. I just correct the exposure, contrast and white balance. Capture One is an excellent tool for working with color: you can carefully choose any color shade and change it if necessary. One of the latest innovations, Luma Curve, is very helpful in correcting contrast and adding volume to the portrait. It allows you to change the contrast of the image, almost without affecting the color, which is not possible with a standard RGB Curve. I almost never add sharpness to Capture One – if the camera is focused correctly – then this is absolutely not required, the editor himself chooses the optimal sharpness.

Download a free 30-day trial of Capture One Pro or Capture One Pro (for Sony).

“Simplicity, truth and naturalness – these are the three great principles of beauty in all works of art” – said the Austrian composer, Gluck. So, I advise not to complicate the picture with pretentious poses, ridiculous images, or spoil with bizarre skin tones and excessive retouching. Instead, try to shoot classic portraits, which in my opinion will always remain timeless and will be relevant in many years.

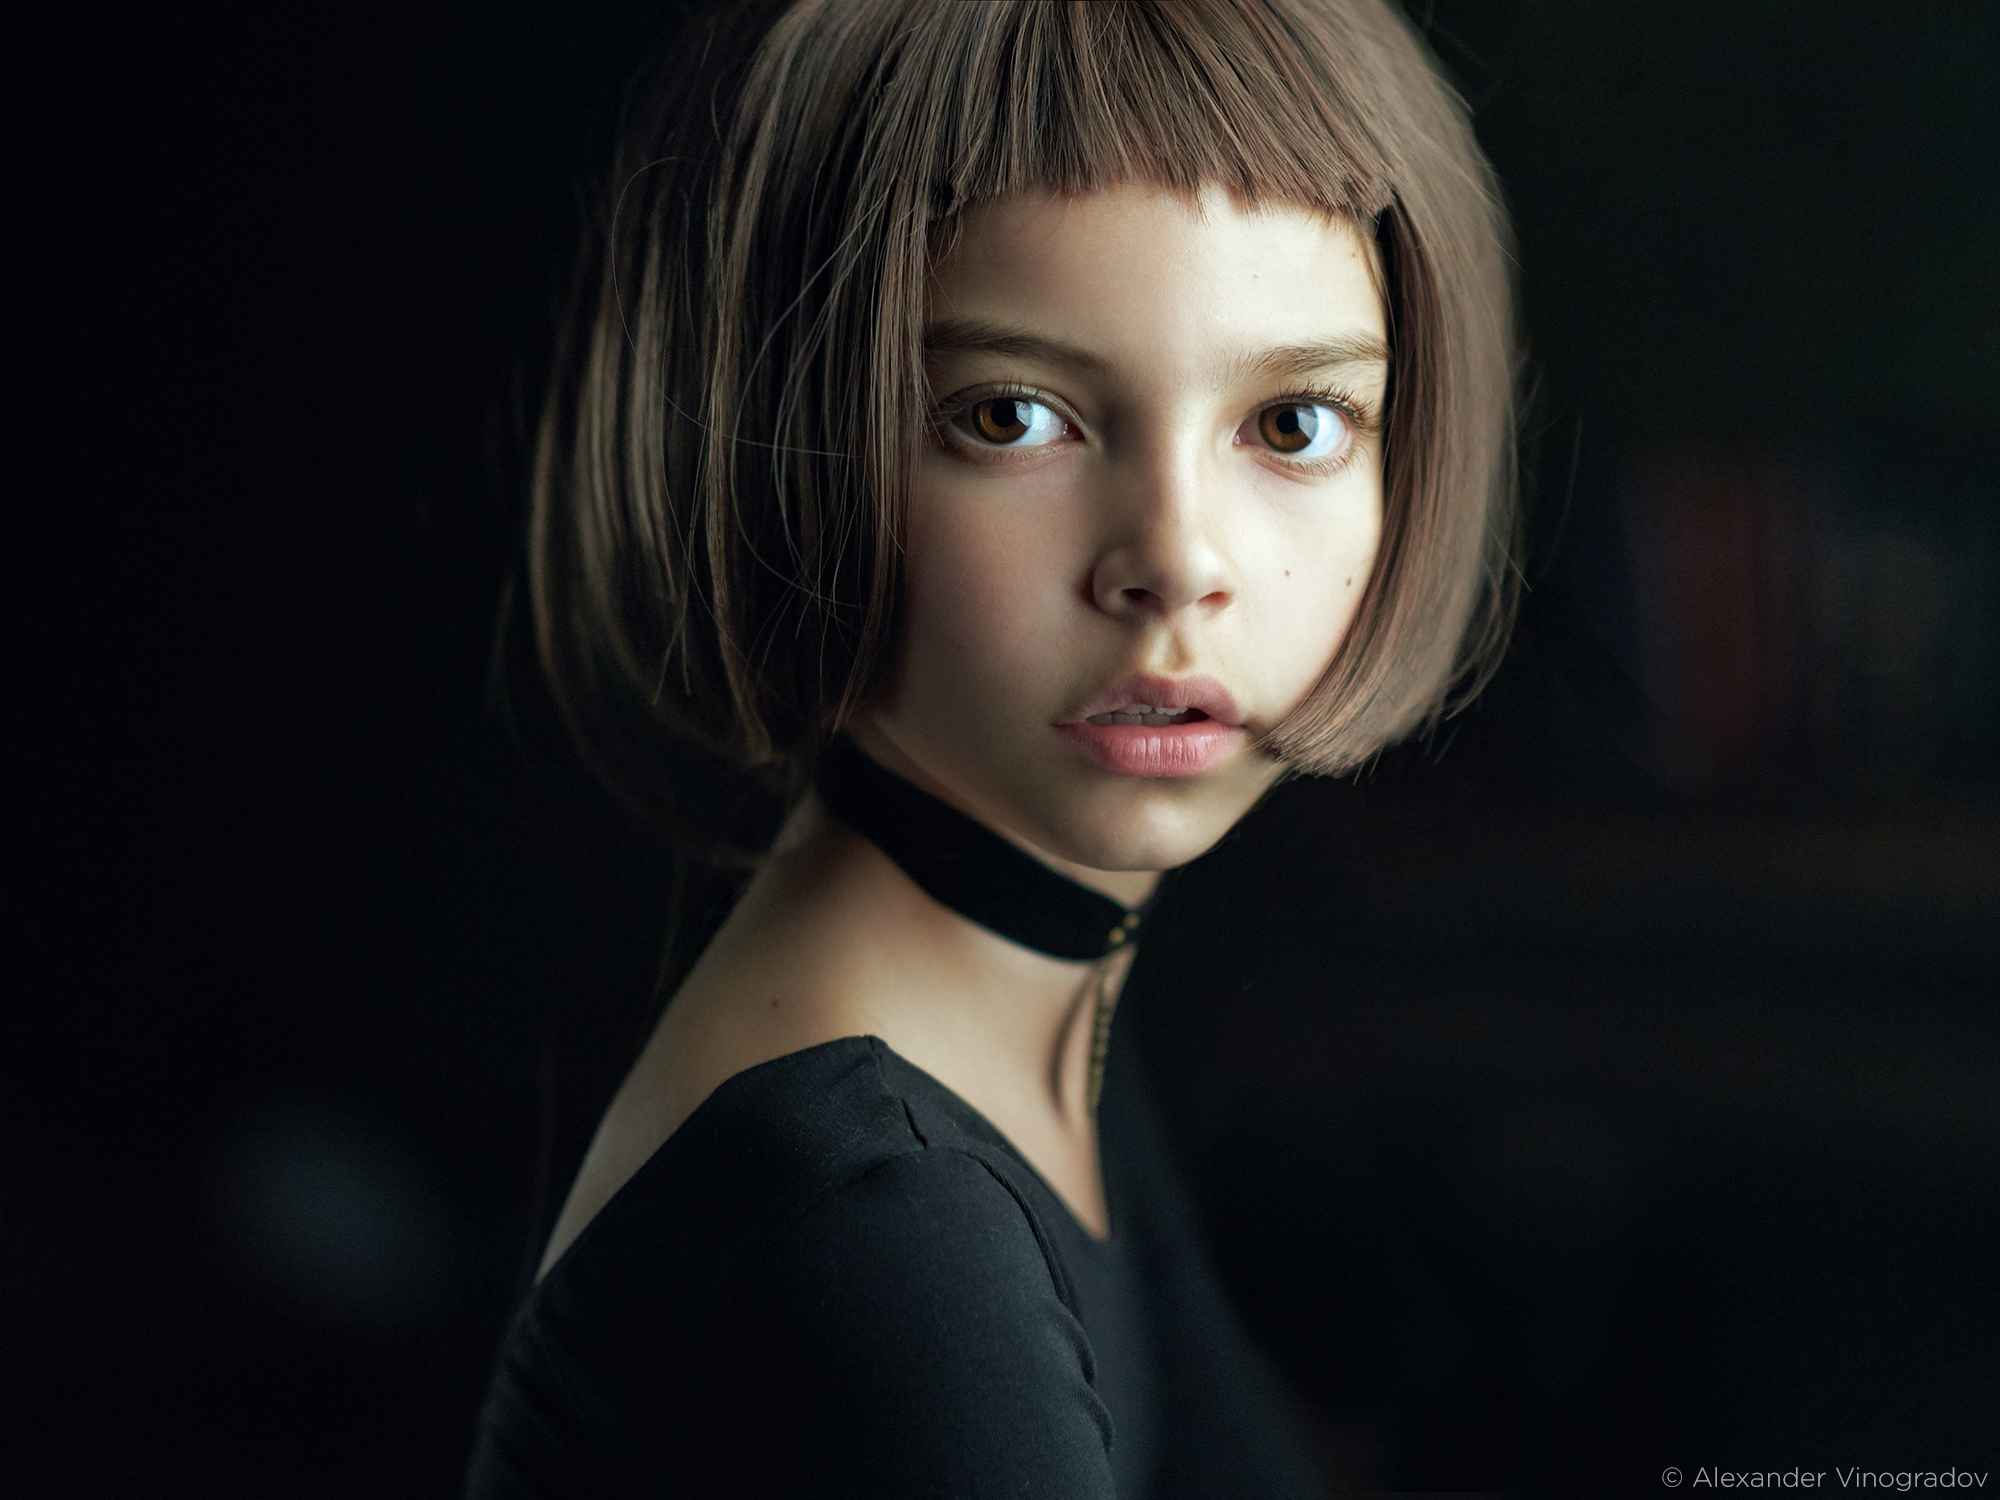
As an example, my picture ‘Matilda’, was the best in the Open category of the largest international competition: Sony World Photography Awards 2017. I did not use complicated light, scenery, and make-up.

The best picture in the Open category of the largest international competition:
Sony World Photography Awards 2017. I’m not a cosplayer, but when I first saw Nastya Marinina, she reminded me of Mathilda from the movie Léon so much! We decided to find a choker necklace and a wig to achieve this Mathilda look.
Tip: Anastasia has a very childish attitude. It can instantly change from cheerfully laughing to seriously looking at you with her piercing dark eyes. To capture the perfect moment it’s crucial to just communicate on an equal level and to press the trigger at the right time.  Model: Nastya Marinina  Equipment: Sony SLT-A99, Samyang 85 / 1.4, 1/160 c, f / 2, ISO 1600

I hope you found this useful and I wish everyone lots of inspiration! Below you’ll find more photos.

Best regards,

Alexander

Sign up for the webinar

PSD Workflow Advantages

NOTE: This article discusses an outdated version of Capture One. To learn more about our latest version, click here.

Capture One Pro is a funny thing.

Not in the comical sense, but in the sense that it seems to get better and better with time, anticipating the needs of its intended audience. That may seem like the obvious evolution of a software, incrementally improving the experience for its users, but I’m sure many of you feel that often it doesn’t seem to be the case with all technologies. It’s rather difficult to tell Microsoft after the fact, no thank you I don’t need a new default web browser, or to kindly point out to Apple that, indeed the removal of a USB port is rather inconvenient and I’m not particularly fond of carrying around a backpack of “dongles”.

The changes in Capture One Pro from the outside may seem small, but it’s the impact they have on my daily use that becomes monumental in terms of saving time. In the interest of full disclosure, it’s important to point out that the software team here at Phase One is, in fact, not clairvoyant. They had not anticipated or somehow sensed that the changes they were making would be so beneficial. The trigger for change was actually more rudimentary than that… they listened to the users!

In that sense, what I find funny about Capture One Pro and all its future versions, is that it’s comforting. Finding solace and comfort in a software is both embarrassing to admit and certainly a funny thought to express. But there it is.

Although Phase One does pay my rent (and I am without a doubt biased) I find comfort in the fact that the tools I depend on when not in the office, the tools that are essential to fulfill my love of photography, are created by a team that listens to the photographers who use their software and are certain to make a difference. Although I do not work for the software department, I do know that the team is dedicated to ensuring that any improvements they make are fully vetted with those that use Capture One Pro. That vetting process certainly occurs here, across the lunch table on a daily basis, but the lengths they go to outside of this office, working directly with full-time professional photographers, certainly makes a difference.

Efficient Workflow

To anyone reading this, I’m sure I don’t need to preach the importance of a well-choreographed and tirelessly executed workflow. It’s been said many times over, by anyone speaking about Capture One Pro, that it’s one of the few photographic tools that puts the power of customizing that workflow directly in the hands of the user.

Creating a customized workflow, tailored to your exact needs and wants, is one of its many strengths.

Stressing the importance of an efficient workflow is one thing, but following one personally is quite another. The old adage, “Those that can’t do, teach” comes to mind. I am far from a professional photographer and working with so many photographers, suggesting, adapting to and embracing their workflows as a matter of diligence becomes problematic when I put my own workflow into practice. Adapting to different workflows certainly affords me the opportunity to explore, but it does hinder my consistency.

The one thing that has remained consistent in my workflow for more than 15 years is the transition from RAW to PSD, and from PSD to TIFF/JPEG. I suspect that will never change.

Sessions or Catalogs come and go depending on the job. New Tools provide new editing opportunities. New layouts streamline the steps one can take to achieve a final image… but the transition of capturing a RAW, editing that RAW, processing to a PSD, editing that PSD, and then delivering a TIFF or JPEG is always a constant.

And when would that ever change? Well, it didn’t change with the release of Capture One Pro 10.1. But it did get a whole lot better.

The critical role of a PSD

A PSD is critical because, well, we’re photographers. And for photographers, Photoshop is critical. It’s a simple truth that Photoshop is an essential tool for every photographer. There have been attempts to replace it, clone it or avoid it, but at the end of the day there’s always something in an image that needs a tweak here or a touch there, and Photoshop is often the answer. It does some things better than anyone can, and likely ever will, but that list of advantages is shrinking.

The role of Photoshop in my workflow has certainly been reduced. At one time, my entire digital process revolved around it (with a brief and embarrassing stint in Lightroom), but now it acts almost like a Plug-in for Capture One Pro and not the other way around.

So, what is a PSD? To put it simply, it’s a TIFF file with some pizzazz. That’s of course not what the P stands for, but it’s close. It’s a file format of your image that is streamlined for Photoshop, compressed in a lossless format (like a RAW file) and puts quality, security and speed, above all else. So, it’s not exactly a TIFF, it’s so much more.

The number one enemy of image editing quality is compression. Bear with me here…

Compression is like packing a rucksack for a month of backpacking. The first time you pack it, it’s perfect. Everything is where it should be, and everything fits safe and snug… until the next time you re-pack it, and the next, and then the next. In the end, your backpack looks like it’s filled with empty beer cans and you’ve lost a tent pole. In digital editing, that type of compression is JPEG compression. By constantly packing and repacking, editing and saving, that JPEG eventually fails to resemble its original form. It may be small, but eventually it’s corrupted and you’ve lost a tent pole. A JPEG is perfect for a one-time, tight, snug, and small pack job, but not for constantly adjusting and resaving. So, for continuous editing, it’s a no-no.

A JPEG ready to deliver

The same JPEG after 25 Open/Save Cycles.. CORRUPT!

This is where a TIFF comes in. A TIFF has no compression and therefore there’s no fear of losing that tent pole. Keeping with the travel analogies, it’s a steamer trunk. It holds all your belongings in an organized way, safely and securely. But… it’s huge, heavy and no one can really afford to travel like it’s the 1920s on a first-class transatlantic voyage.

This is where a PSD comes in. It’s a hard-shell Samsonite suitcase with wheels. All the benefits of a TIFF in that it’s safe, secure and organized, and with some of the benefits of a JPEG in that it’s compressed – but in a good way. The file is quick in Photoshop, takes up slightly less space than a TIFF, and is secure for the foreseeable future. Your tent pole is exactly where you left it.

A PSD is the best of both worlds. In an industry constantly pressured by time, threatened by the unspeakable file corruption, it is without a doubt a vital format for a professional workflow. If you use Photoshop anyway.

Streamlining the Streamlined

So back to how great Capture One Pro is…

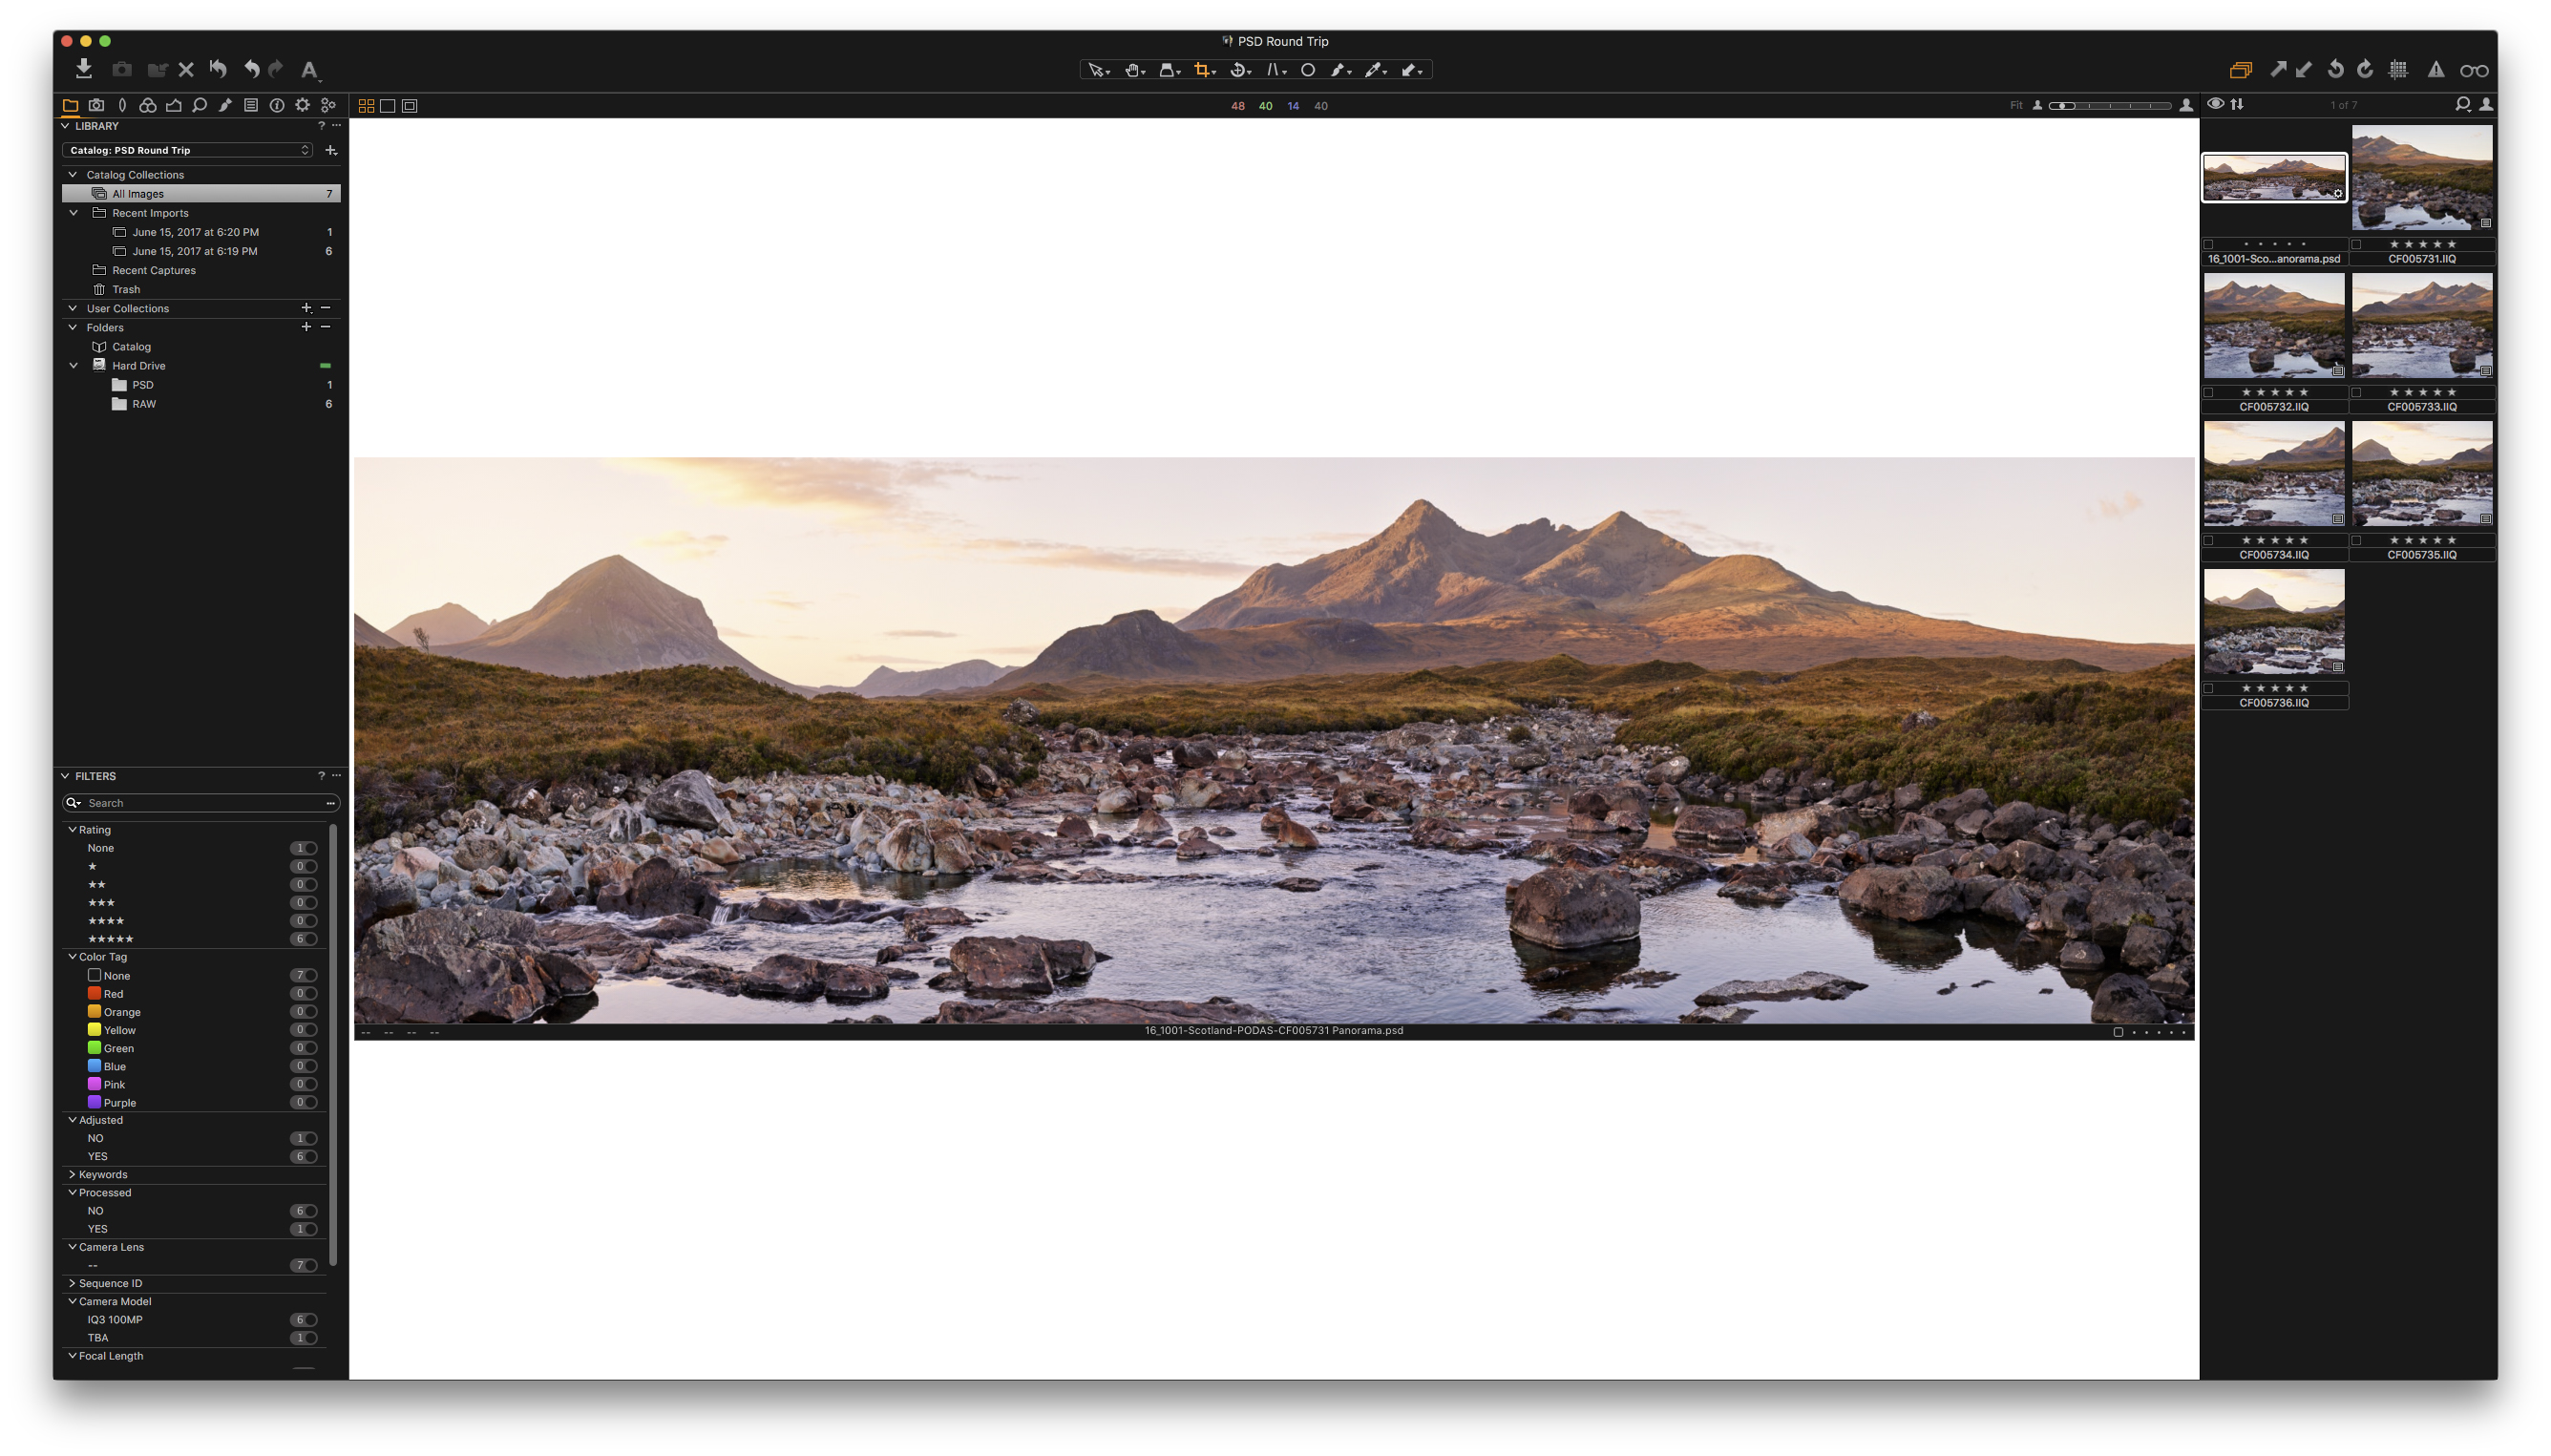
With the release of Capture One Pro 10.1 came a seemingly insignificant, but monumental benefit in that it improved PSD support. What is this improvement you ask? Layers! The pizzazz of the PSD.

Previously, Capture One Pro could see a PSD. It could recognize one in a collection of images (Session or Catalog) and it could see what the original file (or background layer) consisted of. However, if you were a diligent retoucher, you would of course have layers within that PSD that made significant, or subtle, changes to that background layer. So, in previous versions of the software, what you saw in Photoshop was not always what you got in Capture One Pro.

The improvements made it so Capture One Pro will not only see, honor and update the adjustments you make to the PSD in Photoshop, but it will allow you to process that PSD as if it were a normal RAW file. This seems small, but trust me, it’s huge.

For example, say you edit a RAW in Capture One Pro to near perfection and process that RAW to a PSD, and that PSD needs a bit of work via Photoshop to replace the model’s bad hair day with a silly hat. The work is done quickly and effortlessly in Photoshop and saved, still as a PSD. Opening that PSD in Capture One Pro now shows the PSD, silly hat and all.

Or, as a more practical example, you can have several RAW that you shot as a stitch, processed to PSD and stitched in Photoshop, then continue editing that stitched file in Capture One Pro. In hindsight I should have led with that example but the idea of a silly hat made me laugh.

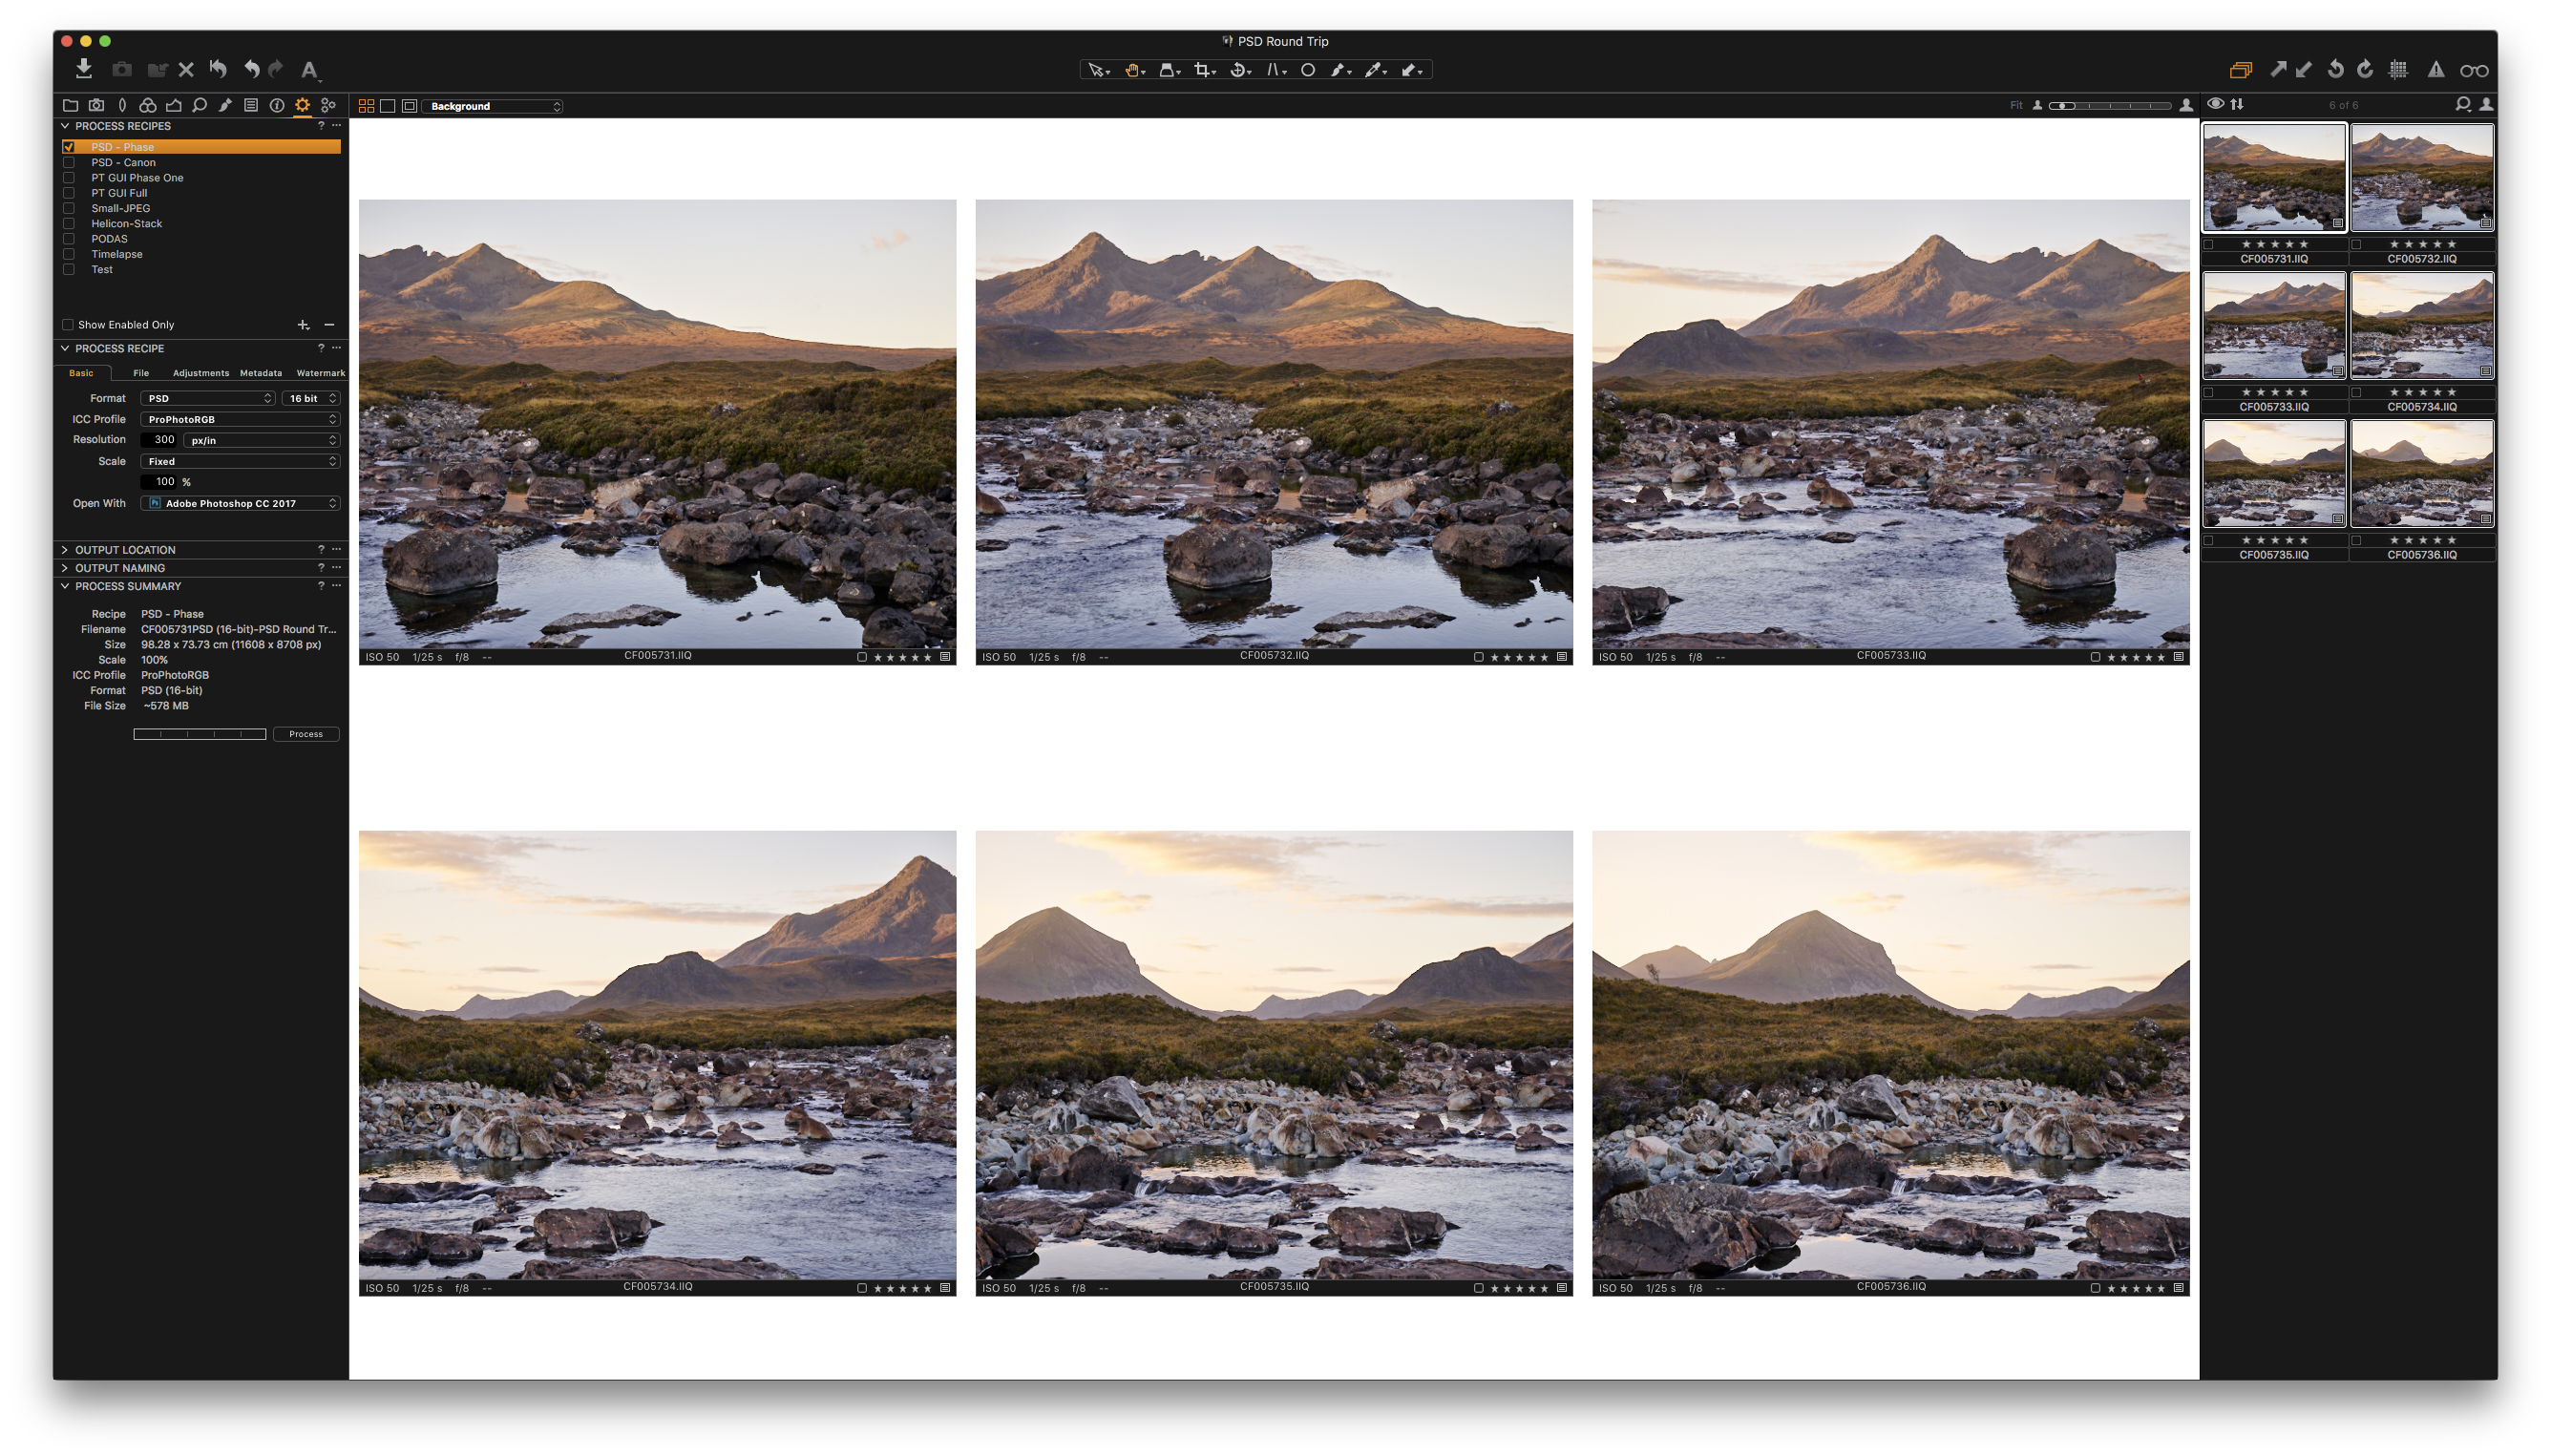
RAW’s in Capture One

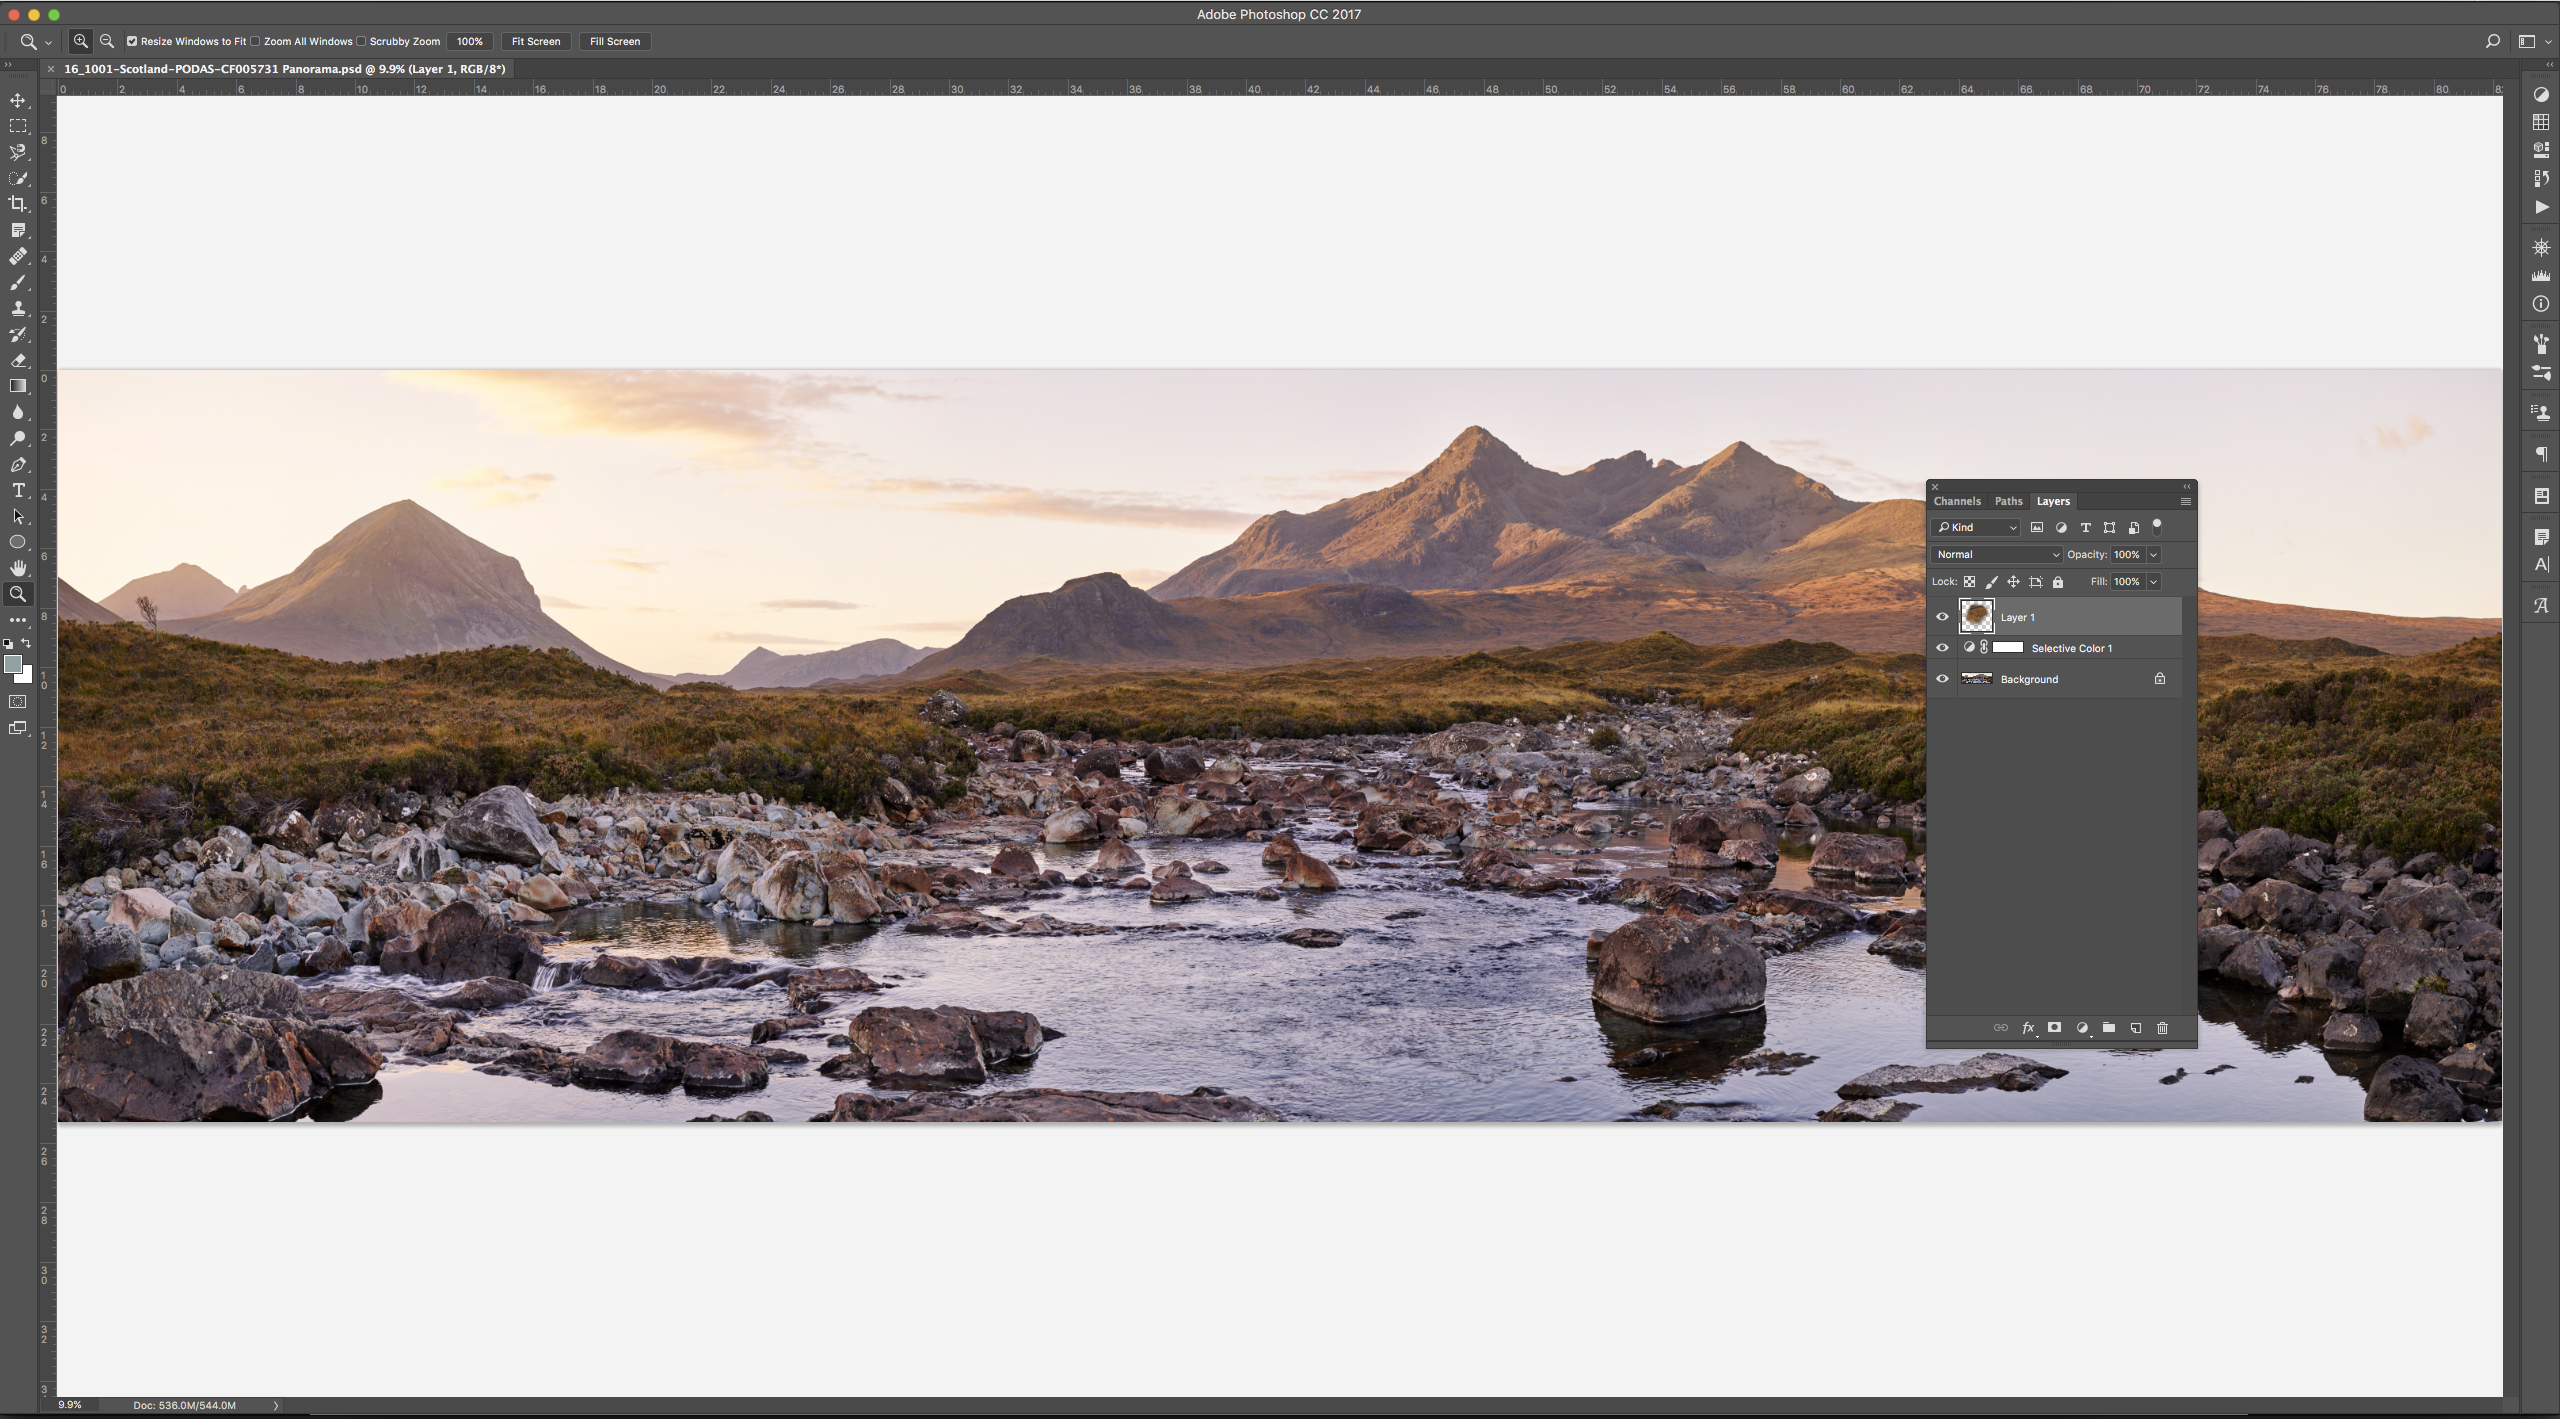
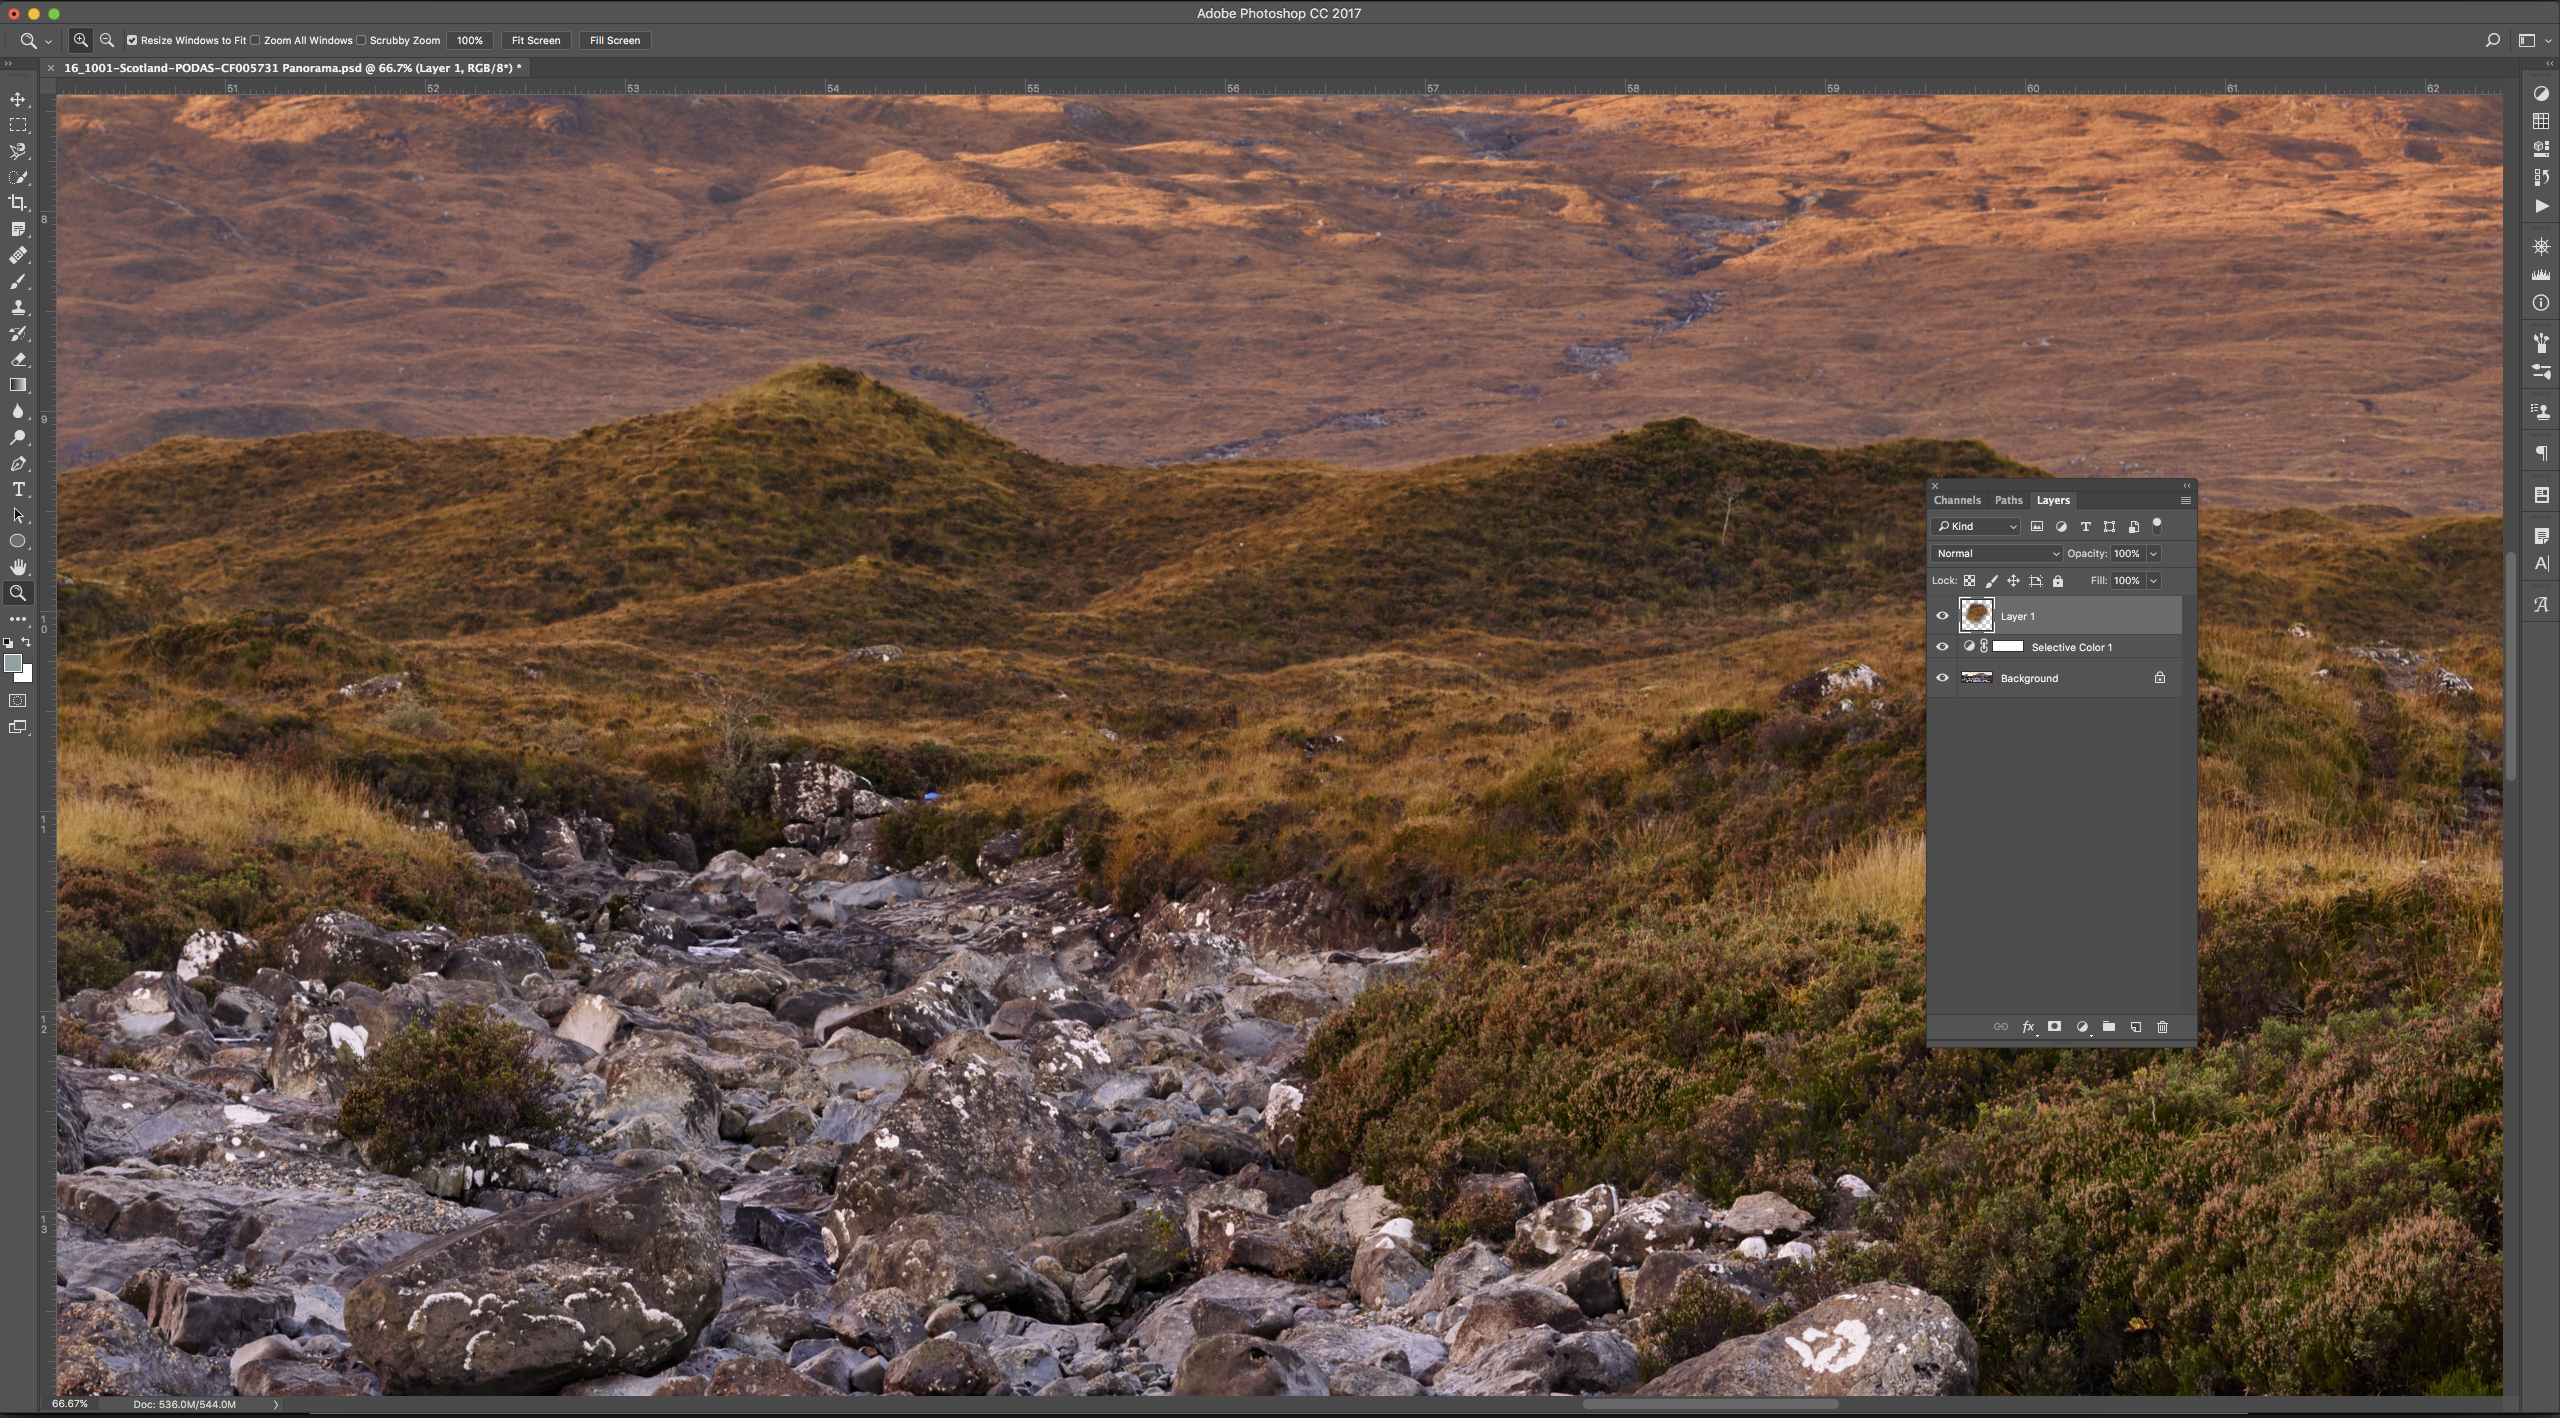
Files Stitched PSD in Photoshop

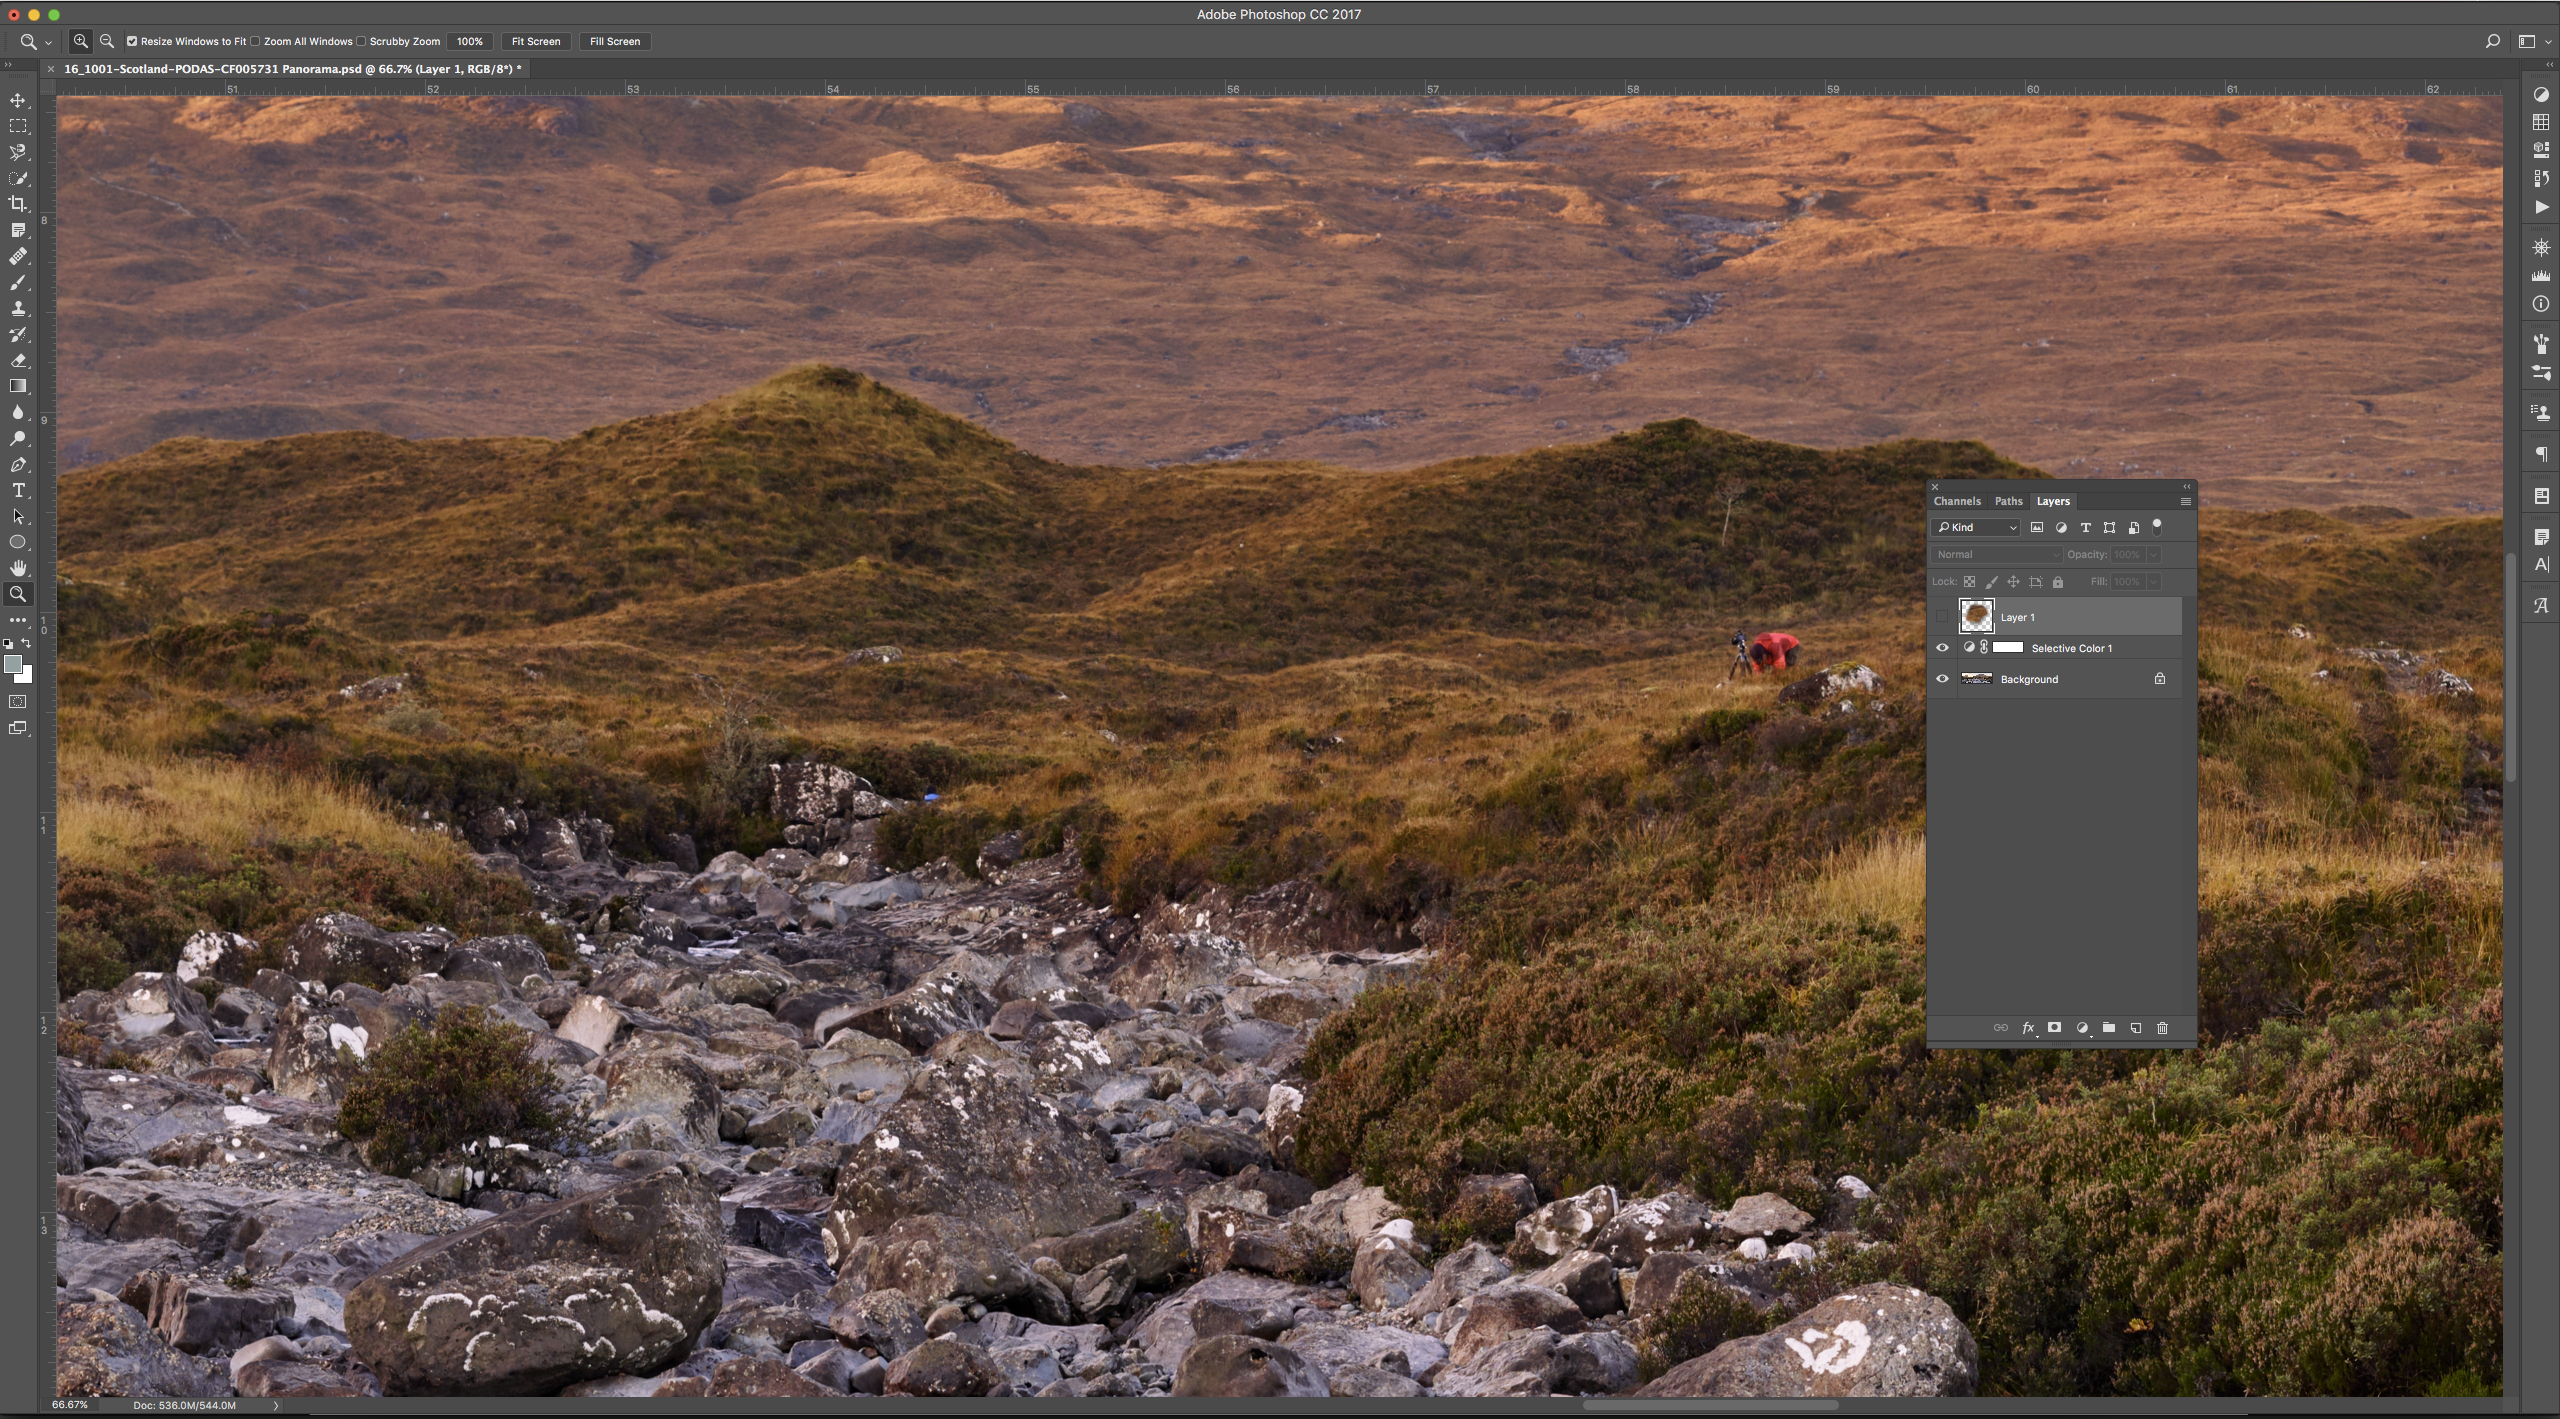
Edited PSD-Before

Edited PSD-After

PSD imported to Capture One and ready to edit or process further

With this file, you can now edit it slightly (if need be) just as if it were a RAW. Just as if it were originally shot as a Panorama! Then, when the art director asks for 5 different image samples of this particular image, including multiple formats at multiples sizes and resolutions, a simply click in Capture One Pro exports the PSD to the desired formats referencing all of the Process Recipe’s you’ve applied.

Bing. Bang. Boom.

No more cumbersome resizing the original in Photoshop over and over. No more hunting for the PSD that matches the RAW, reprocessing and retouching again. Just once and done. Your previously excellent workflow has just become excellenter.

Small Feature, Substantial Change

What this new feature affords me is speed, consistency and peace of mind. My workflow, though not perfect, is quite efficient (#humblebrag). The introduction of this small change however, makes it effortless.

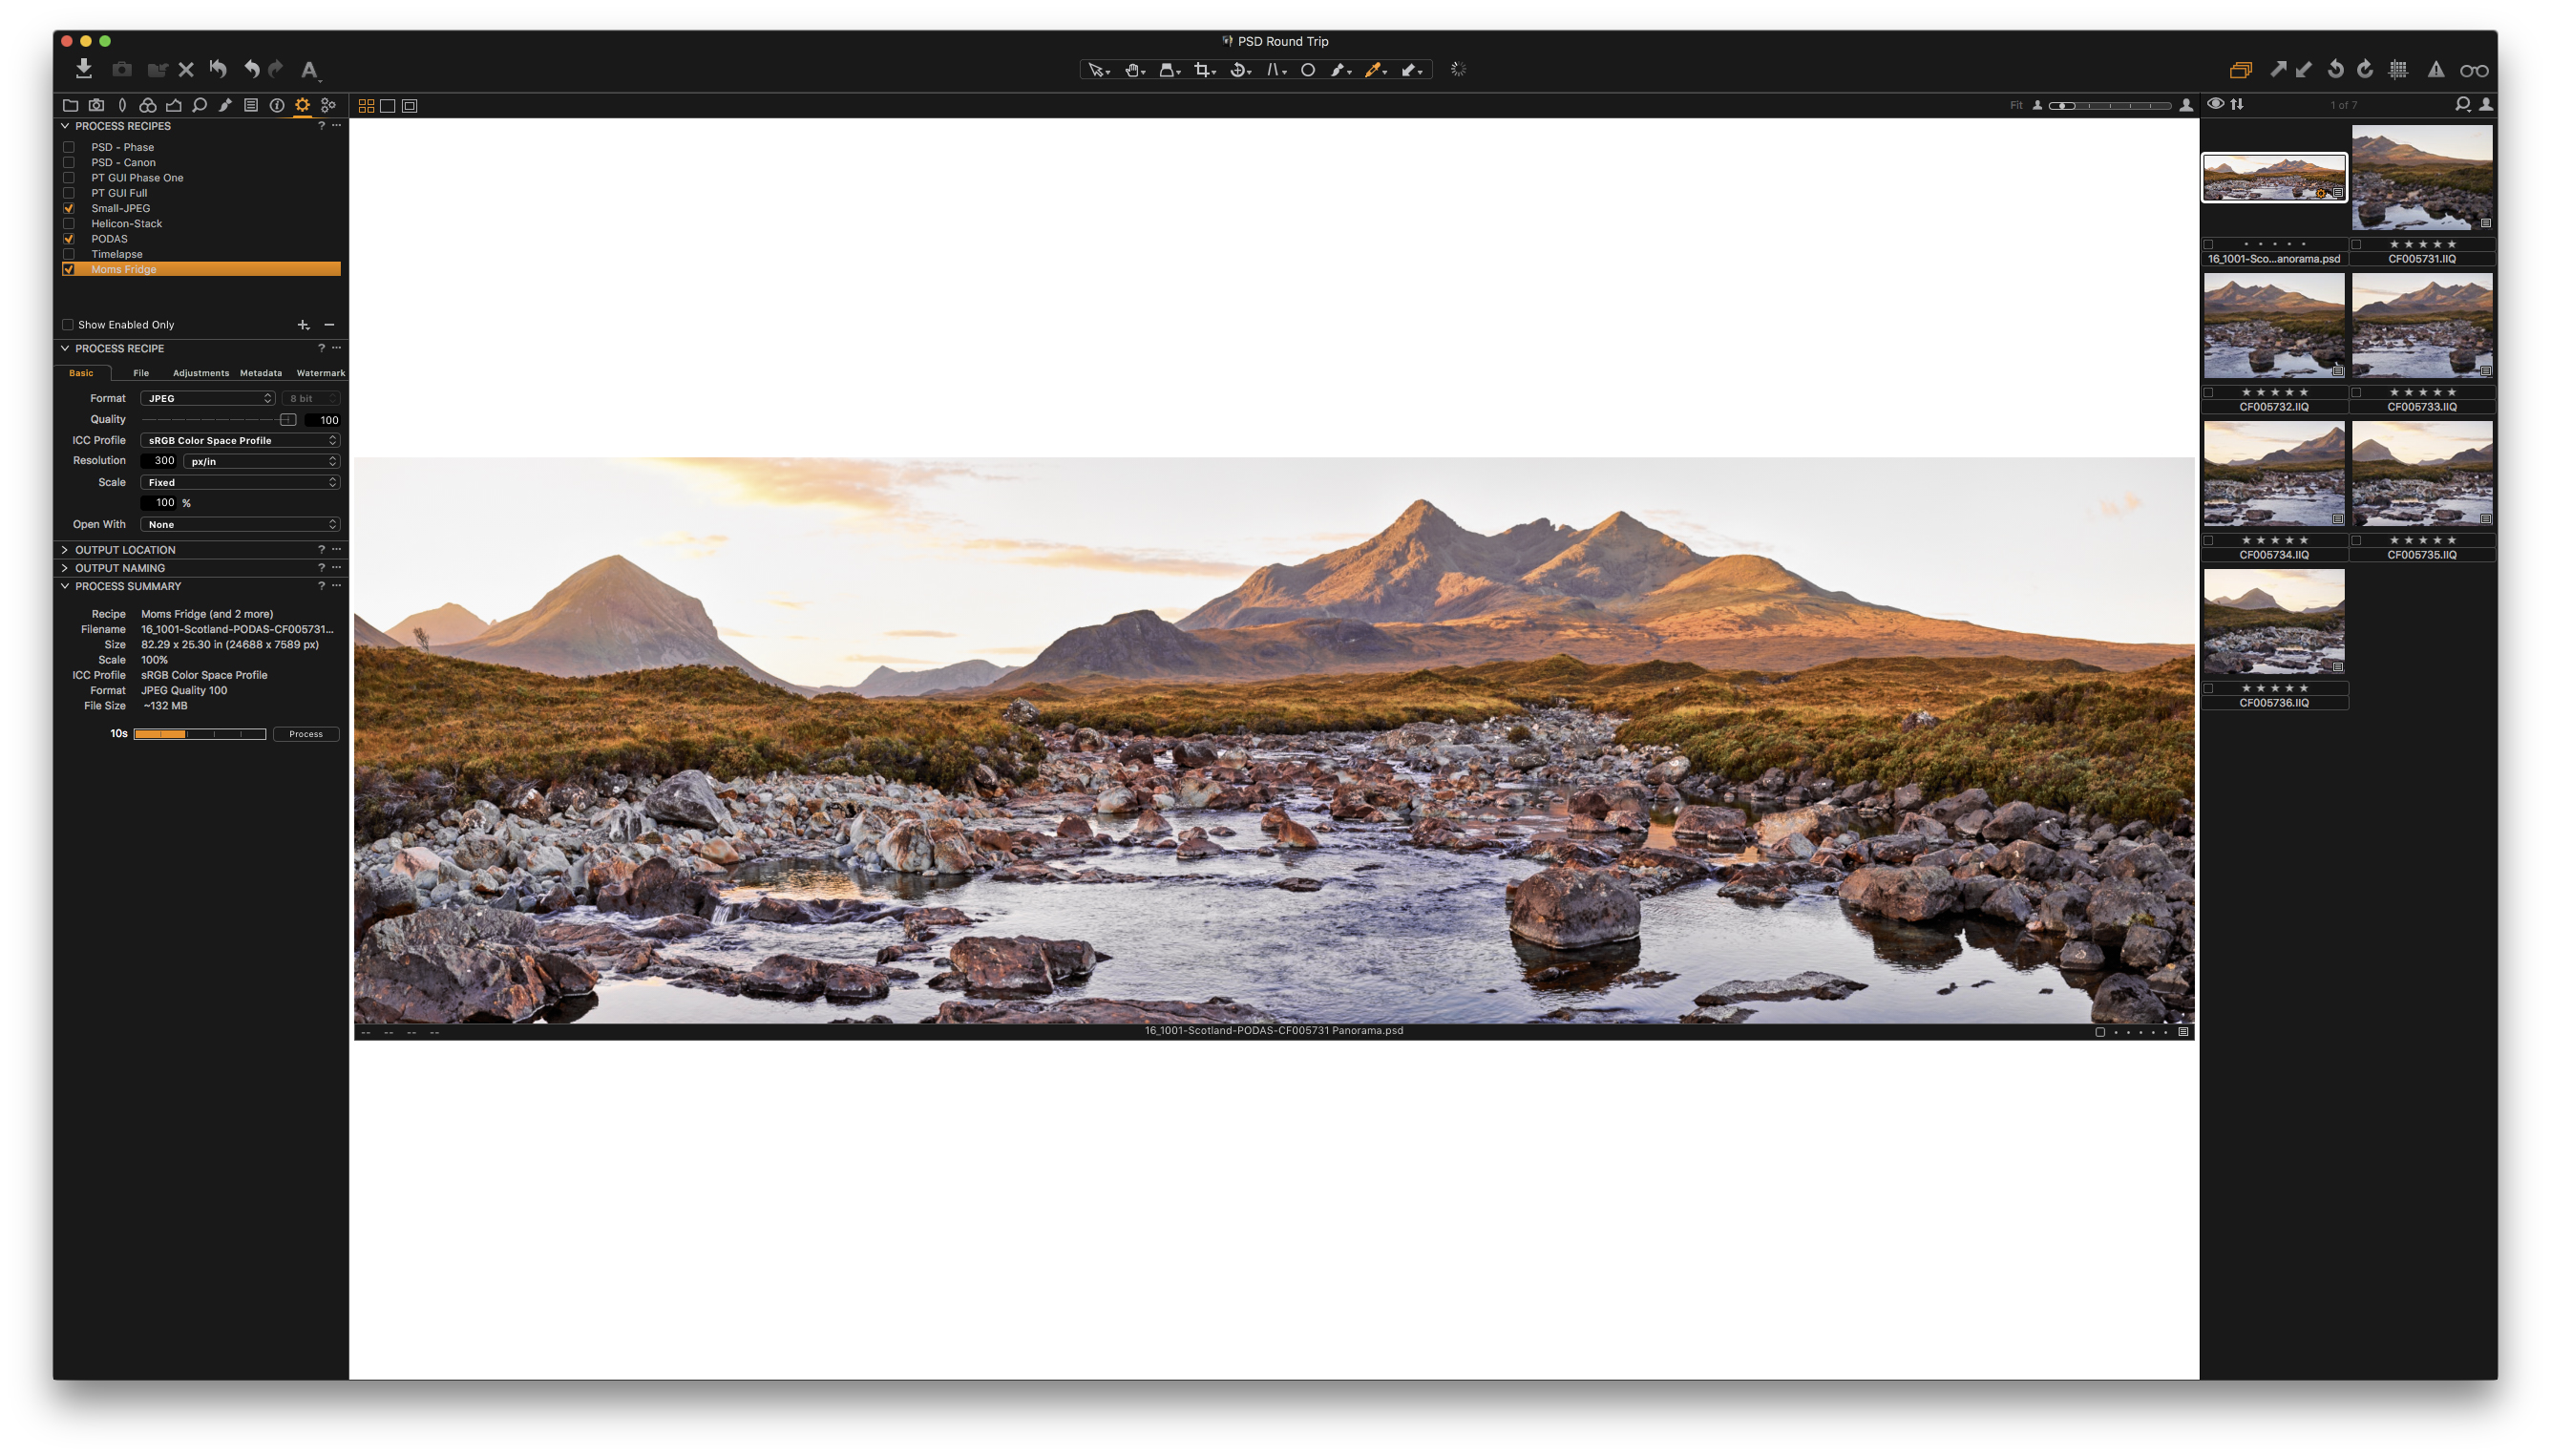
The time switching between Capture One Pro and Photoshop is nearly zero and the manual organization, locating and verifying that I have the most recent file, is a thing of the past. I can see my chosen and edited RAW file alongside my edited and final PSD. If I choose to further edit that PSD in Photoshop, everything remains consistent in Capture One Pro. And when it comes time to process that PSD to one or multiple formats (for Instagram, Photoshop, 500px, personal website, print house, moms refrigerator) it’s one click of the process button and all the files are quickly created, neat and tidy, done and done.

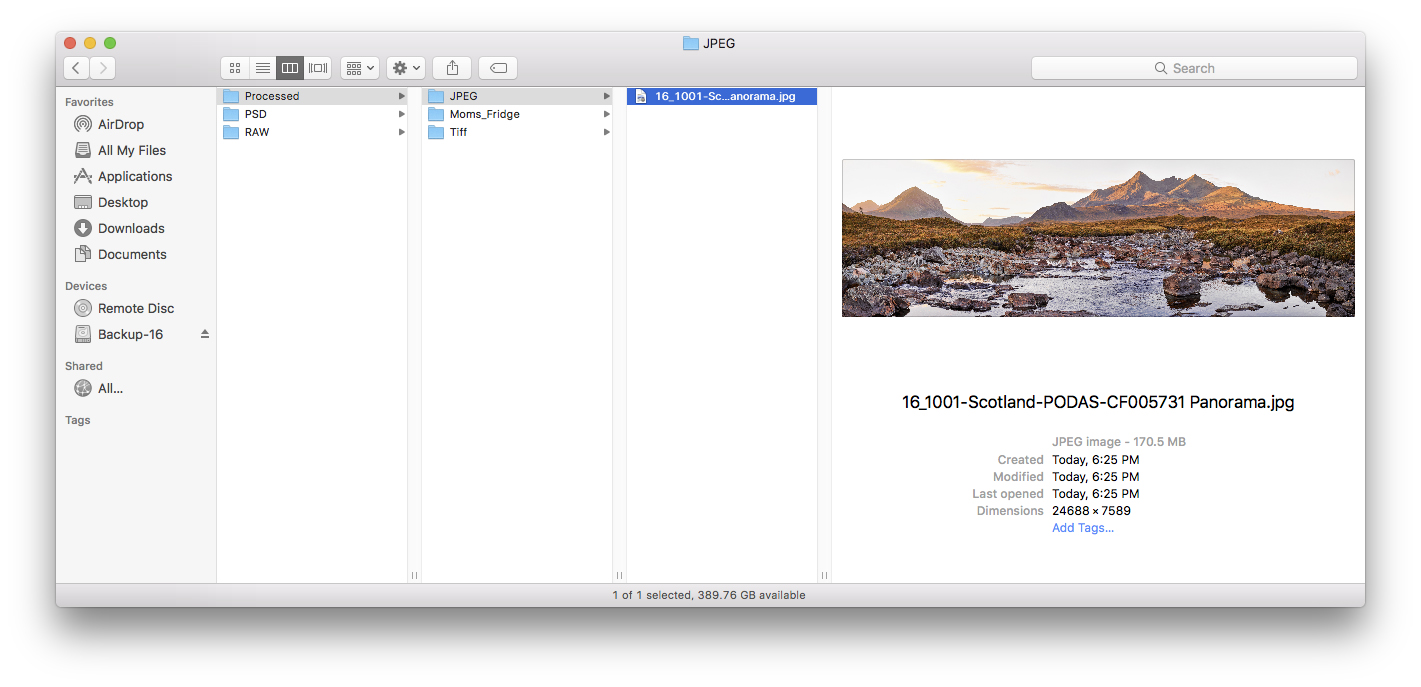
Processed files from the PSD

I know I said this was a seemingly small improvement – and it is – but the effect it has on my workflow is incredible.

So, just to summarize…

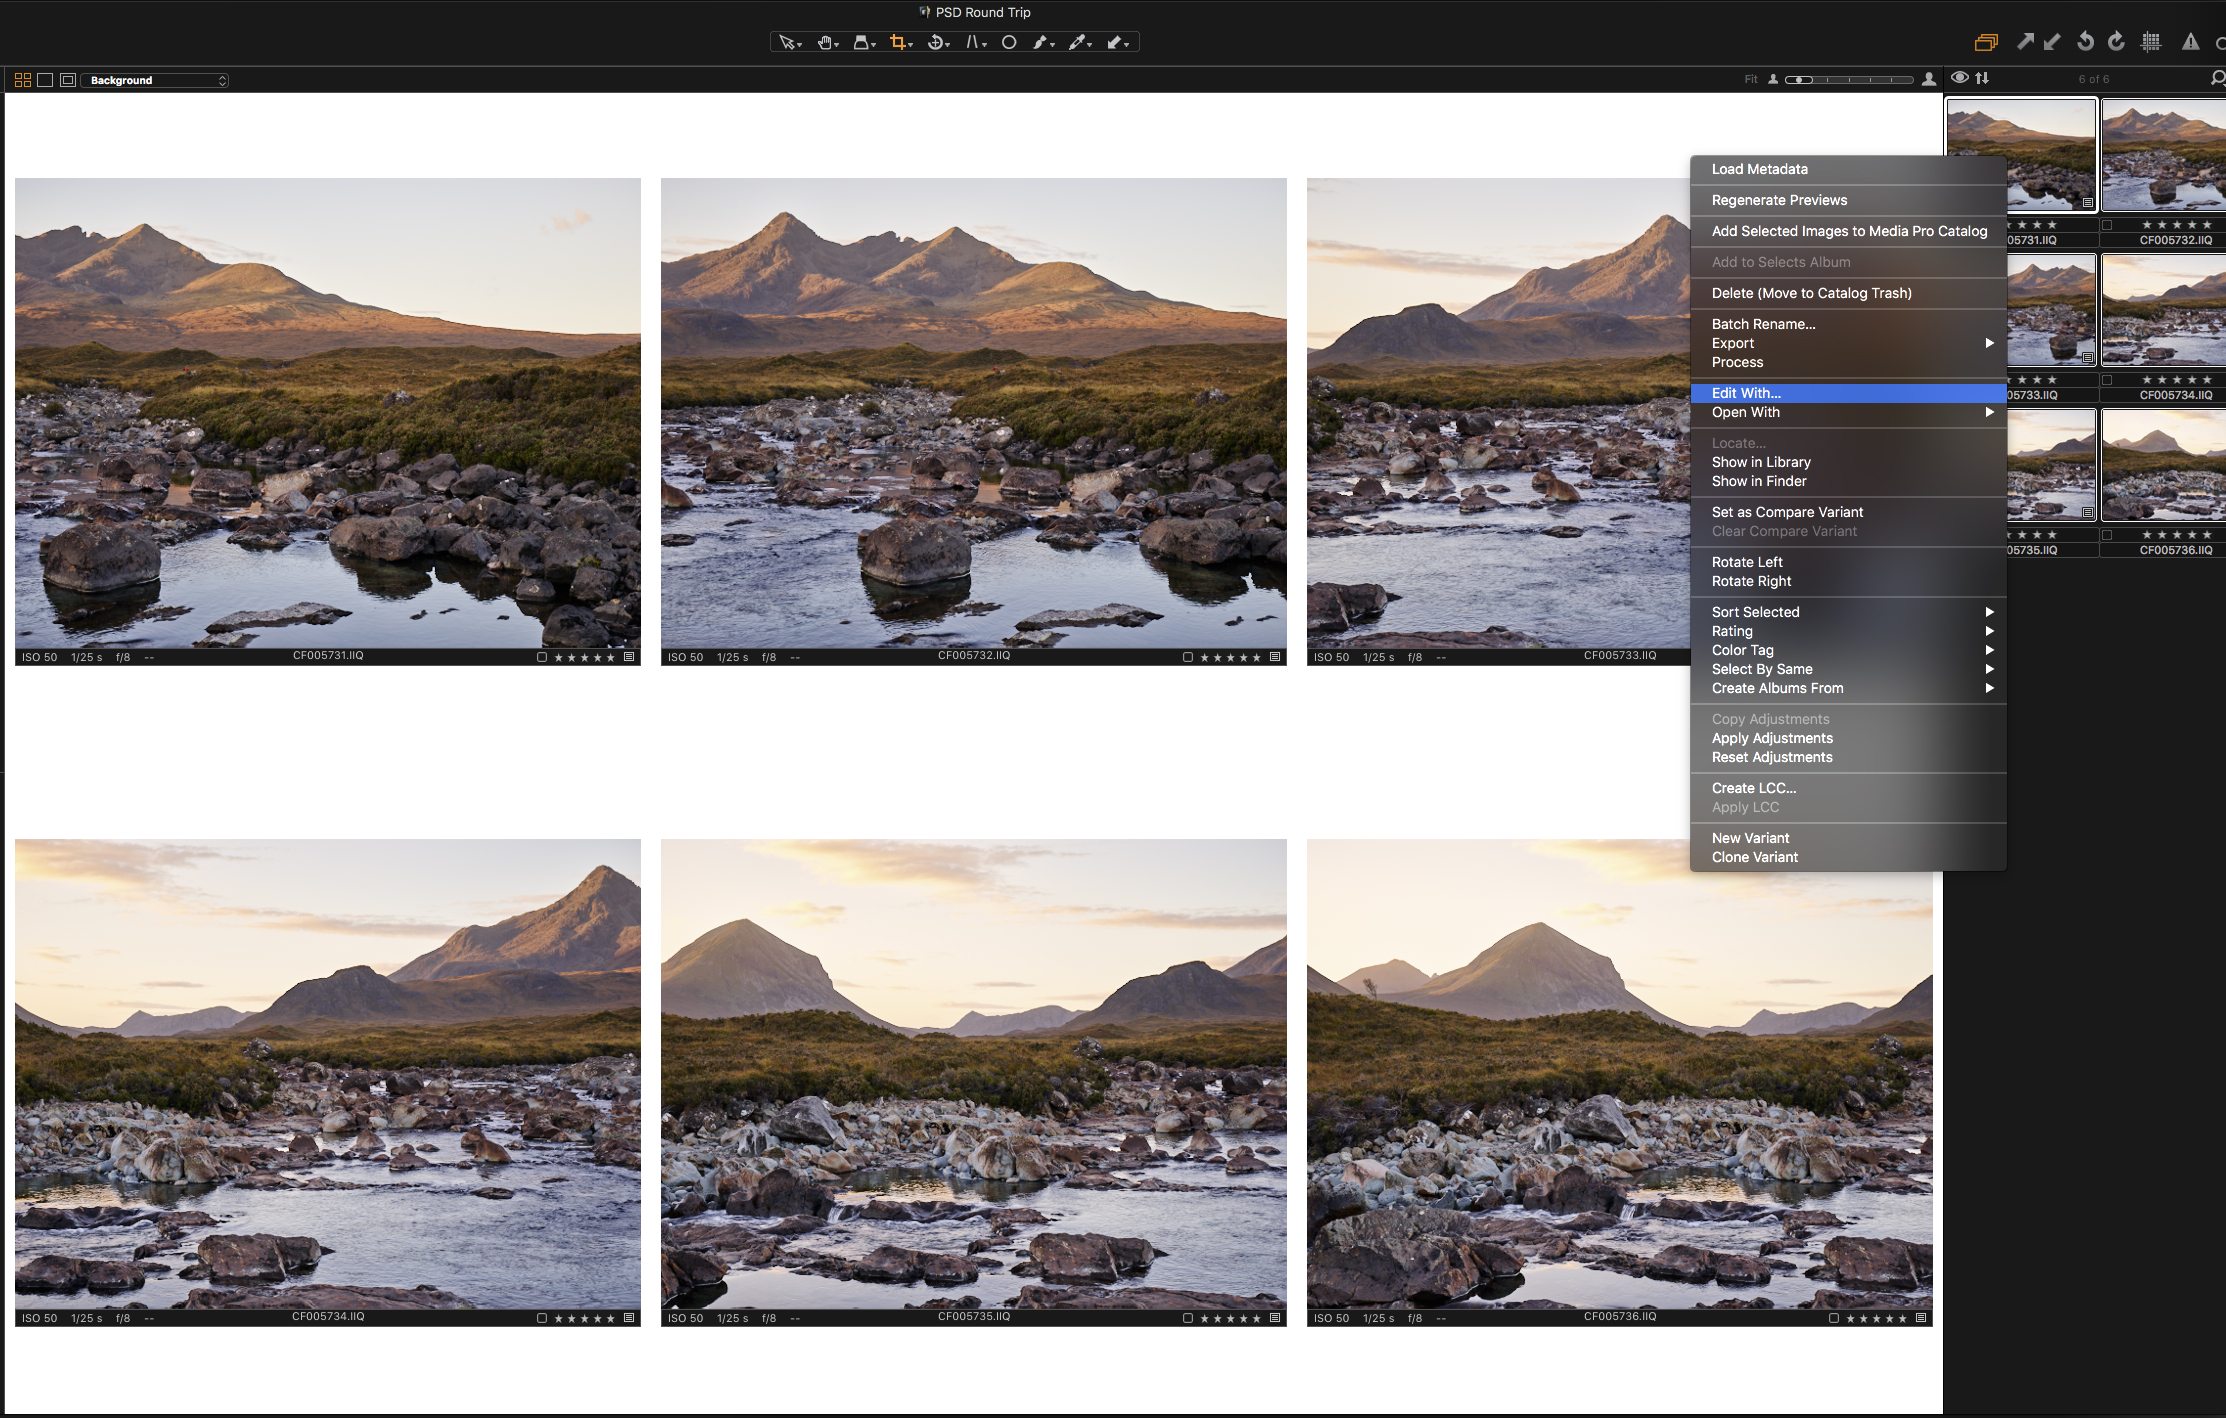
I can edit a RAW in Capture One Pro. I can then right click that RAW, when it’s ready to move to Photoshop, and choose Edit With… from the Right Click menu.

I edit the PSD in Photoshop, stitching, stacking, retouching, etc, and then save the PSD in the same folder as the RAW files.

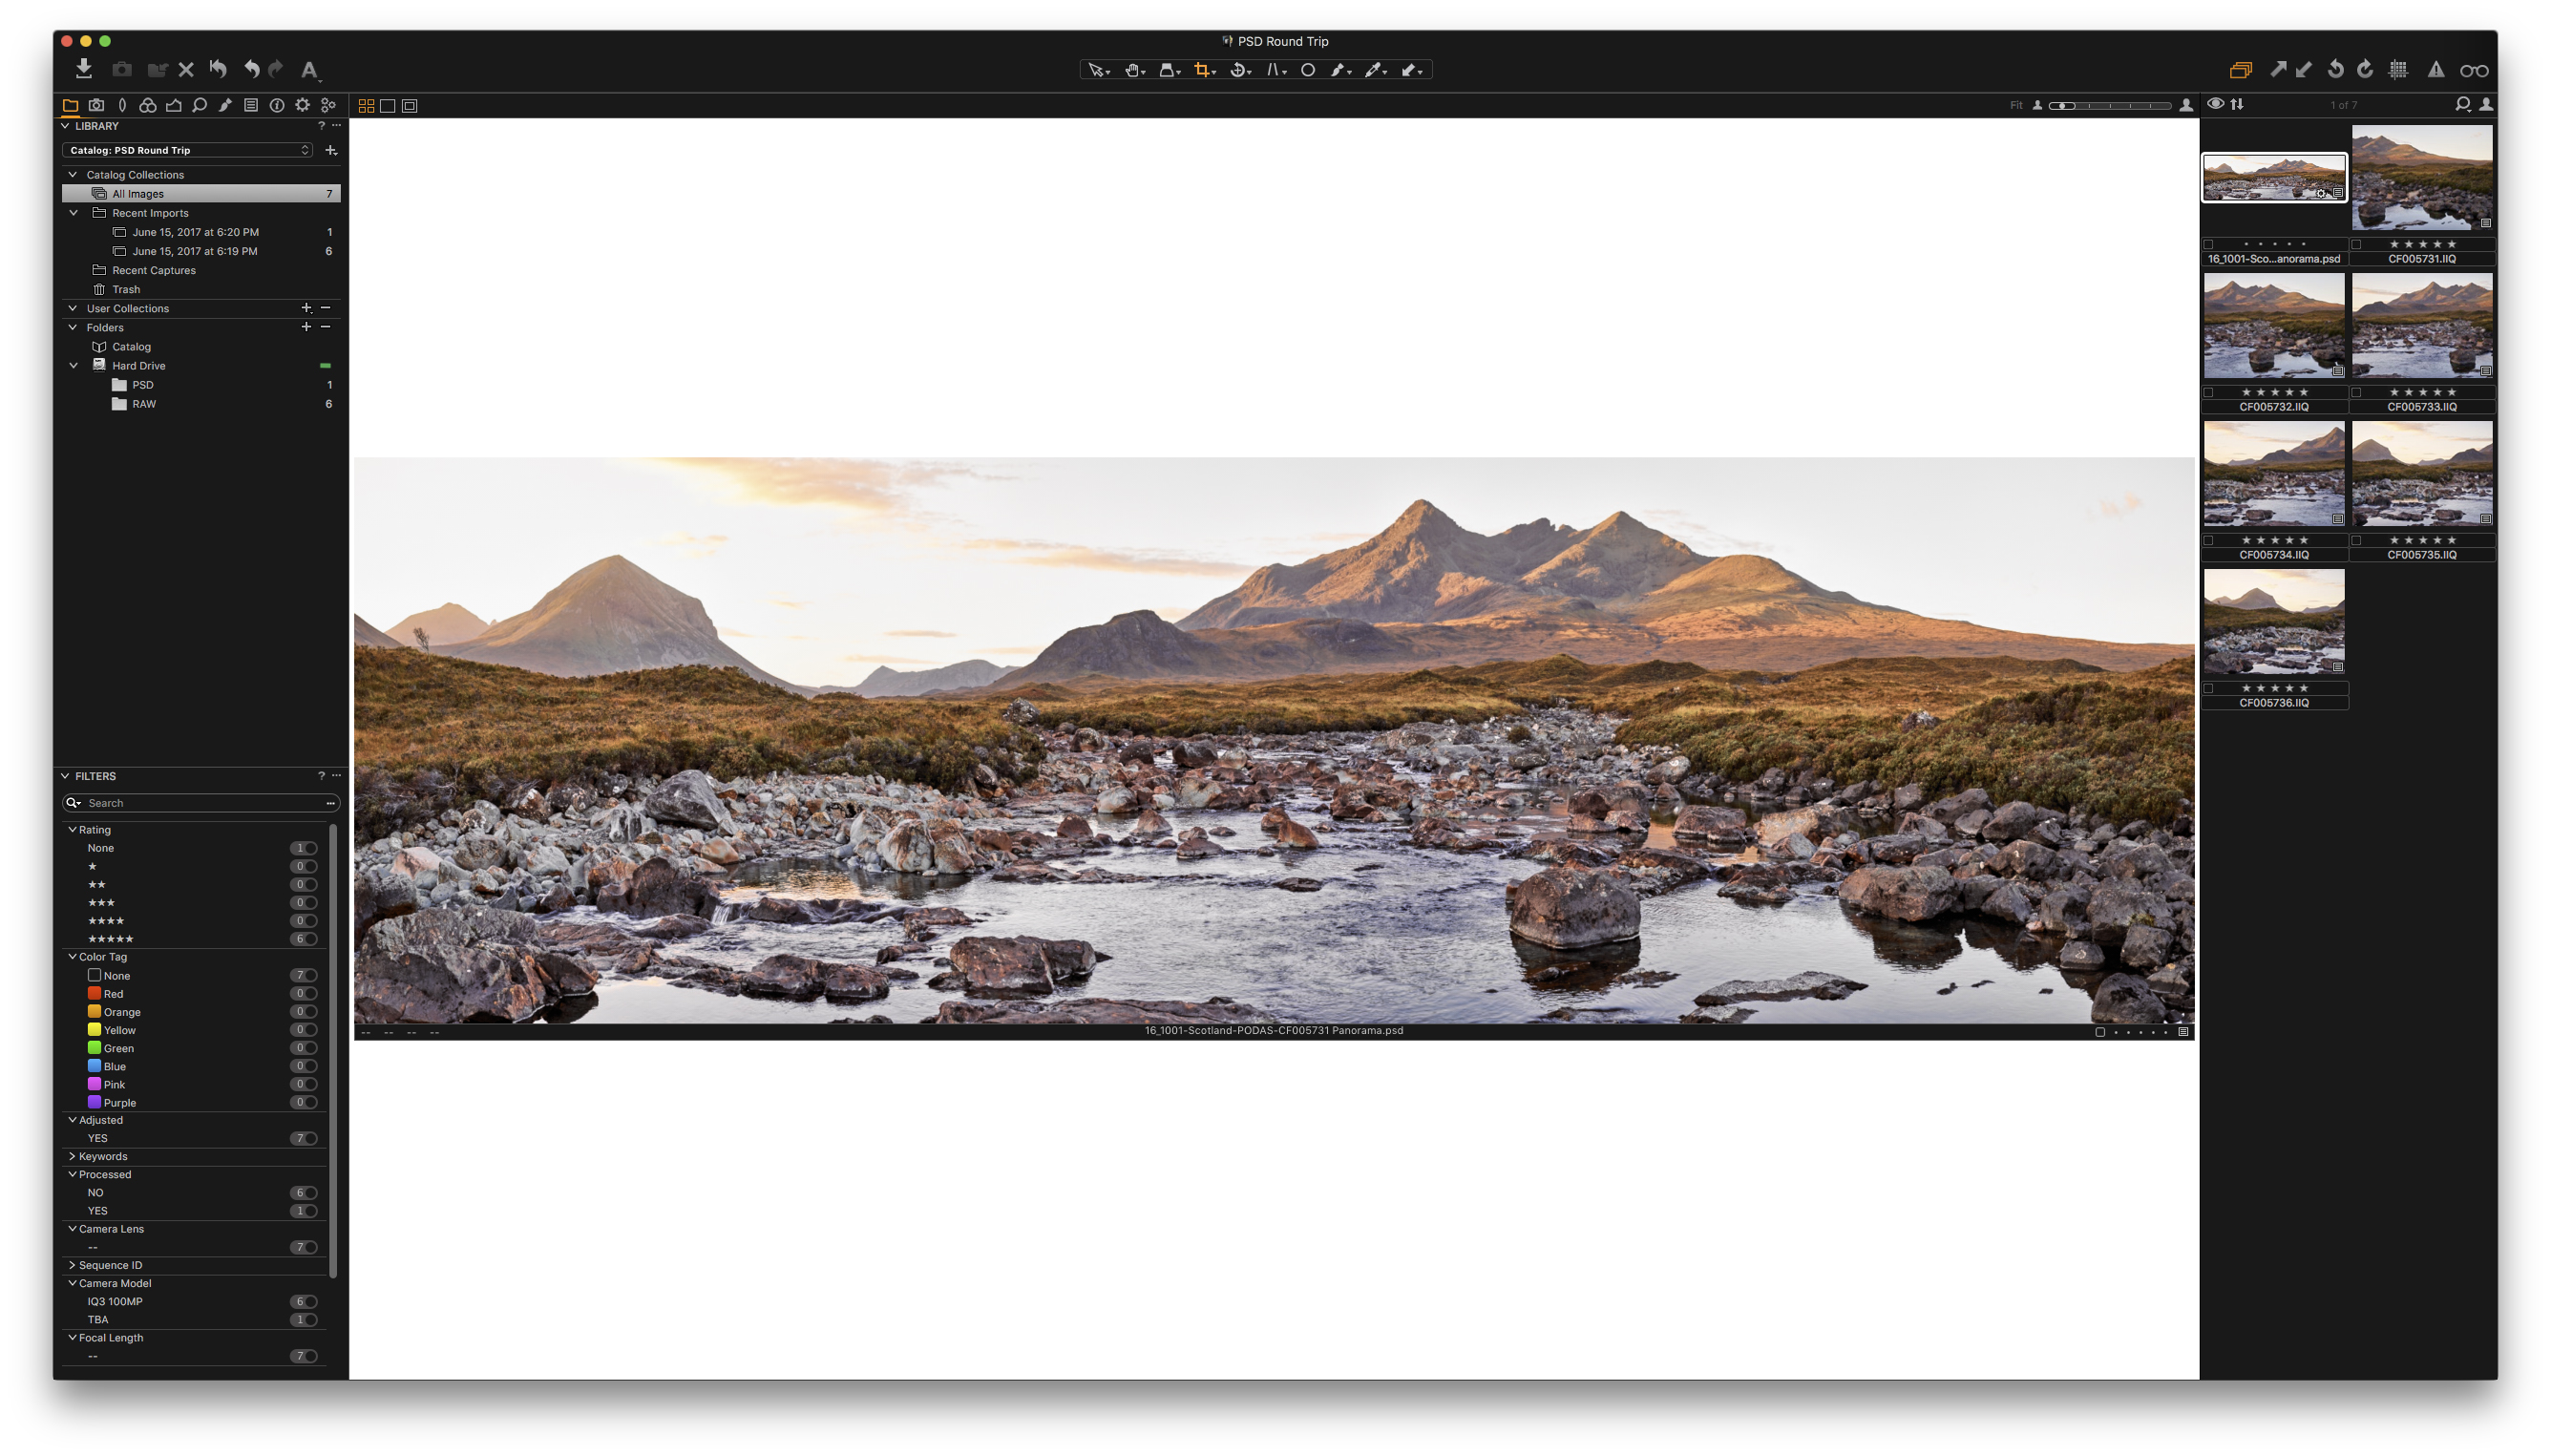
I now have a PSD alongside my RAW’s that reflects my edits. I can choose to continue editing in Capture One Pro if I wish, but when I’m ready I simply process the PSD to the final formats I need (TIFF/JPEG) and I’m done. Simple and clean.

Edit With

Final Capture One Pro structure after editing the PSD

Final image after editing the PSD in Capture One Pro

The Importance of Professional Tools

In a way, Phase One is paying me to say this, but you’ll have to trust me when I tell you that they didn’t come to me to write about this change. I volunteered. I jumped at the opportunity to tell as many people as possible about the potential this small change has on a bigger, and common, workflow.

Capture One Pro is, without a doubt, a professional piece of software. Though it’s not for everybody, I firmly believe it should be. With the ability to customize a workflow to suite your exact needs, and the underlying features to make seemingly anything possible, it’s a software that has everything to offer a photographer and asks for nothing in return (aside from $299 USD).

It is designed and delivered by dedicated individuals who listen to the needs of photographers and it is built to help propel professional photographers the world over.

Ultimately… this is pretty great and I highly suggest you check it out.

Download a 30-day trial and see for yourself what Capture One can do for your workflow.

Sign up for the webinar

Using the Wacom Mobile Studio Pro in the Field

Recently, I was lucky enough to borrow a new Wacom Mobile Studio Pro for a few weeks, as I was keen to try this as a tethering solution in the field.

This product basically combines all the elements of a Wacom Graphics Tablet, 4k Display and a pretty powerful tablet computer to boot. As a self confessed Mac fan and Windows-phobe it was also going to be a good test if I could cope with Windows 10 as an OS as well.

The model I had on loan was the larger of the two, at 16 inches with an i7 processor. More info on the Wacom Mobile Studio Pro here

I was keen to try this in conjunction with my 2016 MacBook Pro as the Mobile Studio Pro can also act as a secondary display to this, with just a simple USB-C to USB-C connection. No adapters required!

Therefore, I thought I could a) capture in the field with the Wacom and b) transfer the data to my MacBook Pro back at home and use the Wacom’s graphics tablet abilities there.

This eventually worked out really well, when I discovered a pretty useful additional feature. More on that later!

Working in the Field

I was lucky enough to be invited on a recent workshop run by one of our American partners, Capture Integration. This workshop was based in Bluff, Utah, which is an ideal base for exploring such sites as Monument Valley and the Valley of the Gods. So I decided this would be a good excuse to test the Wacom, as I figured there would be lots of standing around waiting for the sun to come up… or go down.

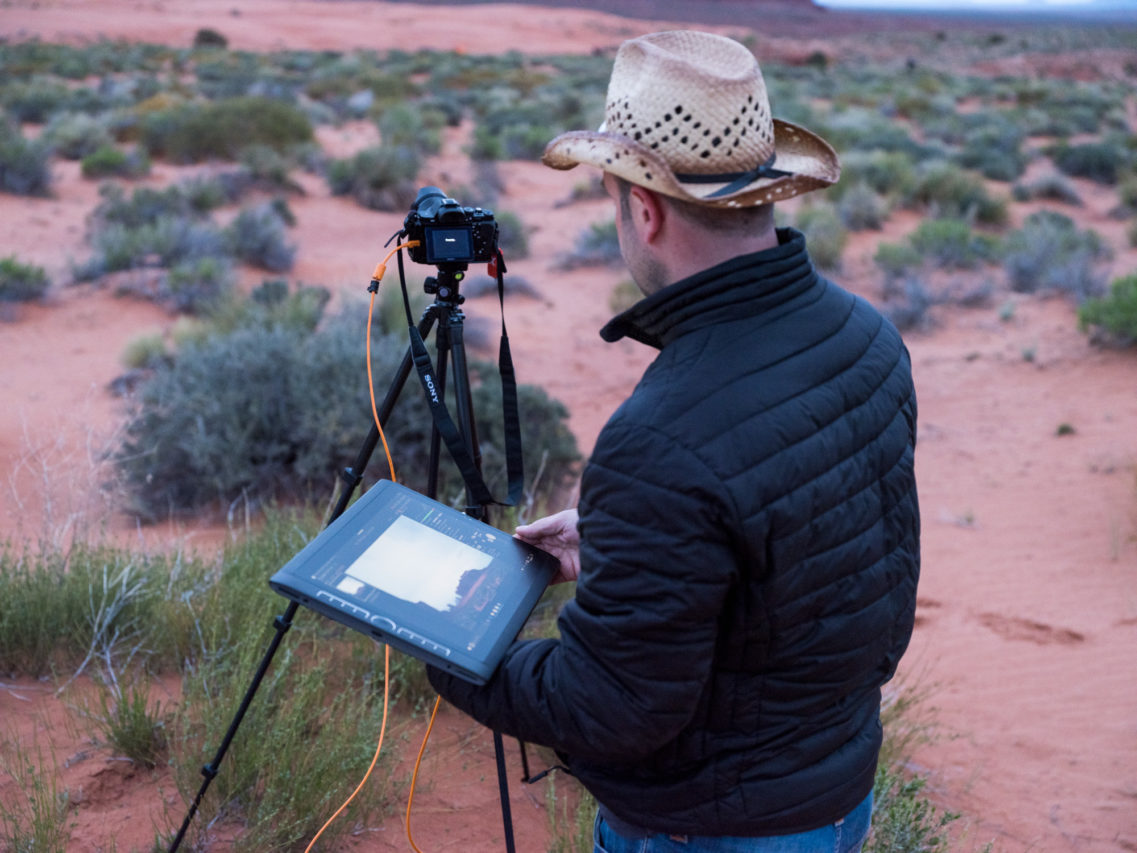
As you can see in this image, I have my Sony A7 connected directly to the Mobile Studio Pro, running (at this time) a beta release Capture One 10.1.

By the way, the hat is optional, but its the full desert look.

The Wacom only has USB-C connections, so to tether a camera, you simply need a USB-C to USB cable or a simple adapter. I already have an adapter I use for my MacBook Pro and that worked just fine on the Wacom too.

I used a Tether Tools cable as you can see as well, in their distinctive orange!

Capturing tethered was simple and fast. No break downs in connection and its nice to be able to connect quickly with the universal USB-C connection.

The Mobile Studio Pro really showed its power and did not struggle with tethered capture, or working with images in Capture One (more on that later).

We also connected a Phase One XF100MP camera to really push it, and it didn’t complain at that either.

For longer periods of use, it would make sense to have some kind of mount so you could attach it to your tripod. Again Tether Tools (for example) have solutions for this. I had a rather skinny tripod with me, so didn’t trust the weight of the Wacom (it is well built and solid) on one of the spindly legs.

When I was waiting for sun-up, I simply sat on my camping chair, or a nearby rock and waited! The nice thing about having a tablet on your lap, is that you can shoot regularly as the light changes, and have a very high quality instant preview of the scene in front of you.

I also have full remote camera control, so I don’t have to move off my perch.

If you don’t want to carry a Wacom pen with you in the field (I didn’t as was pretty sure it was an easy thing to lose for me) then the screen can simply be enabled as a touch interface. Capture One worked well with this for all the basic operations. If you intended to do a lot of editing whilst out in the field, then having the pen would make sense for certain adjustments, like Local Adjustments.

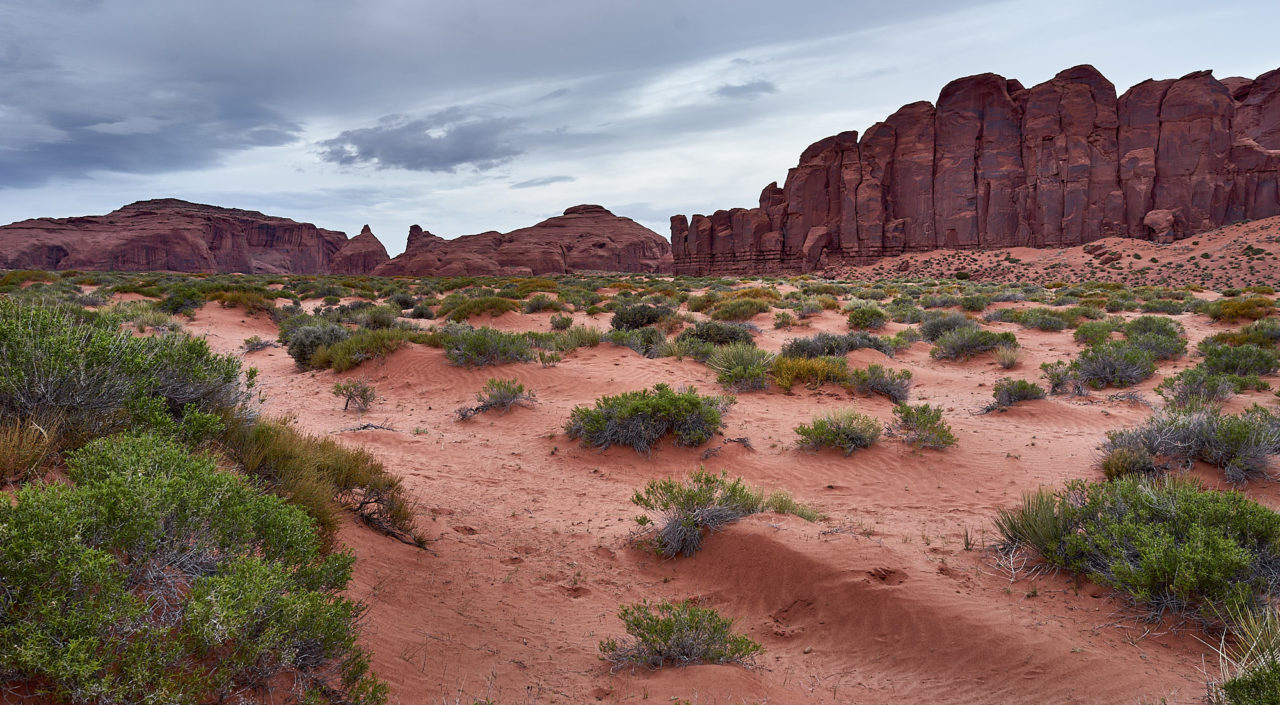
Here’s one of the images I shot tethered.

Optimising the Workspace

One very small change I made to the workspace can really help working with the Wacom, both out in the field and back at base. This does depend if you are right or left handed though, so this comes from a right hander.

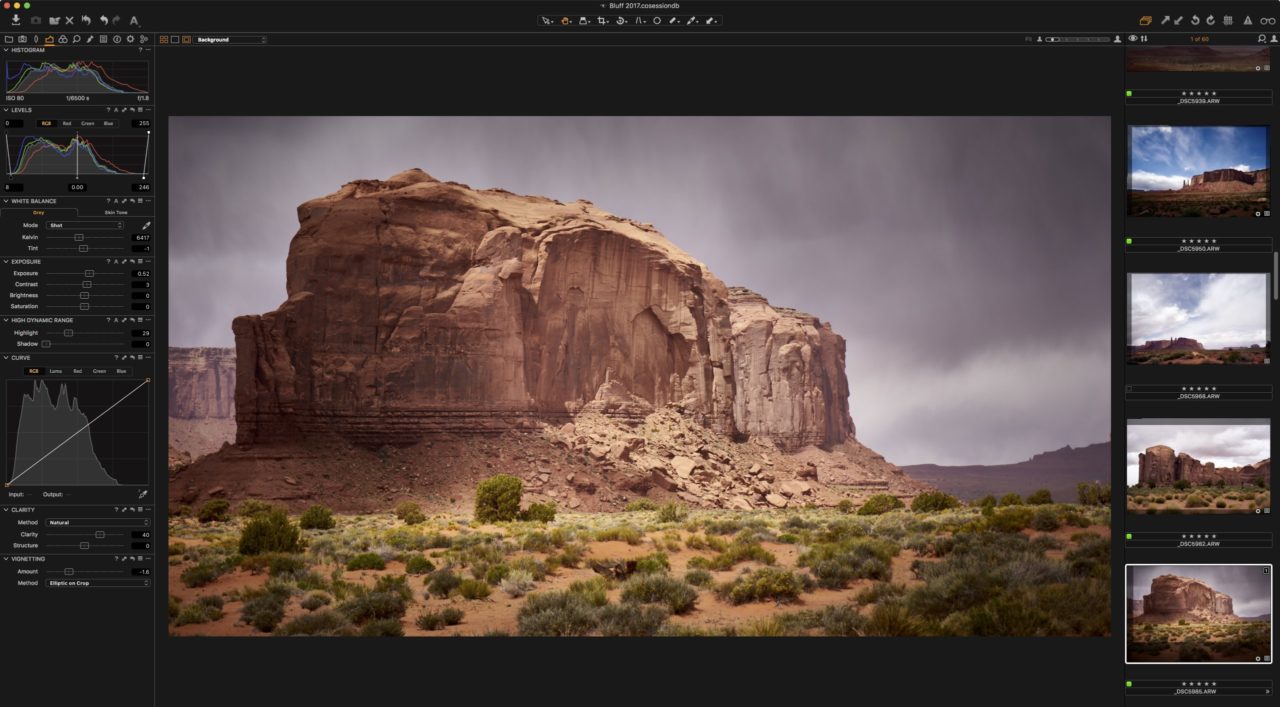
Traditionally Capture One tools are placed on the left, like this…

But this presents a problem if you are using a pen as a right-hander, as your arm will be covering up the image as you try and adjust it!

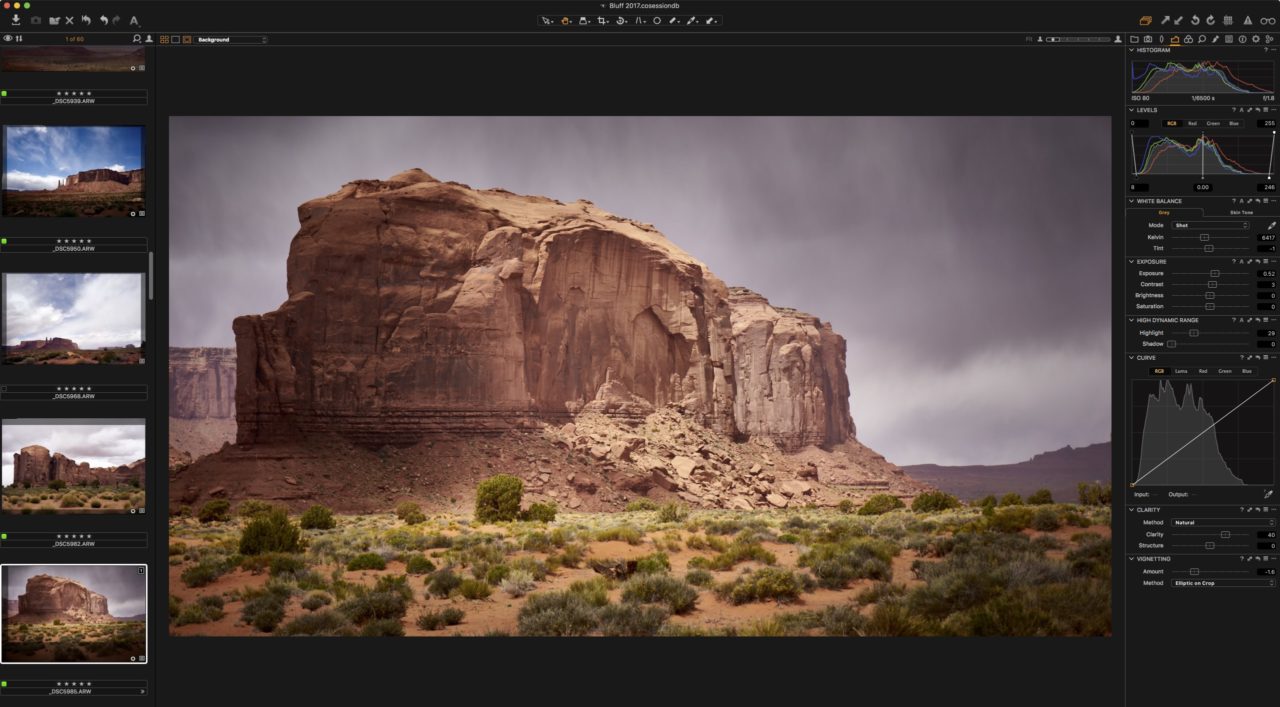
So a simple solution is to simply go to View>Place Tools Right, and then your image will be unobstructed as you adjust. Furthermore, you can use your left hand to scroll up and down the thumbnails and select too. Yes, touch input and pen input can be combined.

I showed this to a workshop participant who was using Capture One on a Dell computer / tablet. “ohhhhhhh – well that helps”. Often is the simple things that have the most gains.

Back at Base

So the real test, was to see if I could get the Windows 10 and OSX chatting happily to each other to get the images I shot from the Wacom over to the Mac. Of course, I could simply have left the Mac at home and used nothing but the Wacom for the workshop duration, but knowing that this was a loaner, I didn’t want to get too deep into customising it.

I thought of the following options for file transfer…

  1. Network them together
  2. Use a cloud storage service like dropbox
  3. Format a hard drive that can be read by the MacBook Pro and the Wacom

I figured as the internet service was next to nothing at our location, and I didn’t feel like researching the intricacies of networking Windows 10 and OSX together, the simplest solution was option 3, which is what I did.

But…. I did discover a really neat feature for the Mac User once I had connected to my MacBook Pro to use as a secondary display and tablet….

Graphics Tablet / Display Use

Fortunately, to use the Mobile Studio Pro as a graphics tablet on a 2016 MacBook Pro, you just need a USB-C to USB-C cable. For non, USB-C enabled hosts, then Wacom sell a converter that splits the signal from USB-C to a standard USB port and an HDMI port.

There is a couple of things to bare in mind :

  1. You must use the middle port on the Mobile Studio Pro
  2. The USB-C cable must be capable of supporting video. For example, your white Mac charger cable will not work! I know a few people who have been tripped up by this.
  3. To trigger the connection, flick the On/Off switch on the left hand side of the Mobile Studio Pro.

After a couple of seconds, the mode changes, and it is now acting as a secondary display, and tablet! Great!

All the usual rules apply then for working with any Wacom tablet, except (if you wish) you can be working directly on the image. This can be great for intense Photoshop work or Local Adjustments in Capture One.

Personally, I am so used to working with a ‘normal’ Wacom that I am mostly happy to just see the Image on my MacBook Pro and not take advantage of the display properties of the Wacom. But for reasons mentioned above, it can be nice to use this mode from time to time.

If you don’t want to use the display on the Mobile Studio Pro, then its important to set in the Wacom preferences to just ‘map’ the tablet to the one display, not divide it between both.

So what’s the neat feature I found that I mentioned above? Well, the Mobile Studio Pro has a built in SD card reader, which also makes it handy for use in the field. But, when connected in the manner described above, as well as acting as a secondary display, additionally you have the worlds largest SD reader attached to your Mac! Now, I use a blank SD card to act as the go-between for file transfer.

Even a windows-phobe can cope with that.

Conclusion

I very much enjoyed my short time with the Mobile Studio Pro. I didn’t have a stand for it, which I think would be essential for stand alone desk work, otherwise you will end up simply hunching over it. Also I would add a small bluetooth keyboard.

Learn more about the workflows used in this blog post by visiting our User Guide:

Tethered Capture
Customized Workspaces

Sign up for the webinar