Latest Posts

Getting started with Capture One Fujifilm

In this introductory webinar, we will make sure you know exactly how to get started, and in turn hit the ground running with Capture One and why you should try it out.

In this webinar, learn about :

✓ What is Capture One? (compared to other photo editing tools – what can you expect?)

✓ Get orientated with the interface

✓ Understand Capture One’s unique editing tools

Length: 60:00 minutes

Download a 30-day trial of Capture One Pro.

Sign up for the webinar

Joe McNally capture one webinar

Capture One with Joe McNally

In this Webinar, David is very excited to be joined by Nikon Ambassador Joe McNally.

An editorial photographer of long standing, Joe is known for portraiture, fashion, commercial assignments and large production work.

Joe recently joined our ambassador program and is a recent convert to Capture One.

In this webinar, learn about :

✓ Capturing for the edit

Getting it right in camera is paramount, and that is Joe’s history. But the introduction of Capture One Pro to his workflow has opened a world of possibilities in the realm of editing.

The powerful, simple, tools of Capture One are allowing him to elevate the impact, color, and graphic nature of his images, while remaining completely true to the spirit and intent of the original capture.

✓ Editing tips in Capture One 20

Moving fast and efficiently to achieve an excellent result, and exporting in various formats for immediate use.

Don’t miss out on this opportunity to learn from one of the best in the field.

Download a 30-day trial of Capture One Pro.

Sign up for the webinar

Discovering the beauty and potential of post–production with Joe McNally

NOTE: This article discusses an older version of Capture One Pro. To learn more about our latest version, click here.

Acclaimed photographer Joe McNally has shot National Geographic covers and built an award-winning career in commercial and editorial photography. Explore his portfolio and discover why Capture One changed his mind about post-production.


My career as a commercial and editorial photographer has taken many twists and turns – aerial photography, fashion, sports, news, and studio portraiture. I’m a generalist photographer, and ever since turning the corner from film to digital years ago, I have always regarded the world of post-production with a certain wariness. Introducing Capture One into my photo editing workflow has truly invigorated my photography process.

I grew up admiring photographic heroes, redoubtable shooters whose work adorned the pages of LIFE and NationaI Geographic. I wanted to be them. Without being too corny, I identified my mission with terms I swiped from the motto of LIFE magazine. “To see life; to see the world….”

Seventy countries and many assignments later, I’m still curious, and I still have a camera in hand. In this blog post, I’ll do bit of a tour through the world as I have been lucky enough to see it. I graduated from the school of Kodachrome, so I have always strived to capture what is in front of the lens, in all its completeness, beauty, and flaws, without much fuss after the capture. For me, for many years, the click of the shutter was the end of the process, not so much the beginning.

That is why Capture One is such a natural partner for me. I can push and pull my digital files with ease and grace, not overstepping, and allowing the original photo to speak.

All digital files need a measure of post-production – especially within the realms of fashion and beauty where you can let your imagination run wild. But, for many subjects I’ve encountered, a measure of beautiful tweaking is still necessary. With Capture One, I am finding that all things are possible, from the slightest push to a powerful influence.

To note, I am still learning the program, and that learning process is itself a strength of Capture One. I have never encountered a processing tool which is so friendly in its outreach, as lucid in its lessons, and as giving in its simplicity. The tutoring available to you as the photographer is as explanatory as possible, and you build your skills in a simple and straightforward way. I have seen many retouching classes where the students walk out more confused than when they sat down. This is not the case with Capture One. They really do want you to understand how to use the program, which is refreshing.

Capture One is a fully professional program that can take me from capture in the field to finished product in an approachable, understandable way. It has helped me to take on the world of post–production with more confidence. It’s powerful, and somehow, simple, in many ways.

Aftermath of War

“Aftermath of War”  In northeastern Rwanda, on the Congo border, a lone refugee child stands isolated and framed by what was at the time one of the world’s largest refugee camps set on the volcanic slopes of Mount Nyiragongo. The aftermath of the Rwandan Genocide spurred one of the greatest humanitarian crises of all time, as refugees flocked across the Congolese border, seeking shelter. Shot in a panorama format, in keeping with the mandate of the story for LIFE magazine, which was published under the title of “The Panorama of War.” Camera Specifications: Fujifilm G617. Approximately f/11, 1/60th of a second, shot zone focused with a cable release on a tripod. Transparency film, Fuji RVP ISO 100

Dramatic Power

“Dramatic Power”  Wonderful athlete and Vegas headliner Manu strains against a truck tire (hung from the ceiling in the studio) for an illustration of strength and athletic prowess, not to mention the sheer beauty of the human physique. Strobe lit scenario, emphasizing musculature and the dramatic B&W play of highlights and shadows. This is another strength of the Capture One program. Conversion to B&W is seamless and powerful. Camera Specifications: Nikon D810 Camera. 70-200mm f/2.8 lens, ISO200, f/8, shutter 1/200 sec. Manual mode at camera.

Crime Scene

“Crime Scene!”  A laundromat in Brooklyn is transformed into a crime scene via gesture, characters and lighting. Murder and mayhem in the elevated world of ballet! This type of shot is perfect for the color sliders in Capture One. By using the color picker, I can isolate a color, and the program will respond by emphasizing and saturating that particular color. Wonderful hands on control for post-production of this picture.
A fun BTS video of the shoot here: https://youtu.be/zQLVoAqUkco Camera Specifications: Nikon Z7 camera. 14-30mm lens, ISO1600, f/11, shutter 1/15 sec. Manual mode at camera.

Cuba Farmer

“Cuba Farmer”  A simple window lit portrait. A classic face in a beautiful ratio of light and shadow. I pulled this raw file into Capture One and was able to enhance the drama of the light, and thus emphasize the beauty and character of the man’s face. Camera Specifications: Nikon Df Camera. 28mm lens, ISO100, f/3.5, shutter 1/50 sec. Aperture Priority Mode, Exp. Comp, -1.3

Future flight

“Future Flight”  Much of the future of flight will be unmanned, especially in the arena of war. This pilotless drone sits on the runway at early sunrise, its shape and wings clearly a harbinger of the future in the sky. This was part of the first all-digital coverage in the history of the National Geographic Magazine. Shot on early digital technology, I was able to take this older file into Capture One,
and simply bring it to life with color and contrast. Camera Specifications: Nikon D1X camera. 24-70mm lens. ISO125, f/5.6, shutter 1/2 sec. Manual mode at camera.


Easy in the Air

“Easy in the Air”  I have worked with dancers for many years, and one of the principal reasons, beyond the sheer beauty of dance, is that dancers can effortlessly (seemingly!) embody and physicalize your imagination at the camera. Here, dancer Jeff Mortensen goes aloft, nonchalantly reading the newspaper, his morning beverage flying in his wake. The subtle middle tonalities of this pictures, holding detail in shadows and whites is another discovery for me in Capture One. The High Dynamic Range workspace has been amazing to me. Camera Specifications: Nikon D3X. 70-200mm lens. ISO100, f/5.6, shutter 1/250 sec. Manual mode at camera.

Sign up for the webinar

Healing brush tool 2020

This new tool is every retoucher’s dream

NOTE: This article discusses an older version of Capture One Pro. To learn more about our latest version, click here.

Capture One’s new Heal Brush “is every retoucher’s dream” says commercial
retoucher Pratik Naik. Get his tour of the new tool plus expert tips on how to use it.


The new heal brush in the latest Capture One update has photographers and 
retouchers rejoicing around the world. In this blog post, I’ll take you through the new tool – and be sure to start by watching the video to get a visual for how you apply it to an image.
 

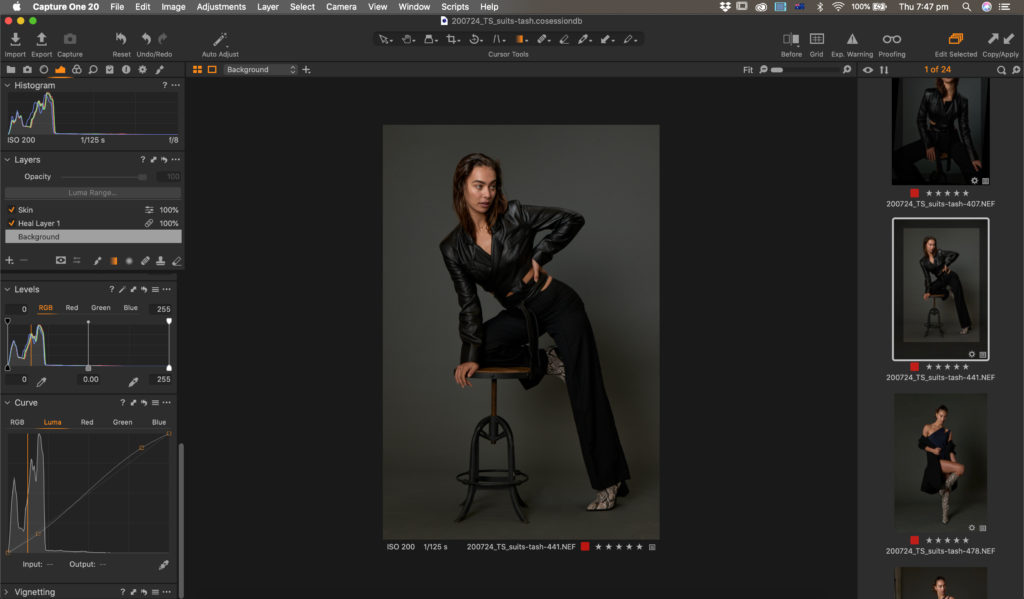
The Heal Brush icon is found in the Layers panel – once activated, it will automatically add a healing layer. Now, you don’t need to add additional healing layers because you can make as many adjustments as you like using the Heal Brush within that one layer. There’s no upper limit for the number of healing adjustments you can make, either. 

Healing brush location and icon

Be default, all you need to do is highlight the element or object in your image that you’d like to remove and Capture One will cover it up by calculating the best possible source point for cover. With the improved coding, the results are better than ever and you get realistic precision in even the most complex situations.   

Sometimes, you will want to manually select the source point for your retouching. In these instances, you can either move your source point after the healing is done or use it in the traditional sense by sampling a source point first by holding “Alt” or “Option” and then picking one before you remove anything. This gives you a solid handle of any situation, even with complex objects like hair or the edges of lips. 

The response time of the tool feels almost immediate, so your workflow feels as fast and seamless as possible. Within the Brush settings menu in the Layer palette, you are also able to turn off the arrows that connect the source point to the result, should you start building them up too quickly. This will give you a clean image to work with without any visual cues.

Healing brush arrows

 You can also erase or delete any particular healing action at any time. 

Saving my favorite part for last, you can now reduce the brush size and still know exactly how small it is. The cursor will still retain a circular shape to ensure you can work on the smallest details! It will never change to a + icon below a certain brush size, giving you the ultimate control with your layers. 

Get a free trial or update your Capture One to try it now – I hope you find it as exciting as I do. 


Sign up for the webinar