I am not sure if I have the correct workflow, but it seems to work well for me. My approach is to expose for the highlights and let Capture One bring out the shadows.
Now, up front I have to emphasise that there is a problem with this technique, and that problem lies in the shadow areas. If I am underexposing my image to ensure the sky doesn’t clip (isn’t overexposed), then darker areas in the image might be receiving very little exposure. This isn’t necessarily a problem if I want to leave these areas dark in the final rendition, but if I want to lighten them, then the really dark areas may lack the quality I desire if I lighten them too much.
However, when using a medium format digital back with a wide dynamic range, I find that I can comfortably lighten up the shadows without too many problems, most of the time.
This would not necessarily be the case with a DSLR camera which has a narrower dynamic range. If using a DSLR, I would be better off bracketing my exposures and using a better exposure to lighten up the dark areas. I also bracket with my medium format back as well, as insurance, but I find I don’t need the lighter file very often.
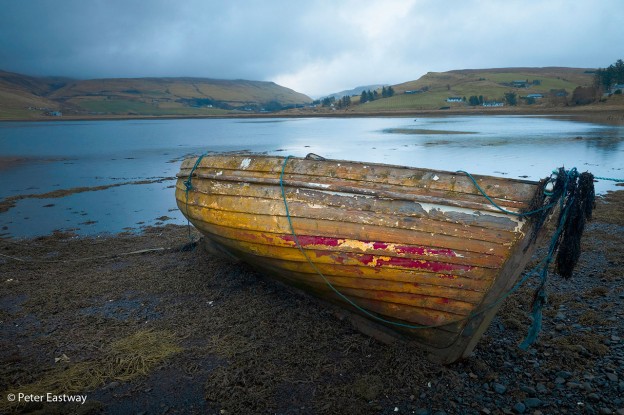
 This photograph of a dingy in Loch Harport on the Isle of Skye is a case in point. The original exposure is very dark in the foreground, but the sky is just about right. The camera wanted to give the image a little more exposure, but I used the exposure override to keep the histogram under control. I am always looking at my histogram for this type of work.
 Using a Local Adjustment, I brushed in the foreground and lightened it. At this size and looking at a low resolution file, it shouldn’t look too bad. There’s lots of detail to be found and, as I still want to keep some blacks in this area, I’m comfortable with the result. However, as noted above, I could possibly improve the quality of this area by using another exposure which better accommodated the shadow areas, and stripping it in. But that’s a lot of work unless I plan to turn the image into an exhibition print. For book reproduction (where this image was used), the current workflow approach is more than adequate.

The late afternoon light was relatively colourless, so I added in a second Local Adjustment and helped the dingy out with a little more colour. I generally don’t change the colours that are already there, finding that an increase in colour saturation is often enough, but for the dingy I preferred the result when I also warmed up the hue. Bringing out the yellows and reds helps.
 Warm colours come forward, cool colours recede, so I added in a third Local Adjustment and made the water and clouds a little blue. This adds to the mood a little and removes a little bit of the murkiness, plus creates more of a separation between the dingy and its background.
 And the final step, as shown in the opening photo, was to add one more Local Adjustment and lighten up the dingy itself, giving it a subtle ‘spot light’.
Peter Eastway is a professional photographer and photography magazine editor based in Sydney, Australia. To see more of his photography, visit www.petereastway.com. Peter also offers an online Landscape Photography MasterClass. It contains articles and videos, outlining his camera and post-production techniques. Details can be found at www.betterphotography.com.


