Latest Posts

Exporting Original Files from Catalogs in Capture One Pro 7

In some situations you may wish to export a raw image file that have been adjusted from a Catalog.

This could be to:
–  Import the image into another Catalog database
–  To continue working on the file on another computer
–  To send the raw file to another person for further adjustments

When working within a Catalog in Capture One Pro 7, adjustments for each image are stored within the Catalog database and not in image sidecar files. To get the original image file with it’s adjustments, you therefore need to use the Export Originals option.

A raw file with adjustments can then be imported normally via the Import Images menu.

Step 1: Exporting the raw file with adjustments

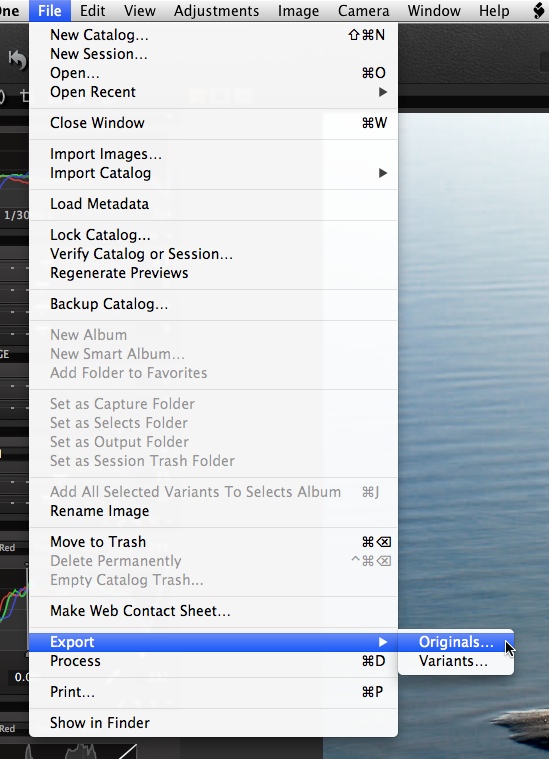
When you have finished your adjustments on one or more images in Capture One Pro 7, choose File>Export>Originals.

2012-12-04_15-46-20

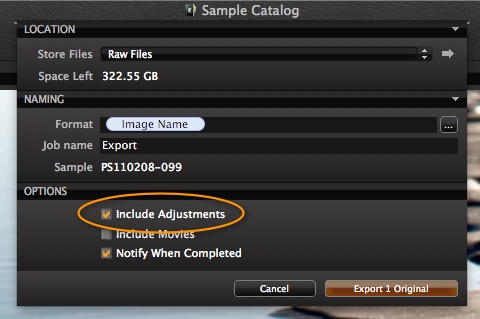
The following Export dialogue will then appear:

2012-12-04_15-48-23

Simply choose a location under Store Files and make sure the Include Adjustments box is checked.

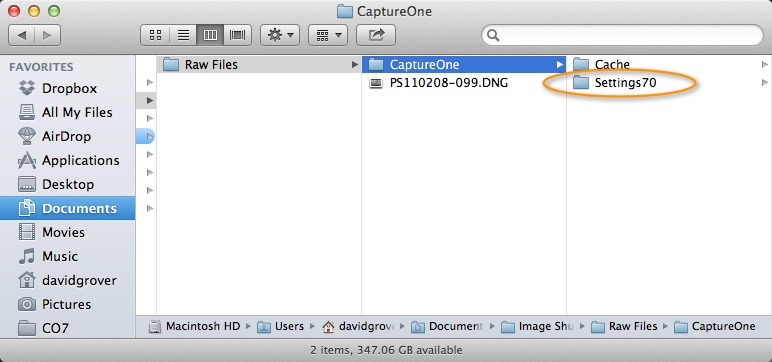
When the export has completed, the raw file will be exported alongside an additional folder called CaptureOne.  The Settings70 folder contains all the necessary information for Capture One to apply the adjustments made to the file before the export.

2012-12-04_15-54-42

Step 2: Importing the raw file with adjustments

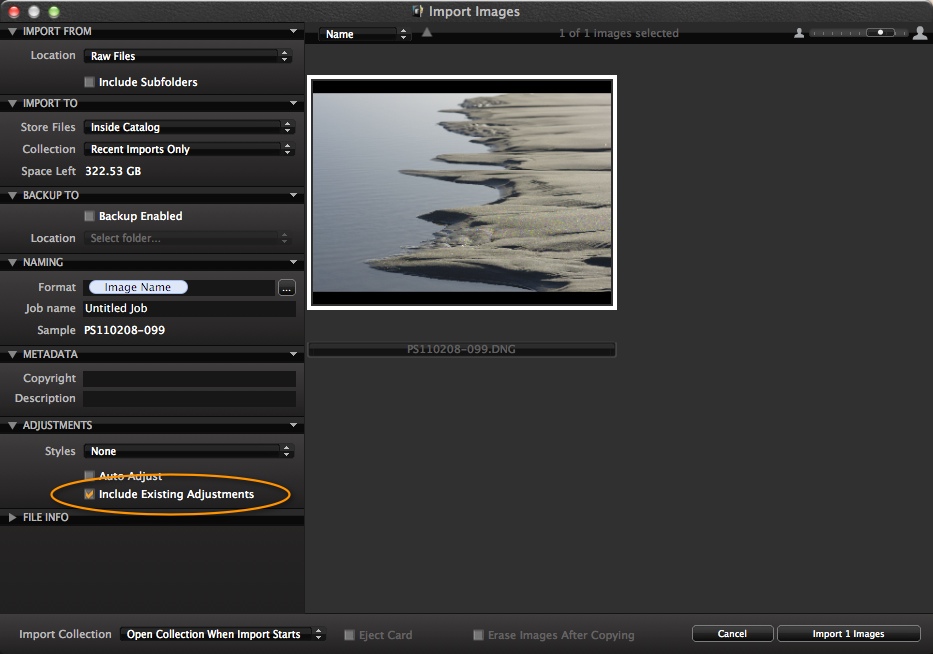
When you are ready to import the image again, open the Import Dialogue, choose the location of your exported originals and make sure the Include Existing Adjustments box is checked as shown below.

2012-12-04_15-58-51

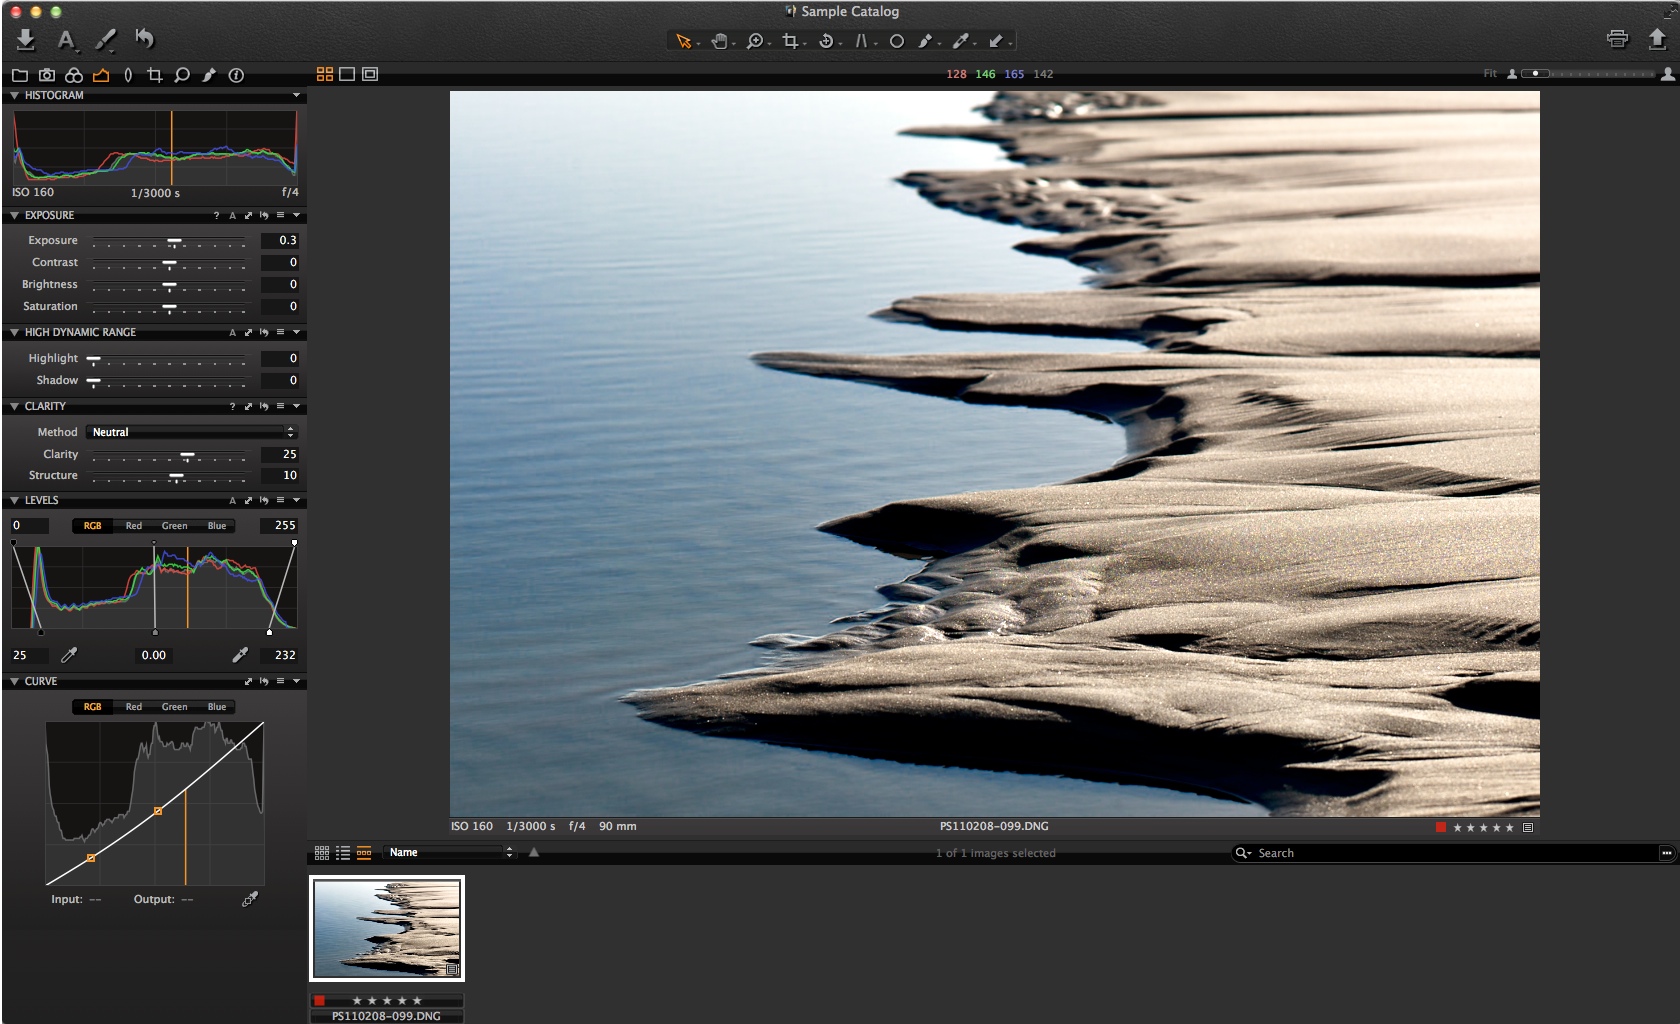
When the import process has completed, the raw file will show in Capture One Pro with the adjustments.

2012-12-04_16-00-53

Remember, you can also do this with batches of multiple images to speed up your workflow.

All the best,

Niels

Sign up for the webinar

Capture One Pro 7’s Improved Local Adjustments Tool

The Local Adjustments tool in Capture One Pro 7 has been improved on a number of parameters giving you better corrections and more precise control.

These improvements cover:

  • Additional adjustment layers (a total of 10)
  • Greatly improved brush drawing speed
  • Brush opacity setting
  • Support for tablet pen pressure
  • Gradient masks
  • Auto masks
  • A new layout for simulating the brush size and hardness of the cursor tool

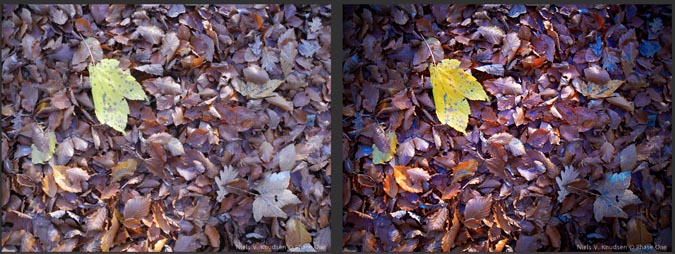
Tip704 Img2 675The image to the left is without any adjustments. Even though the sun strikes the yellow leaf, it is a kind of diffused sunlight and the scene looks quite flat. The image on the right was edited in Capture One Pro 7 using the improved Local Adjustments Tool. The tool was used to emphasize the stroke of sunlight, to draw attention to the contrast between the yellow leaf and the surrounding brown leaves.

New brush cursor tool

Tip704-img3-full_circles

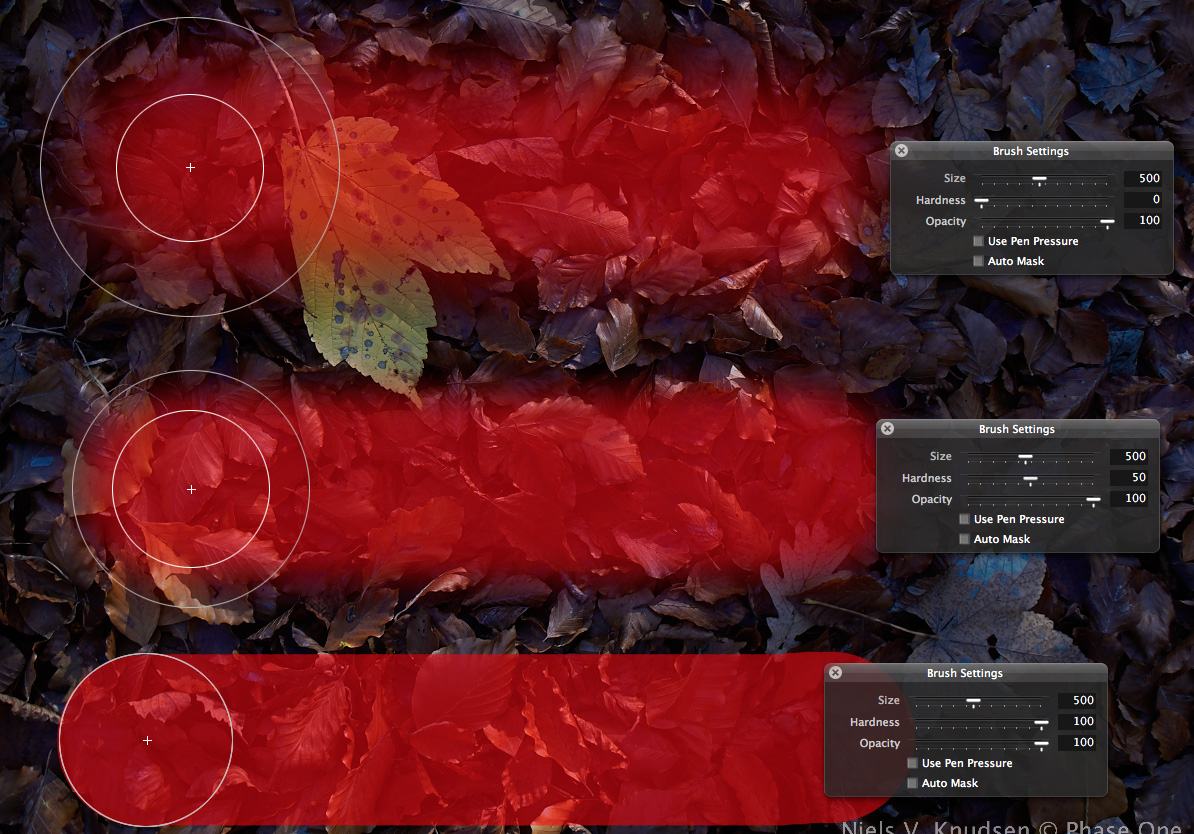
The new brush now has two rings for easier indication of the size and hardness. The inner ring indicates where the brush is at 50% of its maximum intensity. The outer ring indicates where the brush intensity is less than 2%. In the example above, you will notice that all three strokes have been done with the same size brush and only the hardness of has been changed. You will also notice that the inner ring is the same size for all 3.

Tip704-img4-full_circles

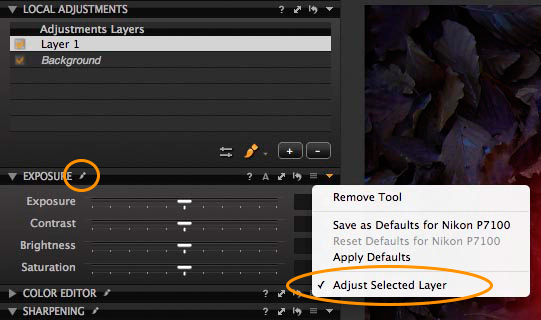
Capture One Pro 7 now also comes with an extra control option that makes switching between working in an adjustments layer in the Adjustments Tool Tab and working in the background layer in any of the other Tool Tabs easier.

In the screen dump above we see that the “Adjust Selected Layer” option is selected for the Exposure Tool in the Local Adjustments Tool Tab. We also see a small brush icon next to the tool label, which indicates that this option is turned on. All tools in the Local Adjustments Tool Tab will have this option turned on by default, and all tools in other tool tabs will have this turned off by default.

This way you can easily switch from the Local Adjustments Tool Tab to any other tool tab and ensure that the adjustments you do there only affects the background layer.

All the best,

Niels

Sign up for the webinar

Amazing Highlight Recovery with Capture One Pro 7

In Capture One Pro 7, we have introduced a new processing engine improving the image quality on a number of different parameters such as the way the software now deals with extreme highlights and data close to being clipped.

These aspects have been dramatically improved and now have:

  • Larger range for how much overexposure that can be recovered
  • Color precision is greatly improved in recovered areas
  • Much smoother transition to clipped data
  • More detail in the highlight areas

Camera generated JPG                            Capture One Pro 6                   Capture One Pro 7

The image above shows three different versions of the same shot. The left side image is the JPG that was generated in the camera. The center image is the result of recovering highlights in the raw file using Capture One Pro 6. The image to the right is the same raw file but now processed in Capture One Pro 7.

Using Capture One Pro 7 it was possible to recover almost all the detail and color tones in the overexposed areas of the swan by using only the Highlight slider in the High Dynamic Range tool.

Visit the blog to see more examples of the improved ability to recover highlights

Below is another example of the new and improved processing engine’s ability to recover color and detail by using Capture One Pro 7 on a raw landscape image.

Camera generated JPG                     Capture One Pro 6                                 Capture One Pro 7

With the JPG file, it is not possible to recover any color and detail in the sky. By processing the raw file in Capture One Pro 6, you can recover most of the sky, but the color information is wrong and the missing color information will show with hard transitions. With Capture One Pro 7 however, it is possible to recover both the detail in the clouds and the color of the blue sky in a natural and pleasing way.

For both raw files, the High Dynamic Range tool was used to recover the highlight detail. Some global saturation was also added.

When shooting landscape images using natural light, it can sometimes be quite challenging to control the highlights as you cannot control the light source. And even when you can control the light, you may still need the ability to recover highlights.

Many of us have tried shooting a portrait in the studio only to misadjust the flash just as the expression was just perfect, like in the example below.

Raw file – way overexposed                                                     Capture One Pro 6 recovery

This image is totally overexposed due to a human error with the flash and even though Capture One Pro 6 can recover a majority of the image, it will still require many hours of retouching to save it.

However, with Capture One Pro 7 it is possible to recover all the highlight detail.  The image above has only been adjusted by using the Exposure tool globally as well as the Exposure tool in a Local Adjustments mask in Capture One Pro 7.

All the best,

Niels

Sign up for the webinar

Catalogs – Working with Managed or Referenced Image Files

In last week’s tip, I talked about the different ways of storing images in Capture One Pro 7 with either Sessions or Catalogs and the advantages of both.

This week, I will concentrate fully on Catalogs and the two different methods of storing images. These are:

  • Fully Managed Image Files (inside Catalog)
  • Referenced Image Files (current location)

Managed files are images that are stored inside the Catalog file. Referenced image files are those which exist outside of the Catalog file.

When you create a new and empty Catalog in Capture One Pro 7, regardless of whether you choose to have Managed or Referenced images, a Catalog file must be created.

Choosing ‘New Catalog’ in the file menu of Capture One Pro 7 will open this dialogue:

Here, you can choose a name for the Catalog and where it should be stored. By default, it is placed in the ‘Pictures’ folder on a Mac and in the ‘My Pictures’ folder on a PC, but you can specify any location.

The Catalog file is essentially the database for your image collection. It tracks the location of images and holds information about them – for example, metadata and adjustment settings. If you use Fully Managed Image Files then they will also be stored in this Catalog file. Once created it will appear like this:

Opening a Catalog in Capture One Pro 7 is easy – just double-click on it. You can also have several Catalogs open at once, if you wish.

Once you have set up your Catalog, you can now decide whether to use Fully Managed or Referenced images, or perhaps even a combination of both.

Importing into the Catalog.

For your Catalog to recognize an image, it must be imported into it, via the Import dialog. This ensures the database is kept up-to-date and Capture One Pro 7 knows how to locate the files. It is within the Import dialog that you can choose to have Managed or Referenced image files.

In the ‘Import To’ section of the Import dialogue, choosing ‘Inside Catalog’ will copy and place the images directly inside the Catalog file. These are Fully Managed Image Files.

Choosing ‘Current Location’ will leave the image files where they are. These are Referenced Image Files.

The ‘Choose Folder’ option is useful for importing images from a memory card and copying them to another chosen storage area. These would also be Referenced Image Files as they exist outside the Catalog file.

Fully Managed Image Files

A Catalog with Fully Managed Image Files is very simple to organize and maintain as you don’t have to think about where to place or store the images. The Catalog takes care of that!

Even though the original files are stored insidethe Catalog file, they are not inaccessible or completely hidden from view. In the Mac OSX Finder, right-click on the Catalog file and choose ‘Show Package Contents’.

The following secondary window will appear:

This shows that your original files are stored safely in the folder marked ‘Originals’ and organized by year / month and date imported into Capture One Pro 7.

However!  Making any changes into this structure will render the Catalog unreadable or damaged.

A Catalog with Fully Managed Image Files is very easy to backup, as it is simply one file to duplicate and sharing is also quite simple! If multiple users have access to the Catalog then simple mechanisms are in place to prevent damage.

As opening a Catalog in Capture One Pro 7 is like opening a document, you could have different Catalogs for different clients, or even types of photography. Remember though, that any search and filtering would be limited to the currently open Catalog.

Referenced Image Files

If you prefer to store your image files outside of the Catalog file, on any other storage device, then your images will be Referenced Image Files. This way you can also retain an existing folder structure.

Therefore, the images will not be copied and moved inside the Catalog file but remain in their existing location, or another location if you chose to do so in the Import Window.

Using this method means you have no limitation on your storage as you can place the image on very large external devices (for example a RAID or other kind of server) or even across multiple storage devices.

Remember also that the Catalog file and images don’t have to be on the same location. Therefore the Catalog file can be placed on your laptop while the images are on your external storage.

The Catalog file holds a large high-quality Preview of every image in your database so you can still browse your entire Catalog even when you don’t have access to the external storage.

You can even make image adjustments, edit metadata, and change the virtual organization!

Using the Folders area in the Library tool

The location of referenced images is shown in the Folders area of the Library Tool and can be managed here. By default, only the root of the storage and final folder location are shown. To see the complete hierarchy, right click in the Folders area and choose, ‘Show Folders Hierarchy’. This will reveal the complete path from the storage to the imported folder.

Here, you can also add a Folder to the system, by clicking on the ‘+’ icon for the Catalog to recognize. This is not a facility to add images to the catalog (the Import dialogue must always be used for that) but for making a new empty folder to move images too.

Images can easily be dragged and dropped between folders, but make sure you do this within Capture One Pro 7 to keep the Catalog database aware of the changes.

Combining Managed and Referenced Image Files

Your Catalog can also contain a combination of managed and referenced files. If your Catalog is comprised of referenced image files but you would like to go ‘on the road’ with the full raw data then simply drag and drop any images onto the Catalog icon in the Folders area. In the example below, it will move the file from the external storage to the catalog file itself.

Images can also be moved in the same way from the Catalog back to a storage location.

This is another good reason why you might want to add a new folder in the Folders area. For example you can shoot tethered on location into the Catalog file itself and then move these images to your external storage when you are back in the studio or office.

All the best,

Niels

Other Resources

Phase One’s YouTube Channel has plenty of videos on the subject of Catalogs.

Offline Browsing
http://www.youtube.com/watch?v=8IgzqVLtuoE

Catalogs In-depth
http://www.youtube.com/watch?v=H1uj5ytvklo

Working with Referenced Images
http://www.youtube.com/watch?v=HfJHSizFcyE

Sign up for the webinar