Latest Posts

Bryan Minear - Capture One

Color grading Fujifilm files with Bryan Minear

Let’s start with a short backstory. When I made the decision to quit shooting for clients, refocus my art, and pursue landscape photography it was because I naturally gravitated towards nature. I am from a very rural area in Ohio which is considered the foothills of the Appalachian mountains. I grew up with lots of rolling hills, rock cliffs, and waterfalls.  Ansel Adams has been my inspiration since before I picked up my first camera. His work showed me not only the raw emotion that you can invoke with a landscape scene, but also the importance of the darkroom in the process. As a young graphic designer, Photoshop became my darkroom, and the post-processing of my images took on a whole new level of importance. I began to see color in a way that I never had before. I began developing my style along the way and shooting with purpose.


Bryan Minear - Capture One


Process

When it comes to my landscape photography I live and die by my color. Part of the reason that I switched to shooting Fujifilm cameras in the first place was their deep history in making film and their wonderful color science. Similarly, my first experience with Capture One had that same draw.  The tools and integration were a perfect fit for my process, and there is no software that renders the X-Trans files as well as Capture One. As a person who prints big often, I need the best detail quality that I can get. Not to mention the announcement of the upcoming inclusion of the Film Simulation modes. Those played such a pivotal part in my “color revolution” that I will be very excited for native support.


Bryan Minear - Capture One Color Grading


I tend to shoot most at the golden hours. So much of what I do depends on that perfect light and cloud combination, and I have to follow through by choosing the right composition to complement the mood. I begin post-processing my images in my head the moment I click the shutter. I know that I am going to try to draw as much contrast out of the image as I can without over-processing. Typically, this involves pulling the exposure and contrast sliders down a bit, the brightness up, and then balancing out with curves. With Fujifilm I shoot my higher dynamic range scenes by exposing for the highlights, knowing that I will be able to recover the shadows as much as I can with the HDR shadow recovery.


Bryan Minear - Capture One Color Grading


Color

When it comes to color, I have a very specific artistic palette that I gravitate to. I say artistic because I am not ashamed of taking liberties in certain areas. I am a huge cinema fan and I draw inspiration from film and television constantly. One of my favorite exercises is to take a photo and try to replicate a look that I am particularly fond of, never to imitate, but to understand the process behind doing something new. I am not a fan of the color green in the slightest. So I tend to either desaturate and reduce the lightness of my greens, or turn them more to a yellow hue. Along those same lines, I know that I want my yellows to go a bit orange, and my oranges a bit red, and the easiest way to achieve that is by diving into the Advanced Color Editor. I will pick the color area that I want to focus on with the eye dropper and increase the smoothness when needed to include hues a bit outside of my selection range. Then adjust the hue, saturation, and luminance until I am satisfied. I don’t shoot a lot of blue skies, but I tend to do the same thing with my blues. I know a lot of landscape photographers that prefer very vibrant blue skies, but I desaturate and darken a bit as it better suits my look.


Bryan Minear - Capture One Color Grading


Sharpening

Capture One has the most effective sharpening tools that I have ever used. I have a 2-3 stage sharpening technique that I use depending on the subject matter of my image. I realized really quickly that regardless of where your work is being displayed or viewed, learning to selectively sharpen plays an extremely important role in what people are drawn to in your images. Global sharpening alone was not enough for me. I will start with a low amount of global sharpening for my landscapes. Something around 100 for the amount at a 0.8 radius, 1 for threshold, and 30 for halo suppression. (These numbers of course are all relative to the resolution of your file, I am working with 24-26mp images from the Fujifilm X-T2 and X-T3 specifically).


Bryan Minear - Capture One Color Grading


Next I will pull up the focus mask to show the areas of focus in the image to make sure that when I start selectively sharpening that I am doing it in the proper areas. And then I zoom in and paint in the subject or contours of my subject and apply a heavier amount (250-300 amount, 1.5-2 radius, 3 threshold, and 30 halo suppression). The nice thing about this is that it’s a mask, so right away you will be able to tell whether it’s working or not and which areas you really want to add the extra focus. Once you are happy with the results take the opacity of the mask down to around 50-60%. I find it best to overdo an effect, and then dial it back a bit to maintain a level of subtlety.


Bryan Minear - Capture One Color Grading


The last stage is really dependent on the image. Sometimes you can get by without it. But for an image that I know I am posting on instagram, I know I want to give it a little extra “zip” to fight the low resolution of the platform. When I am shooting landscapes I am typically at base ISO on my camera for optimum noise performance. I don’t even bother with it if I have any noise to my image as you will just end up amplifying it with this step. I will paint a mask covering the entire image and set the sharpening to around a 100 amount, 2.4 radius, 2.5 threshold, and 30 halo suppression. The last step is to adjust the opacity to something between 15-25%. And that’s it. Nice images that really have a nice pop to them.


Bryan Minear - Capture One Color Grading


Purpose

As a post-processor my work has gone in a lot of different directions. Like anything, I believe that experimenting is the best way to get acquainted with the tools at your disposal, as well as the best way to grow as an artist. I like to say that I did a lot of things the wrong way before I ever started getting it right, in both shooting and processing. When it came to developing a signature style, it was never something that I set out to do. It just sort of happened over time as my skill set grew. In the same way that my eye for composition and vision became more refined, the processing followed.


Bryan Minear - Capture One Color Grading


I think that one of the most beneficial things that you can do for yourself is to revisit your photo archives often. Whether it is to re-edit a shot in order to utilize new techniques, or finding something that you maybe missed on the first or second pass. I can’t count the number of times that I have looked at my photos from the past and found something I never noticed before that jumped out at me as an obvious keeper shot. I rarely delete any of my photos unless there is really no hope to save it.


Bryan Minear - Capture One Color Grading


I like to tell everyone that attends my workshops something that I learned not so long ago: Though the image is our ‘prize’, the ‘experience’ is worth so much more. The images we shoot end up being gateways back to experiences that we never want to forget. I can’t even count the number of times I have gotten up early (or just never gone to bed) in order to go out and capture something incredible. More often than not, you get let down and don’t end up coming home with what you had hoped for. But it’s these losses that make the ‘wins’ so much sweeter.

So push yourself often, learn the tools that you have, and create something spectacular.

If you don’t already have Capture One, you can download a 30-day trial and try it out!

Sign up for the webinar

Martin Bailey Capture One

Get your Lightroom Catalog into Capture One

NOTE: This article discusses an outdated version of Capture One. To learn more about our latest version, click here.

Introduction

Two years ago, I decided to jump ship from Lightroom to Capture One Pro. At the time, it seemed like a brave move, but after an afternoon of testing I felt somewhat confident, so jump I did. Two years on, I can confirm that this has been the best thing I could have done for my photography.

Recent changes to the Lightroom product strategy have lots of people asking for help, so when my friends at Phase One asked me to write a post outlining points to consider when migrating from Lightroom to Capture One Pro, I jumped at the chance.

Preparing to Migrate

In case anyone recalls my original post on jumping ship, I’d like to mention that Capture One Pro now supports Photoshop PSD files, so it’s no longer necessary to convert any PSD files that you might have to a different format. You can keep them in your library as they are. I also talked about cleaning up Catalogs, to avoid extra work after the migration, but this is no longer necessary either, although a bit of spring cleaning doesn’t hurt.

Export Your Lightroom Catalogs

When I was using Lightroom, I had every image I’ve shot since 2000 in a single catalog, but Capture One Pro does not work well with this many images in a single catalog, so it’s best to split images into multiple smaller catalogs.

Note that in both Lightroom and Capture One Pro, I do not keep my images inside the Catalog. I think this makes backing up hard work, and is less transparent and therefore error-prone than referencing images in a separate folder structure.

My main archive of raw images lives in a folder called Photo Originals, and at the time that I migrated, had a one catalog for 2000 to 2005 images, and then a separate year catalog for all years from 2006 to 2015.

To prepare to import these years into separate Capture One catalogs I right clicked each year folder in Lightroom and selected Export This Folder as a Catalog. I was able to select multiple folders and export them as a single catalog for years 2000 to 2005.

I have one special folder that I call Finals, and this contains a copy of every image I’ve ever shot that is worth a hoot. It’s like my Keepers folder and has images just in year subfolders. I exported this as a separate catalog as well, in preparation to migrate.

If unlike me, you already have multiple Lightroom catalogs, you will need to decide how you want to organize these in Capture One Pro, and export your various catalogs accordingly.

In the Export dialog in Lightroom, uncheck the three checkboxes to Export negative files, Build/include Smart Previews and Include available previews in the new Catalog. The export process is quick, and once you have your bite-sized Catalogs exported from Lightroom, you are ready to import into Capture One.


Lightroom Export Capture One


Importing Lightroom Catalogs into Capture One

To import a Lightroom Catalog, open Capture One Pro, and if you don’t already have a catalog to import to, create one from the dialoag that is displayed. I personally prefer to work with Catalogs rather than Sessions.

If you are creating year catalogs like me, just give your catalog a name like 2018, or whatever year you need, then from the File menu select Import Catalog > Lightroom Catalog. The following dialog (below) will tell you what settings will be imported, which includes Collections, Crop, Rotation, and Orientation information as well as White Balance, Exposure, Saturation and Contrast settings, and Metadata, including IPTC, Rating, Color Label and Keywords.


Import Lightroom Catalog in Capture One


Catalog Considerations

Capture One Pro stores more information and previews inside the Catalog than Lightroom does, which I imagine is the main reason that Catalogs can’t contain that many images. I have found my strategy of keeping my original raw files for each year in single year catalogs to work very well.

My 2016 original photos catalog, the year that I jumped-ship, ended up a little over 30 GB, and my 2017 catalog was 40 GB, each containing around 22,000 images. I can’t say if Capture One Pro has got better at handling large catalogs since then, but I have grown to like having each year’s original raw images in a catalog of its own, so I’ve had no reason to try larger catalogs at this point.

My Finals catalog for my final selects for all of my shots is just over 11 GB, and only grows gradually, so this strategy has worked out well too.

Metadata Settings

Note that in the Image tab of the Capture One Pro preferences, I have my Metadata settings set to Full Sync for the Auto Sync Sidecar XMP option. I turn off Prefer Embedded XMP over Embedded IPTC and turn on Prefer Sidecar XMP over Embedded Metadata.


Capture One Settings


These settings enable me to get the most basic metadata from sidecar files into Capture One, as well as synchronizing back to the xmp files to enable other editors to read the changes to metadata I make in Capture One. Since Capture One stores the image adjustments either inside the Catalog or in .cosetting files in Sessions, these are independent from the xmp files. If I need copies of my raw files outside of my Catalog, I right click the images in Capture One Pro and select Export > Originals, select a folder, and make sure to include the adjustments. These can easily be imported in another Catalog if needed – including the adjustments.

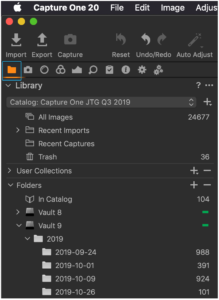
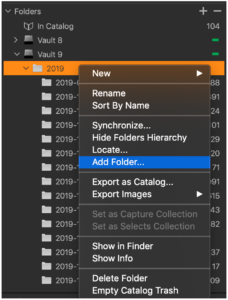
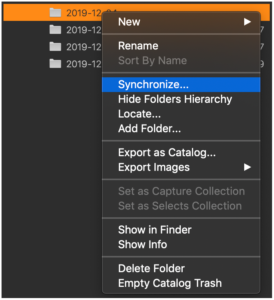
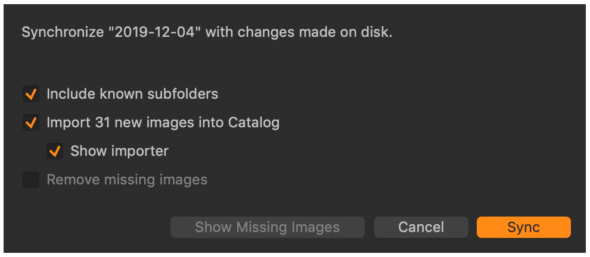
When using this method to copy images to my Finals Catalog for example, after making a copy I go to my Finals Catalog and right click the folder that I exported the images to, and choose Synchronize. Note though that to Synchronize adjustments you have to turn on the Show Importer checkbox, select all the images in the Import dialog, and make sure to tick ‘Include Adjustments’ within ‘Adjustments’ for this to work.

Working on Multiple Computers

I like to keep my images and catalog on an external drive so that I can move from computer to computer by just moving the drive. I was able to continue to do this with Capture One Pro, although my method is not entirely sanctioned by the Phase One Team, so try what I’m about to tell you at your own risk.

I achieve this by storing my Capture One Pro settings folder in Dropbox, with a symbolic link to the settings folder in the Library (on Mac OS). This way, all of my presets and settings automatically synchronize between my computers, so just moving my drive with my images and catalog on it from one computer to another works seamlessly. Rather than bloating this post, you can check out my post on how I do this, along with my backup strategy, etc. on my blog here.

Conclusion

From a Lightroom user’s perspective, you will notice some differences in how Capture One Pro does things, but in the two-plus years since I switched, not once have I been disappointed by my decision.

If you want an application that works the same as Lightroom, then stay with Lightroom. But, if you want the ultimate image quality, and you are willing to make a few changes to your workflow, I think it’s worth the effort to change.


If you don’t already own Capture One, you can download a 30-day trial and try it out!


Sign up for the webinar

Lorenz Holder Capture One

Riding Thrones

Intro

About three years ago I was watching the first episode of Game of Thrones. I still remember how it hit me when I saw that first location – what they call the Haunted Forest. My mind just said “WOW”! The landscapes and the look of the world of Westeros were amazing to see. I was immediately inspired and I knew I wanted to shoot there as well. There was only one problem – Westeros is a fictional place that doesn’t exist in real life. But I knew that those scenes where filmed somewhere in the real world.

After a little research, I found out that a lot of the scenes were filmed in a relatively small area of Northern Ireland. So, there it was – I’d found the real-world Westeros. I don’t know why, but from my first thoughts about what I’d like to shoot there, I saw a BMX rider. I asked Senad Grosic, an Austrian BMX rider, and friend, if he would be up for such a project. I’ve never gotten a faster reply, and that’s how the journey started.

Prologue

I spent a year doing my homework, researching locations that could work for shooting. But scouting locations via Google Earth and Game of Thrones Wikis is totally different from seeing them with your own eyes. I had to experience this version of Westeros myself.

To be honest, I hate nothing more than being unprepared for a shoot. I decided to fly to Northern Ireland to scout all of the potential locations, and to determine what time of year would make the most sense to shoot. I ended up in one of the heaviest snow storms that Northern Ireland has ever seen. But I loved it! I felt like I was finally in Westeros and even the weather was like in the series – winter is coming…

Back home I made a master plan for the main shoot. Who would be on my team, when would we shoot, what would we shoot? A couple of weeks later, the blueprint for Riding Thrones was ready – and so was I. I simply couldn’t wait to get started.

The Adventure Begins

Locations

Over a period 10 days, the goal was to capture a variety of shots of Senad doing tricks at and around the Game of Thrones locations. We had two bases. The first was close to Bushmills, a small town close to the coast. From here we could create images featuring the landscapes of the Iron Islands, Dorne, Winterfell, the King’s Road and Dragonstone. For those of you who are not so familiar with Game of Thrones, this is more about the rough coasts of Westeros.

The second base was close to Tollymore Forest Park, where we tried to capture images with a darker mood. In Game of Thrones, this was the Haunted Forest north of the wall and Wolf’s Creek where the Stark kids find the dire wolf puppies.

Obstacles

Due to the fact that Game of Thrones is widely famous all over the world, it’s no wonder that pretty much every filming location is flooded with tourists during the daytime. That made it difficult to get shots of just Senad, his bike, and the landscape. We ended up shooting lots of sunrises and sunsets to go around this. During this time of year, those are either very early or very late.

The crowds and the sunlight weren’t the only challenge. Sometimes things got truly bizarre! During a shoot a bus showed up at the Dark Hedges, the location of the King’s Road, and thirty people with black coats and swords stepped out. They began an epic role-play at the scenic location and I have to admit – that was pretty fun to watch!

The Hero Shot

Because of these obstacles, getting the shots was sometimes a struggle. Luckily, most of the time it was great and we had a lot of fun. The shot that got me and Senad the most stoked was the King’s Road shot that we did after sunset. We already had a pretty good image from the sunrise, but my idea was to get an image of Senad in the rain using a flash. It was forecast to rain the whole day, but everybody who knows Northern Ireland knows that you simply cannot rely on weather forecasts. The weather just does its own thing up there.

We figured that we didn’t have anything to lose and decided to give it a try anyway. I set up the camera and the flash and Senad started to warm up when a light rain began. So there it was – the last puzzle piece missing to get the image I had planned. I told Senad to go for it, because rain or shine, you never know how long it’ll last.

Lorenz Holder Capture One Red Bull

Sunrise


Flash Issues

We had some problems getting the flash to work as the distance between me and the flash reached the range limit of the triggers. Because of that, the flash only fired every 6th or 7th try and we simply couldn’t figure out why. It was a frustrating situation for both of us. When the flash worked, I got the wrong moment and vice versa. I was close to giving up, but I knew that we only needed one shot where everything came together. Then, suddenly, boom! There it was. The moment couldn’t have been better, and there was the flash in the background. Looking back, I think that was a key moment of the whole trip. Pure relief and happiness!

Lorenz Holder Capture One Red Bull

With flash


Rounding up

In those 10 days of shooting, every day was different. We had easy shots and we had those where you really need to work for it, carrying all of our equipment down a 100-meter cliff. We met awesome people along the way who not only helped us but became friends as well.

When I look back, it was for sure one of my favorite shoots. It all worked out so well, and so close to how I dreamed of it when I had my first thoughts about Riding Thrones all those years ago. Now I’m looking forward to the last season of Game of Thrones more than ever, to go back to Westeros one last time!

Winter is coming…

Aftermath

Even when the trip was over and all the shots were made. There was still one part missing – the postproduction of the final images. Normally I’m not a super big fan of this part of the process, but this time I knew it would be a lot of fun. The combination of the Phase One IQ3 100MP camera system and Capture One is one hell of a couple! The camera system captures so many pixels and has an extreme dynamic range. You can retrieve huge amounts of details in the image that looked like lost in the highlights or in the shadows.


Lorenz Holder Capture One Riding Thrones Red Bull


In my opinion, the most powerful tool in Capture One is the Color Editor. You can control the colors so precisely that you really get the right color you are looking for at the end. I also made a custom workspace for my workflow, so that I can go through my steps of editing without needing to switch tabs or search for the right tools.


Lorenz Holder Capture One Color Editor


After a week in the editing room I was finally done. When I look at the final images today, I know that this trip to Westeros was something special and something that I will never forget.


If you don’t already own Capture One, download a 30-day trial and try it out yourself!

Sign up for the webinar

Capture One Print L.Type

Power of a Print

NOTE: This article discusses an outdated version of Capture One. To learn more about our latest version, click here.

In a time where almost everyone can call themselves photographers, it’s always about finding ways to stand out as a professional. A very tangible way to stand out is delivering your best work in print.

Enabling you to do this, we have together with L.Type prepared a great offer to all first time L.Type customers, to get the highest quality print. Below L.Type, ambassador Jonathan Glynn-Smith shares why he turned to print again, and we’ve made a step by step guide to get your captures ready for print with Capture One.

Capture One L-Type Print

Jonathan Glynn-Smith – The Importance of Printing

I’ve been a photographer and director for over twenty years. Like many photographers, I used to have printed portfolios to show to clients, and then with the advent of digital moved to the web and my iPad to show off my work. I just stopped printing regularly.

Ever since I discovered L.Type, printing has become integral to my work again. There is so much that a finished print can show that simply doesn’t come across on a screen. All the subtle details of light and shade and color work together to bring the captured moment to life. The image has a sense of being in the paper not on it. 

I became so used to seeing my images on screen that I had forgotten the joy of holding a print in my hand. A print is something you can examine closely, revealing details that you missed as you composed the image. A print is something you can share – whether passing it across a table or putting it up on a wall. Most of all, a print brings images to life, adding texture and emotion that a screen can never capture. Now, whenever I shoot a project, I aim to share at least part of it with the client in print.


Jonathan Glynn-Smith on the importance of printing

We all have thousands of images trapped in computer storage or the Cloud. Recovering them to print can be time-consuming, but I find that if you build it into your workflow then setting aside images for print is easy. I’ve used Capture One for years to manage all my workflow, and its Export Recipes allow me to process my favorite images for printing as I work – and then to print them all easily when I am ready. 

For me, the most critical aspect is that with an L.Type you can hold a print that does justice to the image in both color and black and white. 

Optimizing the process in Capture One

Watch the tutorial or follow the steps written below

Exporting an image for print that will print perfectly in terms of cropping, sharpness and quality can often be a troublesome experience. Process Recipes in Capture One offer a repeatable consistent way to prepare your images for print. 

In this blog post I will show how to create a Process Recipe designed to export a final image to send to a printing service, in this case L-Type.com.  However, the principles can be applied to any other print service. 

Creating a new Process Recipe 

Process Recipes are built in the Process Recipes tool found in the Output tool tab. 


Capture One Process Recipes


To create my new Process Recipe, click on the ‘plus’ icon and give the Recipe a sensible name.  In this case, my Recipe is going to create an A3 Print, to the L.Type specification.


Capture One Print Process Recipe


In the Process Recipe tool, I have to fill in the parameters for the output I want. In this case the format that L.Type requires is either TIF or JPEG.  As I am a quality junky, I will go with TIF to be on the safe side.  I’m using 8-bit TIF because 16-bit just makes for much larger files with no quality benefit for prints. The ICC profile can be left at Adobe RGB (1998) for optimal colors. 

L.Type prints use a unique high-resolution process, and as I am going to export to a particular size in millimetresit’s really important I get the correct Resolution value which is 400 px/in. 

Finally, I want to set my Scale to Dimensions and use 369mm x 246mm which is the exact size L.Type will output a print at for the print sizeA3 with a 25.5mm borderI will choose when ordering.  Why am I so picky about setting this exact size?  For one it will allow me to crop accurately but more importantly it means L.Type will not have to resize my image before printing. 


Capture One Process Recipe Tiff Print


You might be thinking, well surely, I just send them the biggest file I can squeeze out my camera and it will look great!  But the hard fact is that reducing an overly large image to a smaller size might have a negative impact on quality and sharpness in the same way as having to increase an image in size can. You want to be in control of this process. This way, I ensure the best quality I can, to send to print. 

Cropping to Output Size 

There is nothing worse than sending an image to print and having something cropped out of your control.  In this case, L.Type never crop your images, but that may mean uneven borders instead.  In reality that’s your own fault, so be prepared and send exactly the right dimensions as described above! If my image was already cropped, then I might need to tweak the crop to fit into the aspect ratio of my freshly created Recipe.  Fortunately, there is a super simple way to do that in Capture One. 

Long pressing on the Crop cursor tool means I can choose Output in the drop-down menu.   


When I go to crop my image or adjust the current crop it will snap exactly to my dimensions in the currently selected Process Recipe.  In this case, 369mm x 246mm. 


Capture One Crop


Output Sharpening for Print

With the crop, size and aspect ratio in place, I want to control the sharpening. This is a crucial step when exporting to print.  

In the Adjustments tab, choose Output Sharpening for Print in the Sharpening dropdown menu.   


Capture One Output Sharpening


I control the sharpening amount by setting Viewing Distance to approximately 40cms, as these images are going to be viewed in a portfolio at an arm’s length.  L.Type’s print resolution is specifically intended for close viewing, but if you are printing larger prints with another service, you might well want a longer viewing distance. 

Capture One will then calculate the amount of sharpening required, based on my scaling and viewing distance.  Sharpening is very much a personal preference or subject dependant, but I have found the default amount of 80 to work well on a variety of subjects.  If I feel the image quality is less than perfect, perhaps slightly missed focus or some motion blur, I might back it off a little to 60. 

Proofing the Recipe 

To take the guesswork out of exports, there is a very neat feature that will simulate the selected Recipe in the viewer.  Recipe Proofing will simulate the scaling and output sharpening for this Recipe. 

First of all, I need to zoom my image to 100%, and then click on the spectacles icon in the toolbar. 

Capture One Output Proofing


Immediately the image will be resized and sharpened.  Don’t be alarmed if the image looks a little over sharpened if you are going to print!  But if you are really concerned or want to nail your own personal preference, you can always send 2-3 prints to your chosen service to see what works best for you.  As I said earlier, the default of 80 at a viewing distance of 40cm has been working well for me.  

Output Location 

Last but not least, Process Recipes can also have unique export locations.  


Capture One Output Location


By default, the output location is decided in the Output Location Tool as indicated in the Root Folder of the File tab.  However, I want my Process Recipe to have a unique location. 

Therefore, I change the Root Folder to a Dropbox folder which is already linked to my L.Type account.  This way, Capture One exports directly to Dropbox, so I can simply order prints on L.Type.com or easily on their iOS app. 

This avoids any additional upload or file management steps.


Capture One Output Select Folder


Exporting


To export my image, I click on the Process button in the Process Summary tool.   

Capture One Process Summary

Tip – Don’t forget you can process multiple images at once and even use more than one Process Recipe simultaneously.  Simply check the box next to your Process Recipes to activate them.  

Conclusions  

The steps outlined above can be applied to any kind of output, whether that is for print or screen.  Remember, having your own set of Process Recipes leads to consistent and repeatable output. Not only that, you will save time with Capture One doing the heavy lifting. 

The Quality of L.Type Prints

L.Type exclusively produce the world’s only 400ppi true continuous tone prints. Having designed their own printers, they apply the 21st century digital technology to expose traditional silver halide (”C-Type”) paper to a previously unachievable level of accuracy. Featuring their patented technology, L.Type can reveal all the detail that a human eye can see at arm’s length.

Hope this has inspired you to get some of your favorite captures printed. Now it’s time to act.  


Sign up for the webinar