
When everyone has a camera in their pocket, it is on you as a professional photographer to make your work stand out above the rest. As both a craft and a form of expression, developing a strong voice through your photography is key.
We spoke to three young photographers from Authority Collective – a group of womxn, non-binary and gender expansive people of color working towards more inclusivity in the photography, film and VR/AR industries – about how they found their own artistic expression and their best tips for making your work unique in both workflow and look.

Shravya Kag
Photo and video documentarian Shravya Kag treats the camera as an extension of herself. As a queer person of color, she navigates the terrain of human relationships by sharing mutual curiosity with her subjects.
Born and raised in India, but having lived in New York since 2015, Shravya draws on her own experiences to bring a unique outlook through her photos, which often revolve around questions of identity, home, and personal space.
“I deeply cherish the conversations with the collaborator before taking their portrait. Whenever time permits, I enjoy asking them how they like to be seen, what is their favorite angle, location, dress, etc., and observing how I see them with my tools, perceptions etc. It is a deeply intentional and meditative process that translates well to the final image.”
The intimacy between Shravya and her subject can be seen in both her personal projects and photo essays and her work for publications and brands like Vogue India, The New York Times and Urban Decay for their collaboration with the Stonewall Foundation.
Seeing patterns in her own style
Taking more time to archive and catalog her work, Shravya has been able to find patterns, see how her voice has developed, and discover ways to improve her work.

“I am currently re-building my yearly catalogs with the final images from each assignment. I also have separate catalogs for larger personal projects, so I can view all the images photographed over the years in one catalog,” she explains.
“I’m yet to create the master catalog for all of my work — which is quite intimidating!”
Observe, read, and journal
Her tip to emerging photographers who are still trying to find their own voice is to look beyond the camera.
“Take long walks without any camera or phone to train the eye in observing composition and light. Read a wide range of topics — philosophy, culture, anthropology — to gain an understanding of yourself and your intentions in image making. Journal, journal, journal your thoughts and your responses to other photographic works.”
See more of Shravya’s work here.
RELATED: How Authority Collective is making photography more inclusive

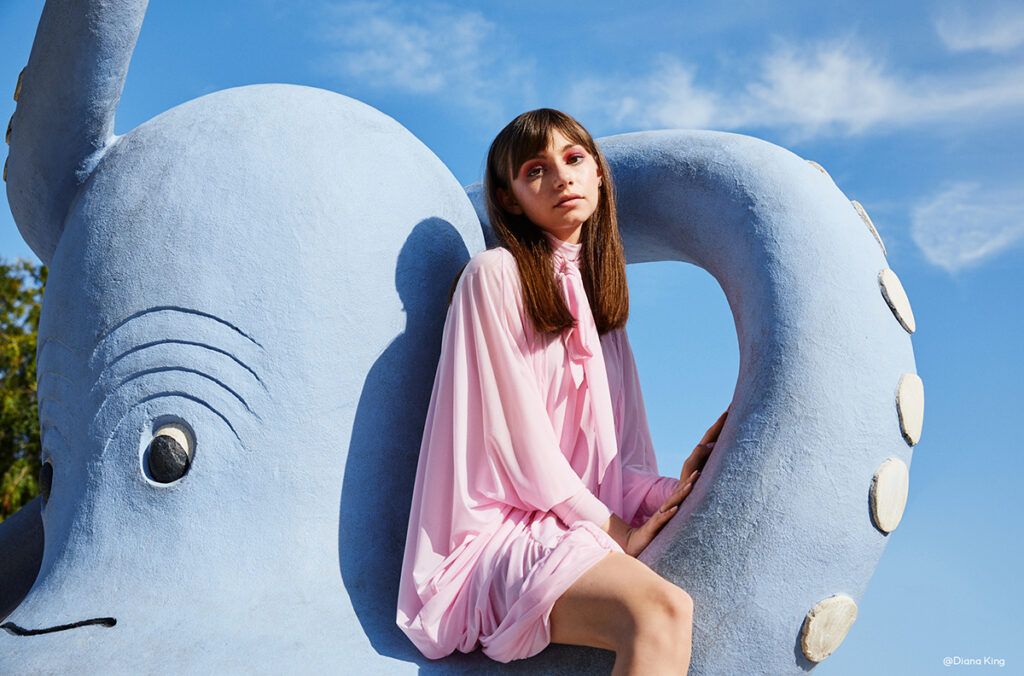
Diana King
“It took me over 10 years to find my voice and I’m still learning, discovering, and developing my voice to this day,” says Diana King.
In the search for her personal tone of voice, the Chinese American portrait, lifestyle, and fashion photographer has built an impressive portfolio shooting for brands and publications like H&M, Samsung, and The Hollywood Reporter, taking portraits of both established and up-and-coming actors, artists, and creatives like Ava Duverney, Mitski, and Ariana DeBose.
“I found joy in taking close-ups and portraits. I loved the intimacy of connecting with my subject and capturing their personality,” she says, adding that she has spent a lot of time experimenting with lighting and color.
With her distinctly vibrant image style, she is able to use contrast and high saturation to draw out genuine emotion in her subjects. In the end, she describes her personal project ”Almost Asian, Almost American” as the place where she was truly able to find her voice.
“This project made me go outside of my comfort zone and find real women to interview and photograph,” she says.
“I discovered that I gravitated towards capturing these women in a certain way, which was confident and powerful. Creating an emotive connection is how I want my voice to be whenever I capture any subjects, whether they are models or real people.”
Stay organized
Like Shravya, Diana credits good organization with giving her an efficient workflow and creating a defined style.
“I created an organized naming system for each Capture One photo session in my archive so it’s easy for me to go back and find any job name and how I did the color grading and processing.”
Diana has also set up templates for her color styles, image size exports, and metadata.
“These templates in Capture One are like automatic actions, which help me work faster and be consistent in my workflow as I don’t have to start from scratch and overthink the process whenever I start a new photo session.”
Play with light and color
“Experiment and discover what color tones you gravitate towards and learn how to color grade your photos. Learn to light if possible,” she says, encouraging emerging photographers to test shoot as much as possible.
“While being technical in all aspects of photography is not the most important thing, I think understanding what happens in all aspects of photography – from pre-production, shooting, to post-production – is important, so if you hire people to support you on a shoot, you learn how to direct and become a better photographer.”

Tana Gandhi
“I love to explore different design and lighting styles, playful compositions and subtle pops of color which have helped me create a specific and cohesive look and feel,” says still life and commercial photographer Tana Gandhi about her style.
Getting inspiration from paintings and things she sees online, Tana uses a lot of graphic design with elements of play in her work. Experimenting with composition, shadows, and light, Tana captures memorable images even when working with a limited palette or minimalistic scenes.
“A game-changer”
As a still-life photographer, Tana takes advantage of some of the features in Capture One Pro that help shape her tableaus how she wants them.
“Working with Live View to build out still life photographs was the biggest game-changer.”
RELATED: Learn how to use Live View
“Working with producers, stylists, and retouchers has also given me the freedom to hone my work more and allows me time to continue testing and experimenting.”
Reach out and connect
For Tana, putting energy into collaborating with other creatives is what brings her photography to the next level – artistically and commercially. She advises aspiring photographers to do the same.
“Keep taking pictures every single day. Keep reaching out to people and connecting. Understand the business side of things. You do it long enough – the taking pictures and connecting with people and finessing your business/marketing skills – you’ll be in good shape.”
Discover more of Tana’s work here
Are you new to Capture One? Try it for free here


