Latest Posts

How to get your architecture shots just right

If you are an architectural or interior photographer using a technical camera, the LCC Tool in Capture One 7 is a tool you wouldn’t want to miss.

LCC is an acronym for Lens Cast Correction and this tool will help you correct common issues that arise when using wide angle lenses and movements on these types of cameras. In fact, users of any camera may benefit from this tool too.

Fixes color casts and uneven exposure swiftly

There are many kinds of technical cameras available particularly suited to architectural and interior photography.

Lenses for technical cameras are typically designed as non retro focus lenses, which means that they behave according to the classical lens equation.  This equation says that if you for instance have a 35mm lens and you focus at infinity then the distance between the lens and the sensor will be 35mm, which is actually very close the sensor. If you also use movements then the light exposing the sensor will be arriving at an extreme angle . This can cause color casts and uneven exposure across the whole image.

An LCC file can be used to swiftly correct this, along with the additional bonus of detecting and removing dust spots in the image. The dust removal feature can be applied to any kind of camera, not just technical cameras.

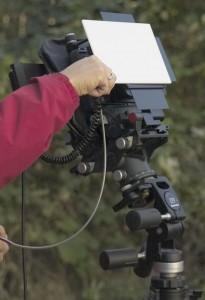
The only additional piece of equipment you need is a semi opaque piece of perspex, available from most photographic outlets. The opaque filter allows for some light to enter through the lens, while still providing a uniform surface accentuating the image created by only what happens when light passes through the lens.

How to create LCC files

Creating and applying LCC files is a simple process and does not require much time, especially as they can be created and applied as a batch in Capture One Pro 7.

Out in the field, remember to capture a LCC reference image with the same conditions as the capture you wish to correct. I.e, don’t change any settings on the camera with respect to movements, position or aperture. If you need to add a bit more exposure to prevent the LCC reference image being too dark, do so by increasing the shutter speed as opposed to changing the aperture.

Also try to keep the same order for capturing LCC reference images compared to the actual image as this makes batch correction much easier, for example:

Image – Image – Image – LCC reference image.  Image Image – LCC reference image.

So, in this case I capture the actual images before capturing our LCC reference images under the same conditions.

Capturing an LCC reference image can look something like this. Note the kind of semi opaque filter the photographer is using.

2013-08-16_11-57-27

Applying LCC files in Capture One 7

Before we can use the corrections to improve our images, we first have to create the LCC file. In Capture One 7 this process has been optimized so we now can calculate the LCC correction files and later apply them to the real images in a batch process. Below we have a sequence of captures and LCC reference images in Capture One 7.  Note the uneven exposure and color casts on the LCC reference images.

2013-08-16_12-39-48In this case the photographer has chosen to capture his LCC reference image after the capture itself. If your captures have become out of sequence, manually sort them by dragging them into the right sequence.

2013-08-16_12-41-41Now, simply select all the LCC reference images, right-click on one of them, and
choose Create LCC. A small dialog box will appear at the top of the screen to set the parameters for the LCC correction.

2013-08-16_12-53-52The first check box includes dust removal information in the LCC file. This is very useful for correcting a large batch of images with the same dust spots. This option could be beneficial for any camera not just technical cameras!

The second option will create a better LCC file if you are using a very wide angle lens coupled with movements.  If you are not sure if you need to check this box, then the safe option is to check it anyway.  It does not mean that the LCC will be unsuitable; it just takes a little longer to create.

Capture One 7 will then proceed to analyze the LCC reference image.  When the operation has completed, the LCC reference images will be marked with a LCC label at the top of the images.

2013-08-16_13-01-20You can already see that the color cast and exposure variations have been removed on all the LCC reference images. We now need to apply this correction to our real images captured under the same conditions.  Now select all the images both the LCC reference images and the real images, right-click on one and choose Apply LCC. The following dialog box will appear.

2013-08-16_13-02-30Remember, you could have captured the LCC reference images after the images, just keep the format the same for a collection of images. Click Apply and the LCC correction will be applied.

Let’s look at the options in the LCC Tool (by default in the Lens tool tab) for a particular image.

2013-08-16_13-05-12In the LCC tool the “Profile” shows us the name of the LCC reference image we are using for the LCC correction.  It is a simple matter of choosing which parameters of the LCC correction you wish to use – Color Cast correction, Dust Removal and Uniform Light.

When the Uniform Light correction is set at 100%, then all the lens introduced light variations will be evened out.  Sometimes you will get a more photographic pleasing image if you only partly compensate for the light variation by selecting for instance 70 % Uniform Light.

Now the images are ready for further adjustments as you would normally do with images from a non technical camera.

If I place a cloned variant of the image next to the original you can see that the Dust Removal option is working well.

2013-08-16_13-10-09

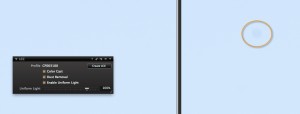
Now that we have checked the Dust Removal option you can see it has removed the dust spot that is visible on our original image, shown on the right in the orange circle. Again, this feature of the LCC Tool could be used for any camera, not just technical cameras.

As I have stated earlier on in this blog post, for the best results it’s best to capture the LCC reference image in exactly the same conditions as the image is to be captured. However, if you are unlucky enough to forget to do this, you could consider saving a library of LCC Presets.  For example, each of your lenses at a variety of your common working apertures. You could include movements as well.

Simply save them as a Tool Preset.

2013-08-16_13-14-37

If you have a stubborn dust spot on your sensor that you cannot remove by cleaning it or don’t want to risk it, then you can also consider including an LCC dust removal as part of a Capture One style applied on import or capture.

LCC reference images can be created and used in a Catalog or Session and are also cross compatible between Mac and PC.


Best regards,

David

Sign up for the webinar

Get a Head Start When Shooting Time-lapse in Capture One Pro 7

I’ve been shooting time-lapse for several years now and learnt a great deal along the way. I’ve put together this short video tutorial for anyone wanting to get a great start in time-lapse. Shooting this stuff can be as complex or as simple as you like.

http://www.youtube.com/watch?v=kGnJrW36PEQ&w=590&h=443

Here’s my top tips:

  • Always shoot Raw, as you can see in the tutorial this gives you amazing control and flexibility when using Capture One Pro 7
  • Shoot in manual exposure
  • If the light is changing we sometimes use aperture priority (Try to use spot metering, and locate a building or some other fixed object to meter off)
  • Fix the camera and don’t touch it once shooting (the tiniest bit of movement can ruin a whole sequence)
  • Use shutter speeds around 1/15 sec or slower, we tend to shoot around 1/4 sec
  • Use ND filters so you can get the shutter speed down in strong daylight
  • Understand where the sun is moving
  • For more dynamic results use a motorised dolly or slider, this works best with some sort of foreground object.

Once you’ve got the images processed, there’s a number of ways to construct the time-lapse, I tend to use Quicktime 7 or an App called “Sequence” by Frosthaus AS available on the App store (sorry I can only make suggestions for Macs).

That’s it, please don’t hesitate to leave a comment if you have any questions.


Thank you,

Adrian


Sign up for the webinar

Take Full Control of the Tone Mapping by Using a Linear Film Curve

It is in the Base Characteristics Tool that you set the Tone Curve and the ICC Color Profile for the file. Together these settings give the camera its overall look.

What does the curve do?
The curve describes the basic tone mapping of all pixels. By default the curve “Film Standard” is used. This curve is designed to give a similar tone mapping as when using transparency film. The curve has a slight S shape in order to achieve deep blacks while still maintaining details in the highlight, giving a gentle transition into overexposed areas.

The default ICC Color Profile is designed to work well together with the default curve “Film Standard” and should be used for classic photographic tasks like portrait, product or landscape photography.

For special photographic tasks or tricky images you can select other film curves like the “Film Extra Shadow”, “High Contrast” or “Linear”.

Tip719 Img2 full                             No Correction                                             Hand tweaked tone curve

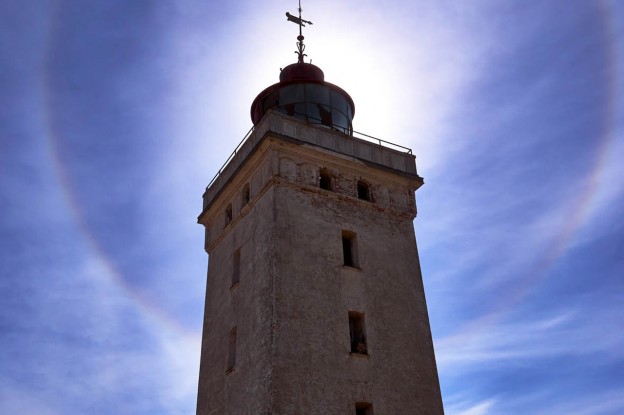
The image to the left is straight out of the camera. The image to the right reflects correction of the image in Capture One Pro 7. This is achieved by taking full control of the tone mapping by first using the Linear Curve, in the Base Characteristic Tool, and then applying a “hand tweaked” curve in the Curve Tool. When performing this adjustment I can add much more contrast in the highlight to really show the circular ice crystal “rainbow” cloud.

The effect of 4 different Tone Curves
In the example below I have made 4 variants of the same image and have applied different Tone Curves from the Base Characteristics Tool to show their effect. The image has a wide dynamic range, retaining details in highlights, mid-tones and the shadows. In the reflection on the light pole data is clipped to 255. Underneath the cars in the shadow we have really deep black.

The Base Characteristics Tool is, by default, placed in the Color Tool tab. In order to show the effect on the image’s different variants, however, I have added the tool as a floating tool.

Tip719 Img3a full                         A- Film standard                                                B-Film Extra shadow

Tip719 Img3b full                    C- Film Extra Contrast                                              D-Linear Curve

Image A: Using “Film Standard” shows a good compromise between highlight details, bright mid-tones and deep black shadows.

Image B: Using “Film Extra Shadow” has almost the same Tone Curve as the Film Standard but is more open in the shadows.

Image C: Using “Film High Contrast” has slightly deeper shadows and brighter highlights.

Image D: Using “Linear” looks underexposed and lacks contrast. Regardless the image has a full dynamic range and still shows clipped highlights on the light pole.


Why have the Linear Curve?

It is obvious that the Linear Curve makes the image look really dull so why do we have this option at all? There are two main reasons for having the Linear Curve:

  1. Scientific photography: You can achieve a perfect linear reproduction of your scene. Scientific flat-art reproduction is also an area where it can be of advantage in combination with specially made color profiles. For true flat art you don’t have the large dynamic range of the 3D world.
  2. Tricky images where you want to emphasize certain parts of the tone scale. By starting with a straight linear curve, it can be easier to take full manual control of the tone mapping in the Curves Tool. If you have the skills you may be able to achieve something you wouldn’t have been able to using the default curve.

Tip719 Img4 full

The image on the left is using the default curve “Film Standard” in the Base Characteristics Tool and you don’t need to do anything to make the image look quite good. This normally gives you a very good starting point for further editing the image. The image to the right is using the curve “Linear” in the Base Characteristics tool. I have additionally made a curve in the Curve Tool to achieve almost the same effect as if I were using the “Film Standard” in the Base Characteristics tool. We can see the “S” shape of the curve, giving more solid blacks and a gentle transition into clipped data.

Let’s go back and look at the image of the old light house and select the Linear Curve in the Base Characteristics tool. We can then start playing with the Curve Tool from the Exposure Tool tab.

Tip719 Img5 full

The left image is using the default curve “Film Standard” but the right image is using the Linear Curve. Already by simply loading the Linear Curve we get much better definition in the sky but it still needs work in the Curves Tool to get a useful image. If we look at the histogram we see 2 peak areas. The brightest are the tones in the sky; the darkest are the tones of the lighthouse and sand dunes. Because we have such a clear separation of tones, it will be possible to do quite a significant correction and still achieve an image that looks natural.

Tip719 Img6 full

I start by increasing contrast to the sky. I do this by adding two curve points, done by simply clicking on the curve exactly over the histogram peak from the sky. To get contrast I need to make the curve steeper through this tone area. I simply drag the upper point until a get the desired amount of contrast.

Tip719 Img7 full

Finally, I brighten the Lighthouse and the sand dunes. To do this I add a third point on the curve in the middle of the histogram peak associated with the lighthouse. By dragging this point up I brighten these tones.

I now have an image with much better balance between the “ring” sky and the details in the lighthouse.


All the best,

Niels


Sign up for the webinar

Recompose with Ease

These five items will help you precisely crop and compose with ease. Below, each of the items are explained.

  • Mask – An opacity mask, which dims the areas of the image that is cropped out
  • Frame – A thin white line around the cropped area of the image
  • Labels – Numerical tags on each axis of the crop showing the value in Pixels, Centimetres, Inches or Millimetres
  • Grid – A series of lines to assist with positioning when applying a crop
  • Guides – A vertical and horizontal line, which can be dragged into any position.
General points on cropping

2013-07-04_09-25-54

To crop an image, choose the Crop cursor tool or press “C” on the keyboard. Click and drag a crop over the image. If you haven’t changed any of the Crop options in the Capture One 7 preferences, this is what you will see. When moving the crop, the image stays centered.

2013-07-04_09-35-52

The labels at each edge show the size of the crop, as specified in the process recipe. The unit of the side lengths are configured here as well. To delete a crop quickly, you can click anywhere outside the current crop (in the Mask) once, or reset the crop tool. To create a new crop within a previous one, hold the shift key to and drag and drop the crop mask where you want it.

The labels, in the example above, are circled in orange and the grid, as well as the mask area is indicated with orange arrows. The behaviour of these elements can be changed in the Crop option on the Capture One 7 preferences.

2013-07-04_09-44-54

So for example, with regard to the Mask, you can configure the Opacity and Brightness to your liking or even completely disabled.

2013-07-04_09-48-49

The frame option will draw a thin white line around the crop edge as seen in the example below.

2013-07-04_09-52-52

By default the grid will only show when you adjust the crop, but you can change this behaviour as well as add more lines to the grid and change their color.

2013-07-04_09-56-04

Guides can be shown by clicking the icon in the toolbar or choosing View>Show Grid and Guides.

2013-07-04_09-59-27

The guides are shown as a horizontal and vertical line centered in the crop frame.  However, they can be moved to a location of your liking by hovering the cursor near to the lines and click-dragging.

2013-07-04_10-02-04

This can be a very useful feature when capturing in a tethered workflow, assisting in a precise alignment.  You can also change their position in the preferences and adjust the color.

2013-07-04_10-05-24

All the best,

Niels


Sign up for the webinar