For more than 10 years Capture One has been supporting various RAW files from major camera manufactures. These fully supported RAW files all come from cameras using the Bayer Color filter layout.
Over the years Phase One has constantly been working on improving the algorithms for converting the RAW data captured by the sensor to a full RGB file, a process often referred to as Bayer interpolation.
The quality that can be derived from the Bayer filter layout has been well proven throughout the years. Using the Capture One 7 processing engine it is possible to achieve an amazing level of detail and precise color from RAW files using this color filter layout.
The arrival of the X-Trans filter
In 2012 Fujifilm introduced a completely new Color filter layout named X-Trans. Fujifilm’s new color filter layout is based on a 6×6 pixel pseudo random color filter pattern (as opposed to the traditional 2×2). Despite a more challenging filter layout the engineers at Phase One have managed to make support for this new filter layout in Capture One 7.1, yielding natural colors and excellent detail rendition.
A camera with an image sensor that uses the Bayer Color filter layout can run the risk of producing moiré when photographing fine structures. Image content with specific types of fabric or distant building details are potentially problematic. Optical low pass filters, also called antialiasing filters, can be used to minimize the risk of moiré by slightly blurring the image, however this can result in an image with less sharpness.
In 2012, Fujifilm offered their own solution to deal with the above dilemma by introducing a new color filter layout named X-Trans. The theory behind the new layout was that by using a more random color filter, over a 6×6 pixel block, you effectively minimize moiré and can then remove the need for an antialiasing filter. Without antialiasing filter a sharper image can be achieved.

The X-Trans color filter layout with a 6×6 pixel pattern
You can, of course, never completely prevent moiré from happening with just a change to the color filters from the classical 2×2 Bayer layout to the new 6×6 X-trans layout.
A big challenge
The new 6×6 X-trans layout is a big challenge for all RAW converters. Many algorithms and process steps in the Capture One processing pipeline have been modified in order to handle this new pattern. As a result, Capture One now has a solution with which you can achieve excellent details and precise colors using these X-trans cameras.
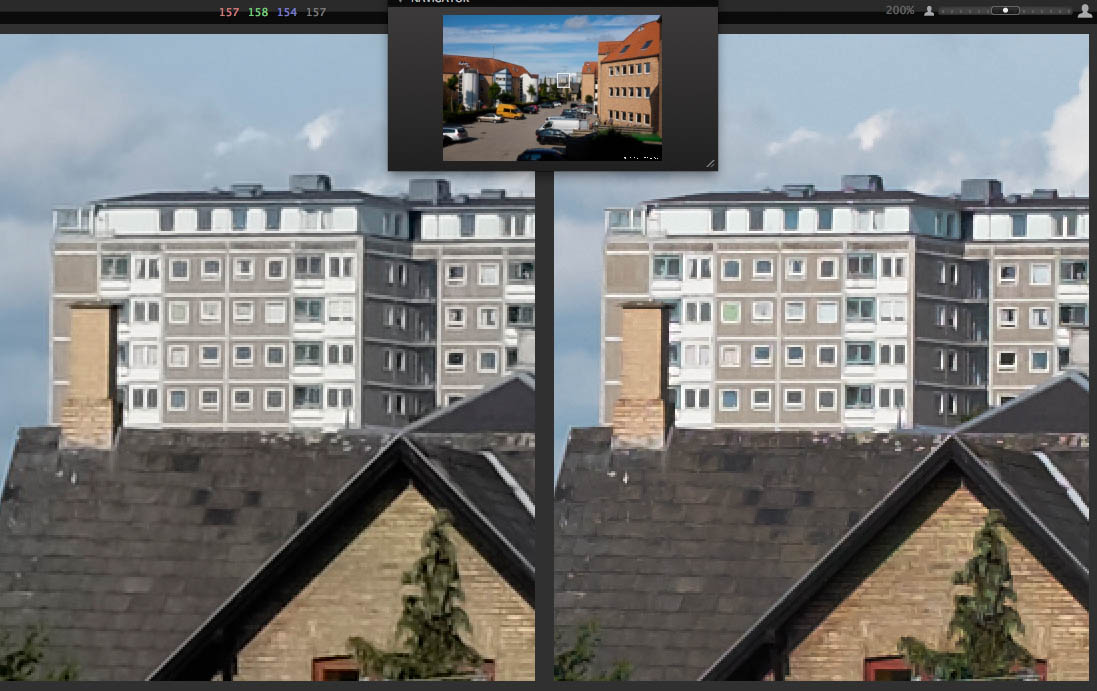 JPEG file from camera RAW file in Capture One
The image above is a 200% zoom into a X-Trans file from a Fujifilm X100S. The lack of antialiasing filter coupled with a sharp lens results in a very crisp image. If you compare the JPEG with the RAW file from Capture One you will see that, by default, Capture One extracts slightly more details.
More precise color rendition
The real benefit, however is a much more precise color rendition of the smaller details in the image. Look specifically at the colors of the curtains in the windows. In the RAW file you can see green and blue curtains while the JPEG file only shows gray curtains. Also notice the natural color variations in the bricks of the RAW file.
When using a sensor with a color filter array, moiré will occur when patterns in the image interfere with the pixel resolution. This is also the case when using an X-Trans sensor.
 JPEG out of the camera RAW file in Capture One.
The image above is a 100% zoom into a picture of two blue shirts. This specific type of shirt fabric has always created moiré problems when testing cameras and it is no different using a camera with an X-Trans color sensor. When no antialiasing filter is used and you have a super sharp lens you can always find a distance (from sensor to subject) where moiré can show up.
Remember that if color moiré occurs you can use the Moiré Tool in Capture One 7 to minimize the color moiré. The Moiré Tool can be applied to the specific area using the Local Adjustments tool, allowing you to apply strong settings adjustments without affecting other parts of the image.
 RAW file with moire RAW file after using the Moire Tool
After using the Color Moiré Tool on the RAW file, all color moiré has been removed. Although X-Trans color filter sensors promise moiré-free images, the reality is something else. Luckily, with the advanced Moiré Tool in Capture One 7 it is possible to remove the Moiré completely.
All the best,
Niels