NOTE: This article discusses an outdated version of Capture One. To learn more about our latest version, click here.
Capture One Pro 10 now provides a whole new way of proofing the quality of your output. Until now, you have only been able to validate colors or zoom in and out of the image to see the quality of the file as it will appear if processed with no scaling changes.
Today’s cameras offer very high resolution. Therefore, exporting your file at maximum resolution is often unnecessary. You may want to deliver smaller JPEG files to your client for selection, or simply export images for your website.
But how do you insure your processed images have the right amount of sharpening, film grain or JPEG compression? With Recipe Proofing, new in Capture One 10, you can now view the image exactly as it will be processed, according to the selected Process Recipe.
Adjustments made to the image whilst Recipe Proofing is active are shown instantly. This means that you can deliver the exact the look and quality needed, even for a small file.
One can even see JPEG compression artifacts if processing out to JPEG.
Typically, the goal is to have as small of a JPEG file as possible, with the right quality for your need. Now, it is as straightforward as adjusting the JPEG quality slider in the Process Recipe, to immediately see the impact.
Images for Web Use
When I process images out of Capture One for the web, I still want the highest possible quality.
Before Capture One 10, I was processing out to a 50% size TIF file. Then, in Photoshop, I downsized the image to a width of typically 1600 pixels. The downsizing process actually makes the image look softer compared to the 100% view in Capture One. This is a logical consequence of downsizing. Therefore, I need to re-sharpen the file.
Finally, I save it as a JPEG file with a specific compression setting.
However, I still need to check the final, compressed JPEG quality for “ringing” artifacts and banding in smooth transitions.
Now, in Capture One 10, all these steps are made redundant by simply using the “Recipe Proofing” option.
Recipe Proofing
Recipe Proofing requires that a Process Recipe is first selected in the Process Recipe Tool. For this example, I have chosen a Process Recipe named “JPEG sRGB 1600 Pixels for web”.
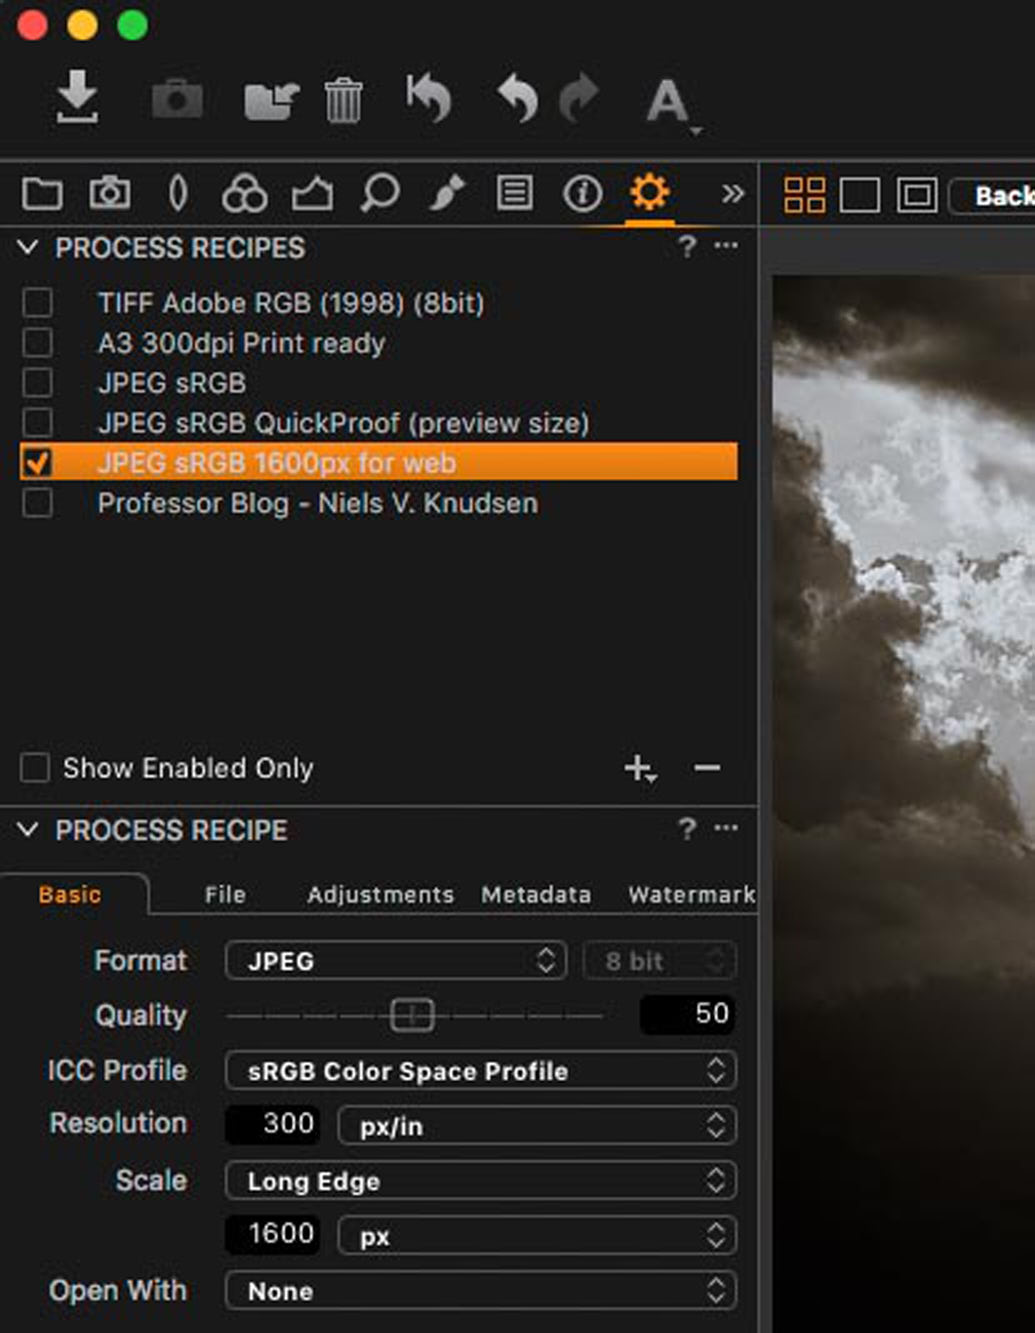
The Recipe Processes to a JPEG file with Quality set to 50. The ICC Profile is sRGB and I have chosen a scaling of 1600 pixels on the long edge of the image.

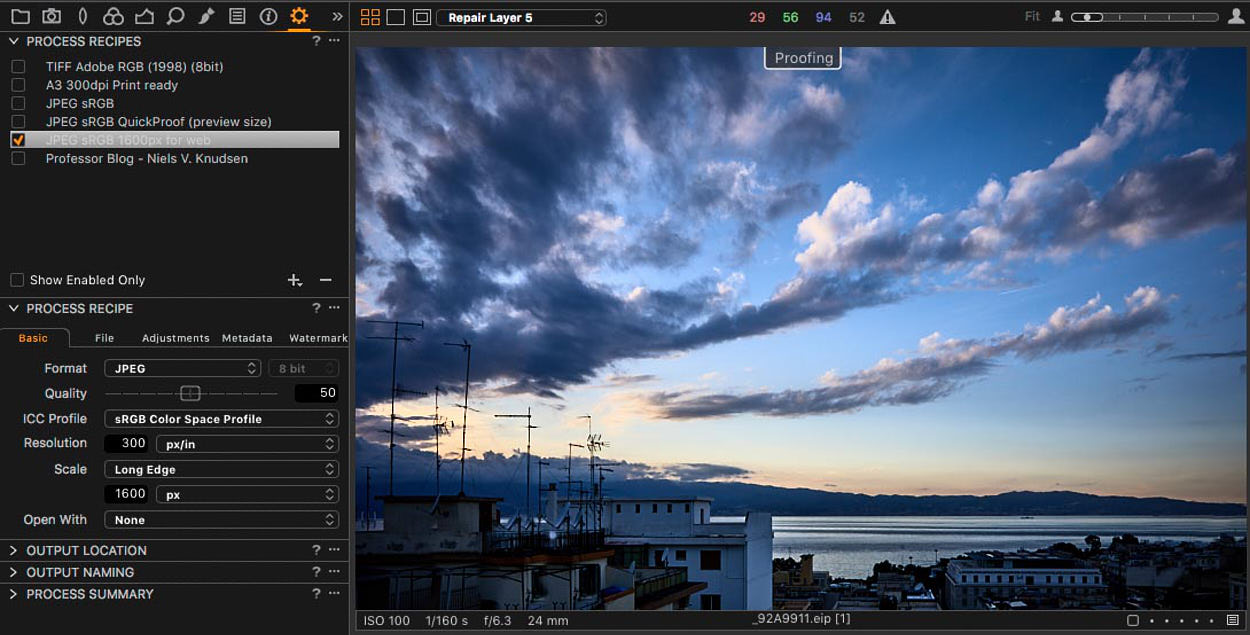
Capture One 10’s new default workspace contains a shortcut on the toolbar to activate recipe proofing. A red circle above the image marks this.
Once activated, the selected image in the viewer shows a “Proofing” label (See above image).
In this mode, the viewer will display the image according to the recipe. So, now zooming to 100% means 100% of the output size. This way, I can see the file exactly as it will look when processed and I can also check the sharpness and the quality of the JPEG compression.
Output Sharpening
To compensate for lost sharpness, caused by the downsizing of the file, I could just add some more sharpening in the Sharpening tool. However, I would then need to change it again if I were to process the same image with different scaling. To deal with this issue, we have added another new Capture One 10 feature that allows you to add Output Sharping to a Recipe.

In the Adjustments tab for the selected Recipe, sharpening is set to “Output sharpening for Screen” with a Radius of 0.6 pixel and an Amount of 80. With Recipe Proofing active, dragging any of the sliders gives live feedback in the Capture One viewer. Image update speed during Recipe Proofing may be slower, as it requires more processing.
Setting the Right JPEG Compression
The following image is good to show JPEG compression artifacts as it has smooth tonale transitions as well as fine high contrast structures:
Underneath, it’s illustrated how I have zoomed in to 200% with Recipe Proofing mode activated. Normally, I recommend validating the file at 100% view, but in order to make it easier to see the differences when choosing different JPEG qualities, I use 200% view.
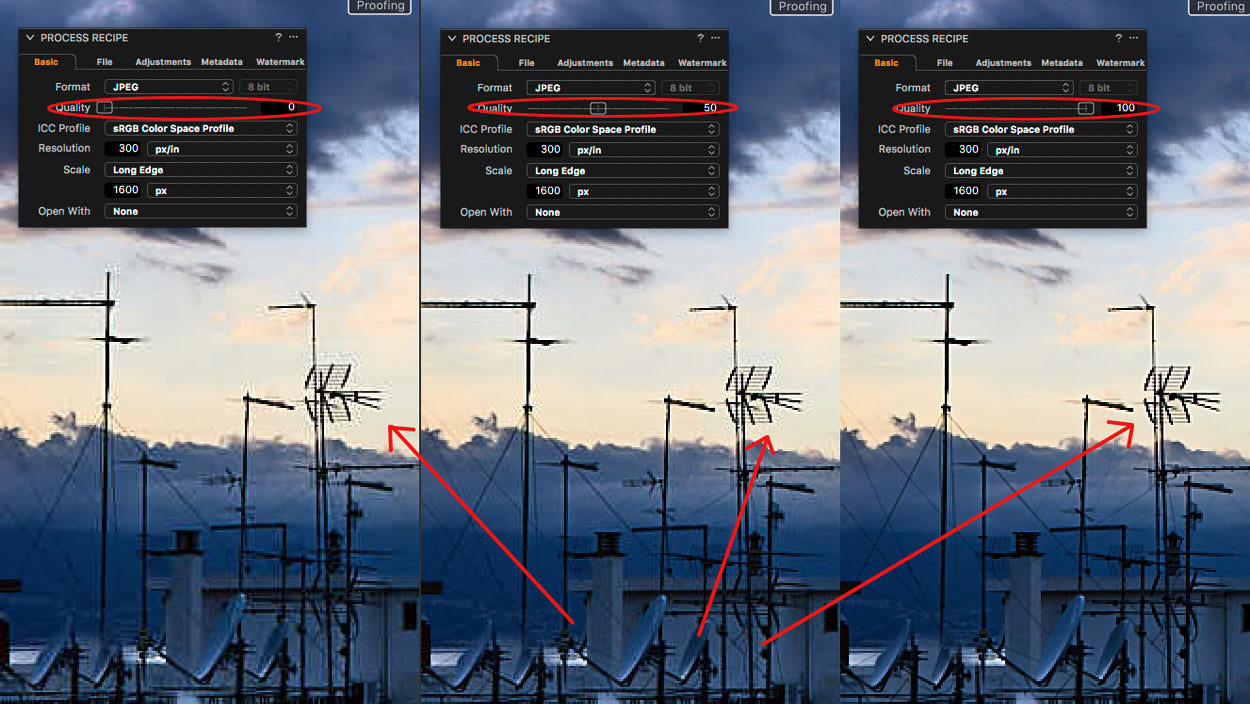
The image to the left uses JPEG Quality 0. In this image, the “ringing” artifacts around the antennas are obvious. The image in the middle uses Quality 50. Here, the ringing is much less noticeable. The image to the right uses Quality 100 and here no JPEG artifacts are visible.
The Process Summary Tool shows approximately how big the file will be. In the example above the file increases from 175kb to 245 kb to 1Mb. So, if you find that 50% quality works for you, then you will have a file that is four times smaller than using Quality 100. Consequently, the upload of files to a client, or Image loading on a webpage, will also be four times faster.
Film Grain
With Recipe Proofing, it has also become super easy to use Film Grain on scaled images as you can view the effect exactly as it will appear in the final image.
Recipe Proofing in Capture One 10 simply provides a much more efficient workflow with full control of the image quality whenever you need to resize images.
If you want to try out the proofing and sharpening, together with a lot other new features, you can download a free 30-day trial or visit our online software shop to upgrade, subscribe or buy a new license.
If you have any questions about the new Capture One Pro 10, please feel free to add a comment.
Niels,
The Image Quality Professor

The Image Quality Professor
The digital pioneer, Niels V. Knudsen, is Phase One’s Image Quality Professor and founder of the IQP blog. Moreover, he is responsible for breakthrough advancements in image quality both in Phase One’s medium format camera systems and in Capture One Pro.


This is awesome because it fixes the color shift that you see with High ISO images at different zoom levels.
Hi Cameron,
Thank you, I am happy to read that you like the new Proofing feature.
Best regards,
Niels, The Image Quality Professor
What is actually best settings for facebook? 2048 and?
https://www.facebook.com/help/266520536764594/
I have the same question – what are optimum JPEG settings for Facebook? I always notice degradation of the image after upload:
Current settings are:
JPEG
100%
sRGB IEC61966-2.1
Long Edge 2048px
300px/in
Output Sharpening for Screen
Can I do better?
Hi Harlow,
Facebook does some of its own compression on uploaded images. So thats the best you are gonna get with those settings!
David
Nice feature – The normal view setup in my CP10 is AdobeRGB and when the proof profile is turn on CP is adding a “output profile” on top of my AdobeRGB or? – If I want to make color changes to the image with the “proof profile” turned on – I need to make a “clone with adjustment” of the image and make the adjustment on clone to keep the original without changes or ?
Hi Jan,
Thank you for your comment.
The new output proofing feature in Capture One 10 hasn’t changed the way the application displays colors.
If you work with the default proofing setup in Capture One, colors in the Viewer are always shown according to the color profile chosen for the selected output recipe.
This means that colors are displayed the same way independent on whether Output Proofing is turned On or Off.
The new thing in the Output Proofing feature is that it deals with all the aspects of resizing an image.
If you normally deliver your file in Adobe RGB, and you then want to optimize the image for web use in Srgb, it could be an idea to make a variant specifically for the web. My experience though is that only very special colors would need an optimization for Srgb, but often if I use film grains or lots of clarity, I will optimize a variant for web use.
Best regards,
Niels, The Image Quality Professor
I never use JPEG unless ordered to do so by a client. Instead, I use TIFF and reduce the resolution accordingly. My minimum color space is Adobe(1998), 8-bit color. Some of my clients want to do their own adjustments.
Not a lot of mention of colour in the article.
Will this provide an accurate view of final sRGB colours ?
In other words, are we at WYSIWYG ?
Capture One has always been able to render the final color space as defined in the recipe. But this assumed 1:1 conversion. What has been added is the ability to preview this in relation to any final scale and sharpness parameters. In some cases this affected color (depending on noise/averaging) when scaling. Now its all come together as a complete WYSIWYG rendering.
Gotta admit to some scepticism, given the profound difference in the past, really boosted the reds, I thought.
Way too in your face for just resizing you’ld think.
But that may be a product of just how far we sqish nowadays,
7362 down to 1600 across is a fair old jump.
Anyhoo, you reckon it works,
so, I’ll fire up the trial and see how we went
Ta.
I don’t see proofing working at all unless an image is significantly zoomed in. At zoom levels less than 50% images look much darker than sRGB JPEG output. It happens for low ISO levels too. Someone on a different thread cited Capture One Pro support responding to this problem with “that the way the product works.” Doesn’t seem to be an acceptable answer. In m opinion, this issue makes the product unusable at least for some workflows such as RAW to JPEG.
Hi Andrei,
Proofing is designed (naturally) to work at 100%, so scaling changes are shown correctly in the Viewer. Viewing at any other zoom level is not going to accurately proof sharpening, scaling, JPEG artefacts and so on.
David
Hi David,
I fully understand that the “accurate” proofing is only possible at 100% zoom level. The bug I’m talking about is in that the proofing view doesn’t reflect any sharpening adjustments unless the zoom level is higher than 33% or the output image size is small enough (around 4000 px or less).
– Andrei
Sharpening adjustments would be useless at anything other that 100% view though, therefore its pointless to view at any other zoom level when using proofing.
Hello Niels,
I really love this new feature, however it seems to me that the file size quoted in C1 is about 50% of the file size. In other words, I played with some files and got it down to 120Kb, according to C1, but when processed, the real size became somewhere around 240Kb. Is there any way to get this more accurate?
Thank you,
Hi Frans,
In the File tab of the process recipe, you could uncheck “Create Thumbnails on save” to see if that helps.
David
I have the same issue where process summary preview estimates a file size significantly smaller than the final output. I was excited to see a potential solution suggested by unchecking the Create Thumbnail in the output file tab, but alas I went to do that and it was no checked to begin with. Any other suggestions for having the preview size estimate more accurate?
Hi Aaron,
Remember, JPEG can only be an estimation, so the final output might vary in size, based on image content. If you have any huge discrepancies, please let support know. http://www.phaseone.com/support.
Hi!
Do you happen to know if it’s possible to export files without adjustments applied in other than raw format? I’m looking to create a behind the scenes timelapse and for this particular case I would like to export jpg files without Capture One settings.
Why is it that if I export to .jpeg at 100 my file is between 4-6 mb? However, if I export to photoshop as a .tif , make my adjustments and export to .jpeg it’s 17mb? I’d absolutely prefer that on export, capture one doesn’t compress so much. What am I doing wrong?
I like the output for prints @ 100%, I think C1 subtly better than LR.
But posting to web, I find that it is not handsome to work. How can I improve output handling:
LR excels in allowing a max. file size (and it will accomodate to that itself) while in C1 I always have to export, check, redo with a diferent quality – quite tedious. LR is better ergonomically. Such a max file option is on my wish list for C1!
Hello!
Yes, i have the same issue. The JPEG file size is approx 856 KB In the process Summary but 1,87 MB in Bridge. How can you help? Thanks.