
I have always photographed a lot of people, and usually tethered to the computer. My workflow revolves around setting up quickly for tethered shooting, and then afterwards rating and color grading.
By default, Capture One Pro is set up so the most commonly used tools are visible. When you get deeper into Capture One Pro, you’ll start to realize that there are some tools you never use, or at least very rarely use. Those unused tools are then simply clutter in the interface.
Capture One Pro is highly customizable when it comes to the user-interface. And when it comes to editing your images, there are usually several ways to approach the same result. When you know which tools you use most, all others can potentially be removed.
I have customized my own workspace, as you can see in the screenshot below. The keen eye will notice that the top tool bar has been modified quite a bit. I have also added another Tool Tab, using the Quick Tool Tab icon for easy recognition
Top Toolbar
I added the Focus Mask, Copy/Apply Adjustments, and Preferences, and reorganized to suit my needs. I am a big fan of the Focus Mask, which is a deeply integrated part of my rating workflow.

The double arrow Copy/Apply Adjustments makes the Copy/Apply even faster, as it does both operations at the same time. Using the Shift-key will apply all copied settings immediately.
The Preferences tool is there to allow easy accessible adjustments of the threshold for the Focus Mask. Noise and pixel-count varies with different cameras and different ISO-sensitivities, and that affects the Focus Mask, if not adjusted for with the Threshold.
Quick Tool Tab
I added a new Tool Tab to contain my most frequently used tools. Let’s go over why I added those particular tools, one by one:
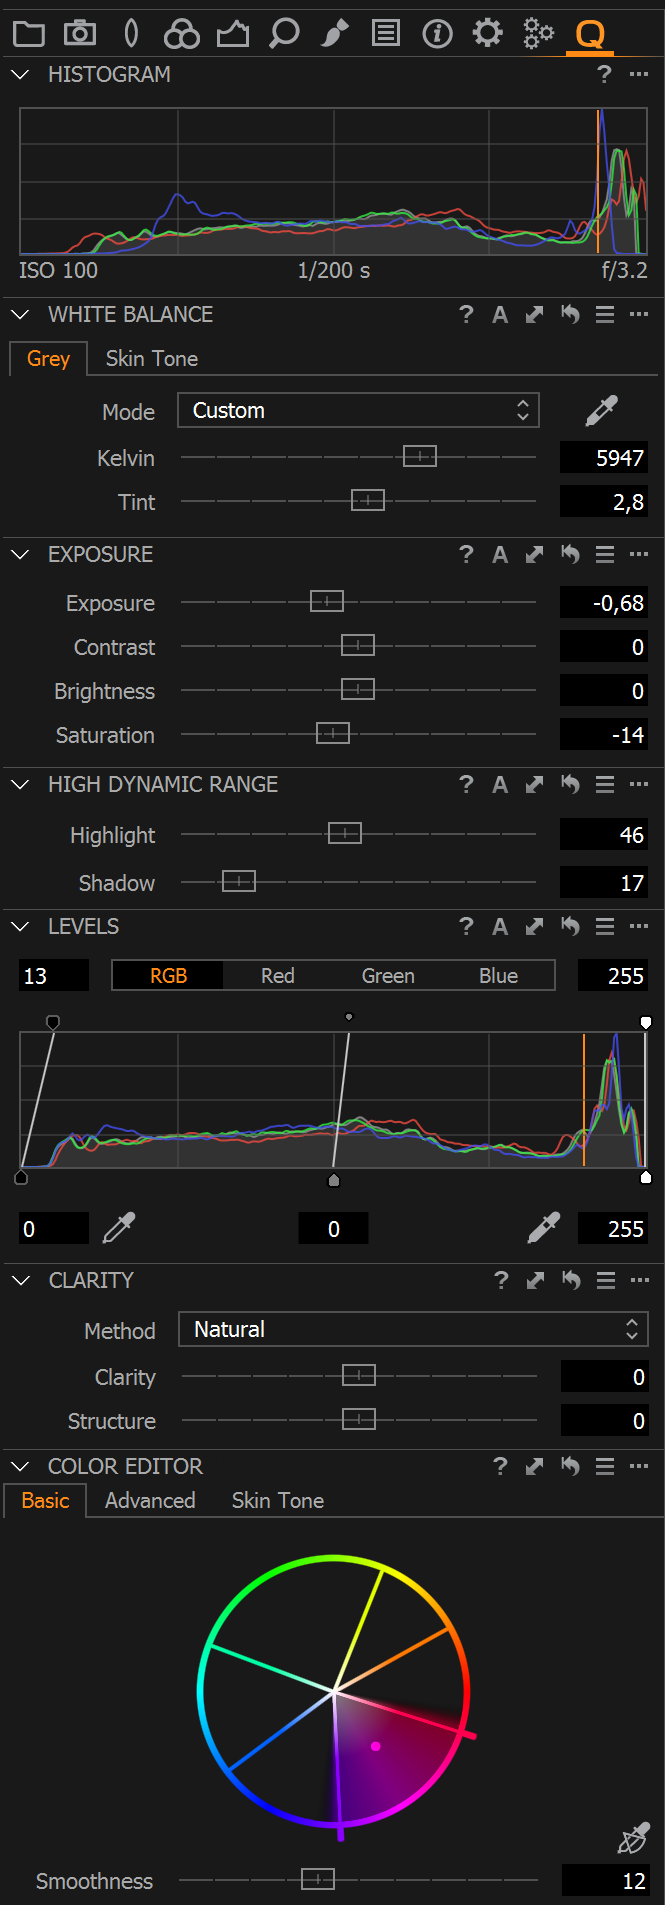
Output Histogram: I use the Histogram to check general exposure and to keep highlights in the skin under control. When grading the image, the exposure can also be helpful to ensure a balanced adjustment. Sometimes I find myself lost after hours of looking at pictures and trying to find a nice look for each of them. In Capture One Pro there are many histograms, but this Histogram shows the final result.
White Balance: I use the White Balance tool as a first and basic grading tool. I push the images in the general direction I want.
Exposure: I use the four sliders to dial the rough tonal look of the image. Recently I have started using Brightness more. The underlying algorithm was changed in version 9, and gives a very nice creamy look when combined with matching underexposure.
High Dynamic Range: Sometimes the Exposure tool-changes can add a little too much shadow or highlight to the images. With this tool, I can recover what was lost, which basically limits my contrast changes to the wide midtones.
Clarity: I use the Clarity tool for one of two things in an image containing skin. Either a smoothing effect or as a micro-contrast enhancer. When smoothing, I use negative values, which gives the skin a much smoother look requiring less retouch afterward. However, the loss of contrast can be too much. On beauty shots, I tend to use positive values. That causes the skin to have more local contrast and enhances the lines of the face. It does inherently make the skin a bit rougher, so techniques such as Dodge and Burn are needed to complete the look.
Color Editor: If I have localized colors I want to change, I use the Color Editor. Depending on what tab you are working in, it provides very fine and precise control over a given color.
Setting up the general appearance
I always set my background to medium grey or even a tad lighter when adjusting images. While a black background makes the interface a bit easier on the eyes for long durations, you tend to edit low key images to dark, if the Viewer is also very dark, and vice versa of course.
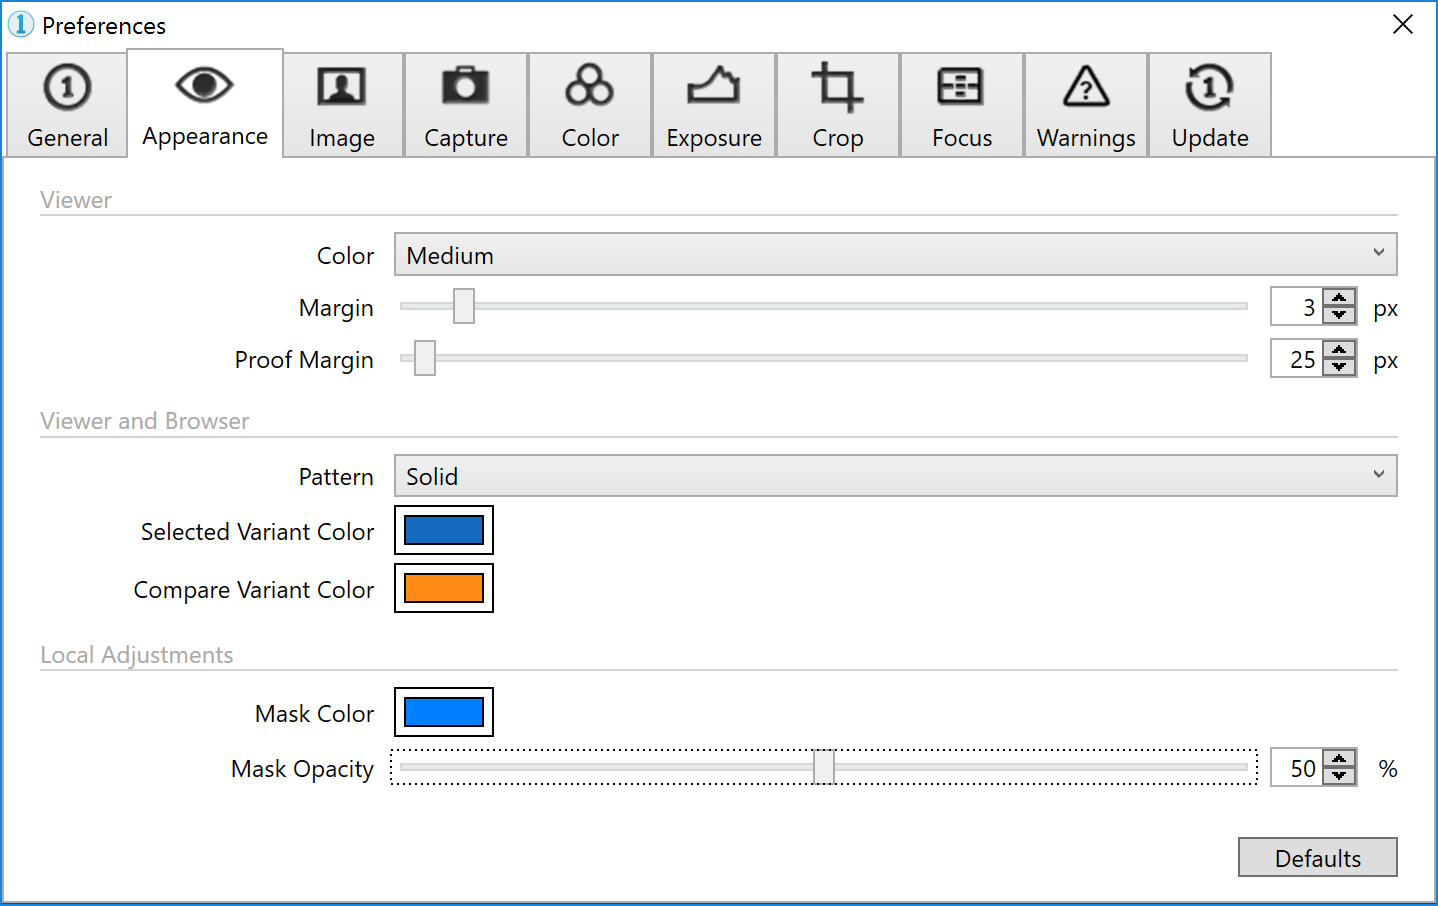
I also change my Selection and Mask Color away from the default. My selection square (Selected Variant Color) in the Browser is a nice Phase One blue-ish. I like shooting high-key images, and thus the white selection border can be quite confusing, as you can have trouble seeing it.
I’ve changed the Mask Color away from a usual skin-tone (like red or yellow) to a contrasting color to more easily see where I am drawing a mask. This especially useful around lips or reddish skin.
Session Templates
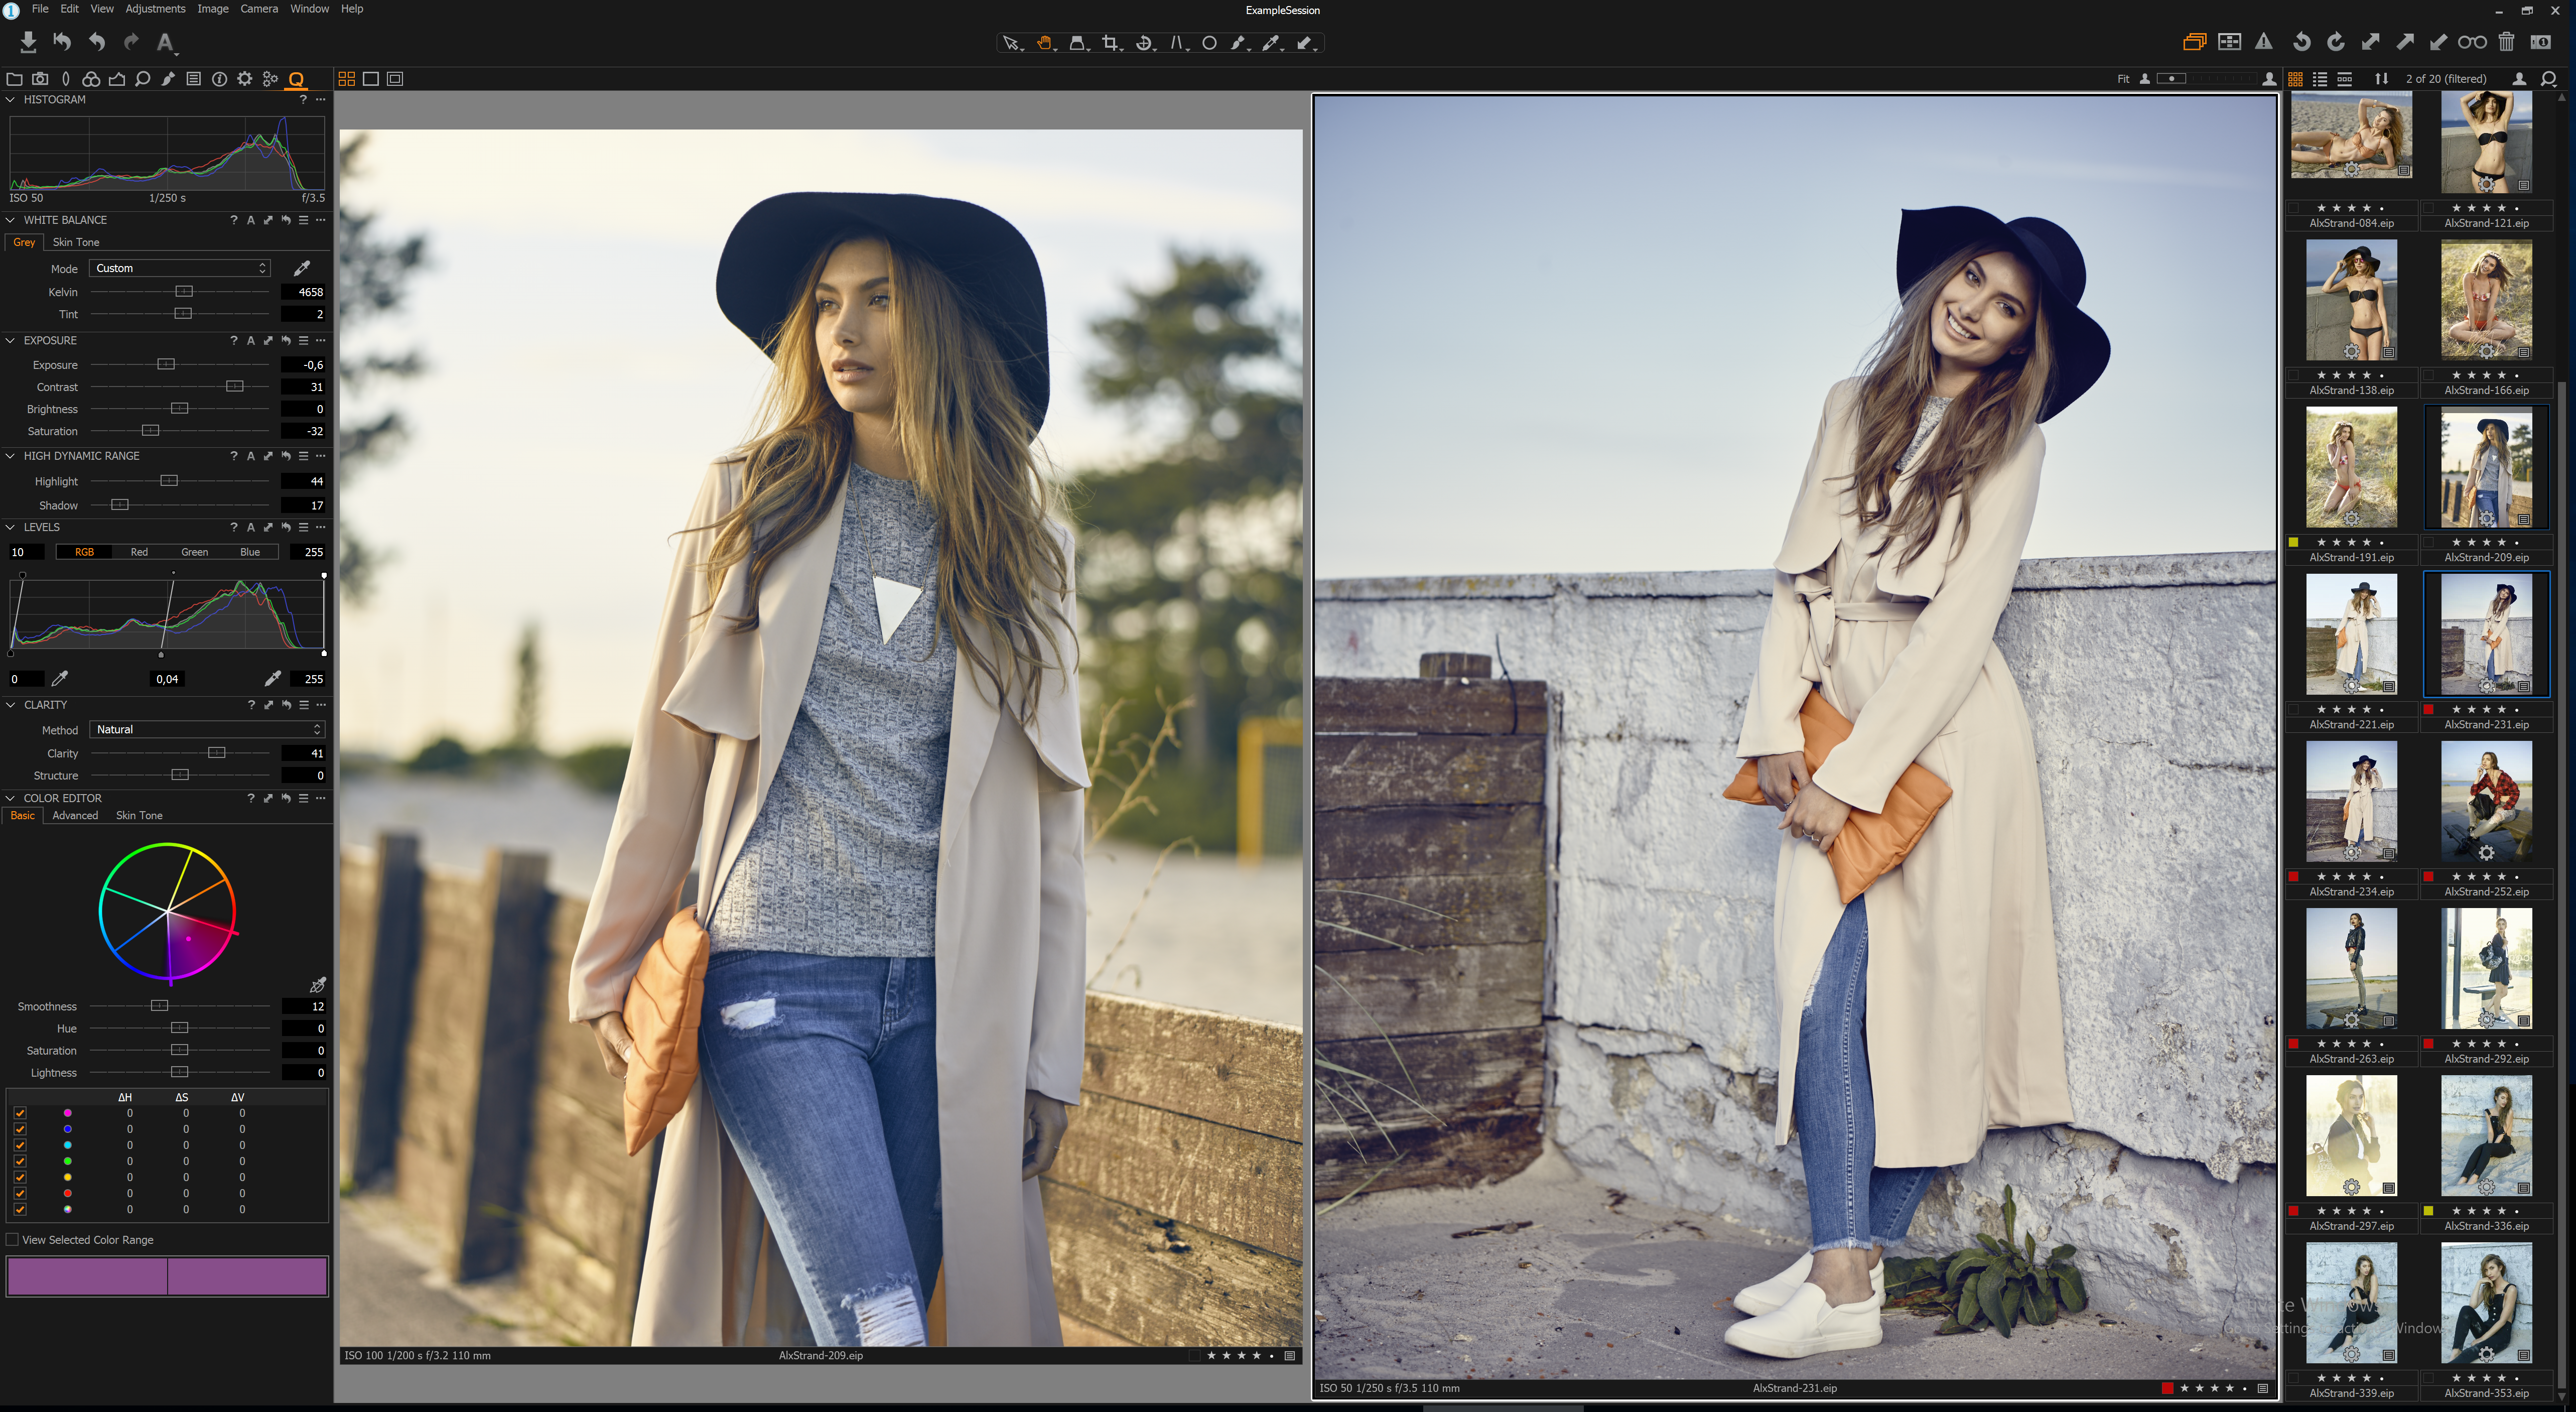
Lastly, I want to show what I do in the studio when starting a new session for a particular shoot. I have always used Sessions, as it fits nicely with my job-to-job workflow. Typically, I just put the Session and its images on the backup when delivered, and then forget about them.
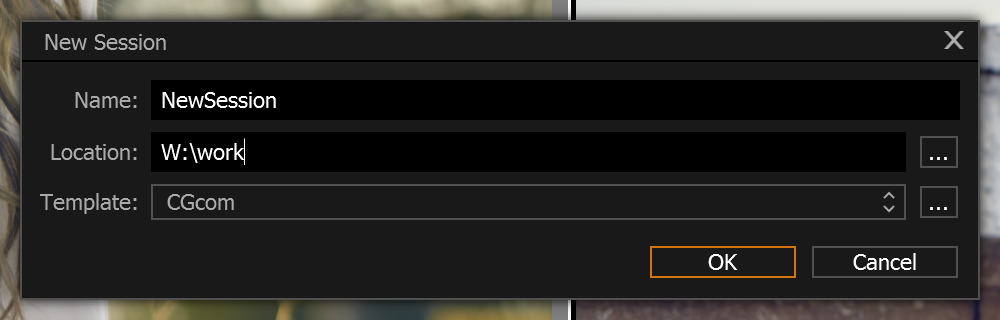
Capture One Pro can use templates for easy setup of things like Next Capture Naming. I use a template that, among other things, configures my Session to use the Session Name and a 4-digit counter. I find repetitive work demoralizing, so using the Session Templates helps me focus on being creative on set, and not stuck with tedious, repetitive tasks.
When you want to save a Template, simply configure a Session as you want it, and then go File > Save as Template.
When creating a new Session, just select the Template from the dropdown.
Rating
Lastly I want to give an insight into my rating-workflow. I usually have hundreds, and sometimes even thousands of pictures after a day’s shoot. There are of course the usual dividers such as different looks, clothing, light setups and such; but choosing a single image out 50-80 pictures is a daunting task.
I use multiple iterations of rating, and iteration has a different theme, so that fewer and fewer images are left to choose from. I use the Filters tool to only show me the images I want.
Initial rating between 1 and 2 stars: For the first iteration, my only concern is the model’s facial expression. I spend no more than half a second looking at each, and if I don’t like it within that half a second, it gets a 1 star rating. If I do like it, it gets a 2-star rating.
Rating for 3 stars: This iteration is always camera focus. I use the Focus Mask to establish if the image in sharp enough for the client, and that focus is in the right place. If it is, it gets a 3-star rating, the un-sharp images are left untouched.
Rating for 4 stars: For this iteration, I take a deeper look at the image. I look at things like pose, composition, lighting etc. The ones that are good enough get 4 stars, other are left untouched. At this point I usually send a Web Contact sheet to the client, asking them to choose what pictures they want. I can have peace of mind knowing that whatever they choose is sharp and works in terms of pose and light.
Rating for 5 stars: For this iteration, I enter the selects from the client into Capture One Pro. There is no need to manually find the images one by one in the Browser, as Capture One Pro has a tool for auto-selection from a text list. You can find that in Edit > Select By > Filename List.
This flow does take a bit of time; however, you have a rating history and can easily select more images for the client from the 3 star rated images without having to redo your rating. It also makes it easy to find images you might have overlooked in your first iteration, as those will have no star rating.
I hope this blog inspires you on ways to customize Capture One Pro specifically to your needs.

Christian Grüner
Christian is Test Manager with the QA/Test department in Phase One. In the very little spare time a job in Phase One gives Christian, you’ll find him shooting pictures, recording aerial imagery with pro-grade drones or trying not to crash on the mountainbike in the woods.


Thanks for the article.
Could you share your workspace and session template for reference?
You are welcome. Glad you could use the suggestions.
I will make the workspace and session template available shortly.
+1 re: downloadable workspace, and thanks for the thorough explanation!
Could you explain more about the focus tool. I never understood the use of this, it doesn’t make sense to me. How do i find the different histograms
The Focus Mask basically shows you your Focus Plane through the image.
If you see everything indicated as sharp (the mask color filling most of the Viewer), you should adjust the Threshold to a lower value, and vice versa, if no mask can be observed.
The Threshold value will differ with resolution and iso-noise, so adjust accordingly.
The different histograms can be found all over Capture One, but the main ones are the Exposure Evaluation Tool, found in the Capture Tool Tab. This represent the image before any adjustments.
Then there is the Histogram Tool in the Exposure Tool Tab, that represents the image as shown in the Viewer, so all adjustments, icc-profile and so on.
Other histograms can be found in the Levels Tool and the Curves Tool, and represent intermediate steps of the imaging pipeline, that Capture One uses.
Thank you for sharing your rating iteration and why. I shot events and headshots and can come out with hundreds, if not thousands per session. Cycling through the 1-5 ratings quickly and dwindling them down helps me stay focused on the best picks that I’m handing off. I also treat this as a culling session to keep my overall catalog size down.
You can read more about my rating methodology at https://axelerant.com/how-to-shoot-open-source-photography/ under `Culling Images by Ratings`. Comments are appreciated as I’m helping other photographers know how important it is to capture their communities.
Happy you find it useful!
Great to see users of Capture One helping other users!
Please is it possible to get a download of your workspace as has been made available for the landscape workspace?
I’m also still waiting for you to please share your workspace via download. Thank you!
I’ve made a workspace file for those who have been requesting (Windows Version) – Setups up the tools and customized tool tab.
Download it free from my site:
https://www.seanmicah.co/photographers.
Thanks, Christian, I really like this tutorial a lot. Being a photo editor I need it deeply.