Every new upgrade to Capture One brings new tools and versatility that leaves you in a bit of a tight spot as a photographer. It’s a good spot to be in for sure, a Champagne problem if you will. You’ve spent years editing images that you’re proud of, but with the new tools you start to notice how much better they can be, and how easily you can make that happen.
Realizing the true potential
With the release of Capture One 9 I started digging through some old images. There were some that I loved in the moment, but when it came to editing, I just couldn’t quite make it happen. I’ve revisited them from time to time but with Capture One Pro 9 I was finally able to pull out the potential I knew was there.
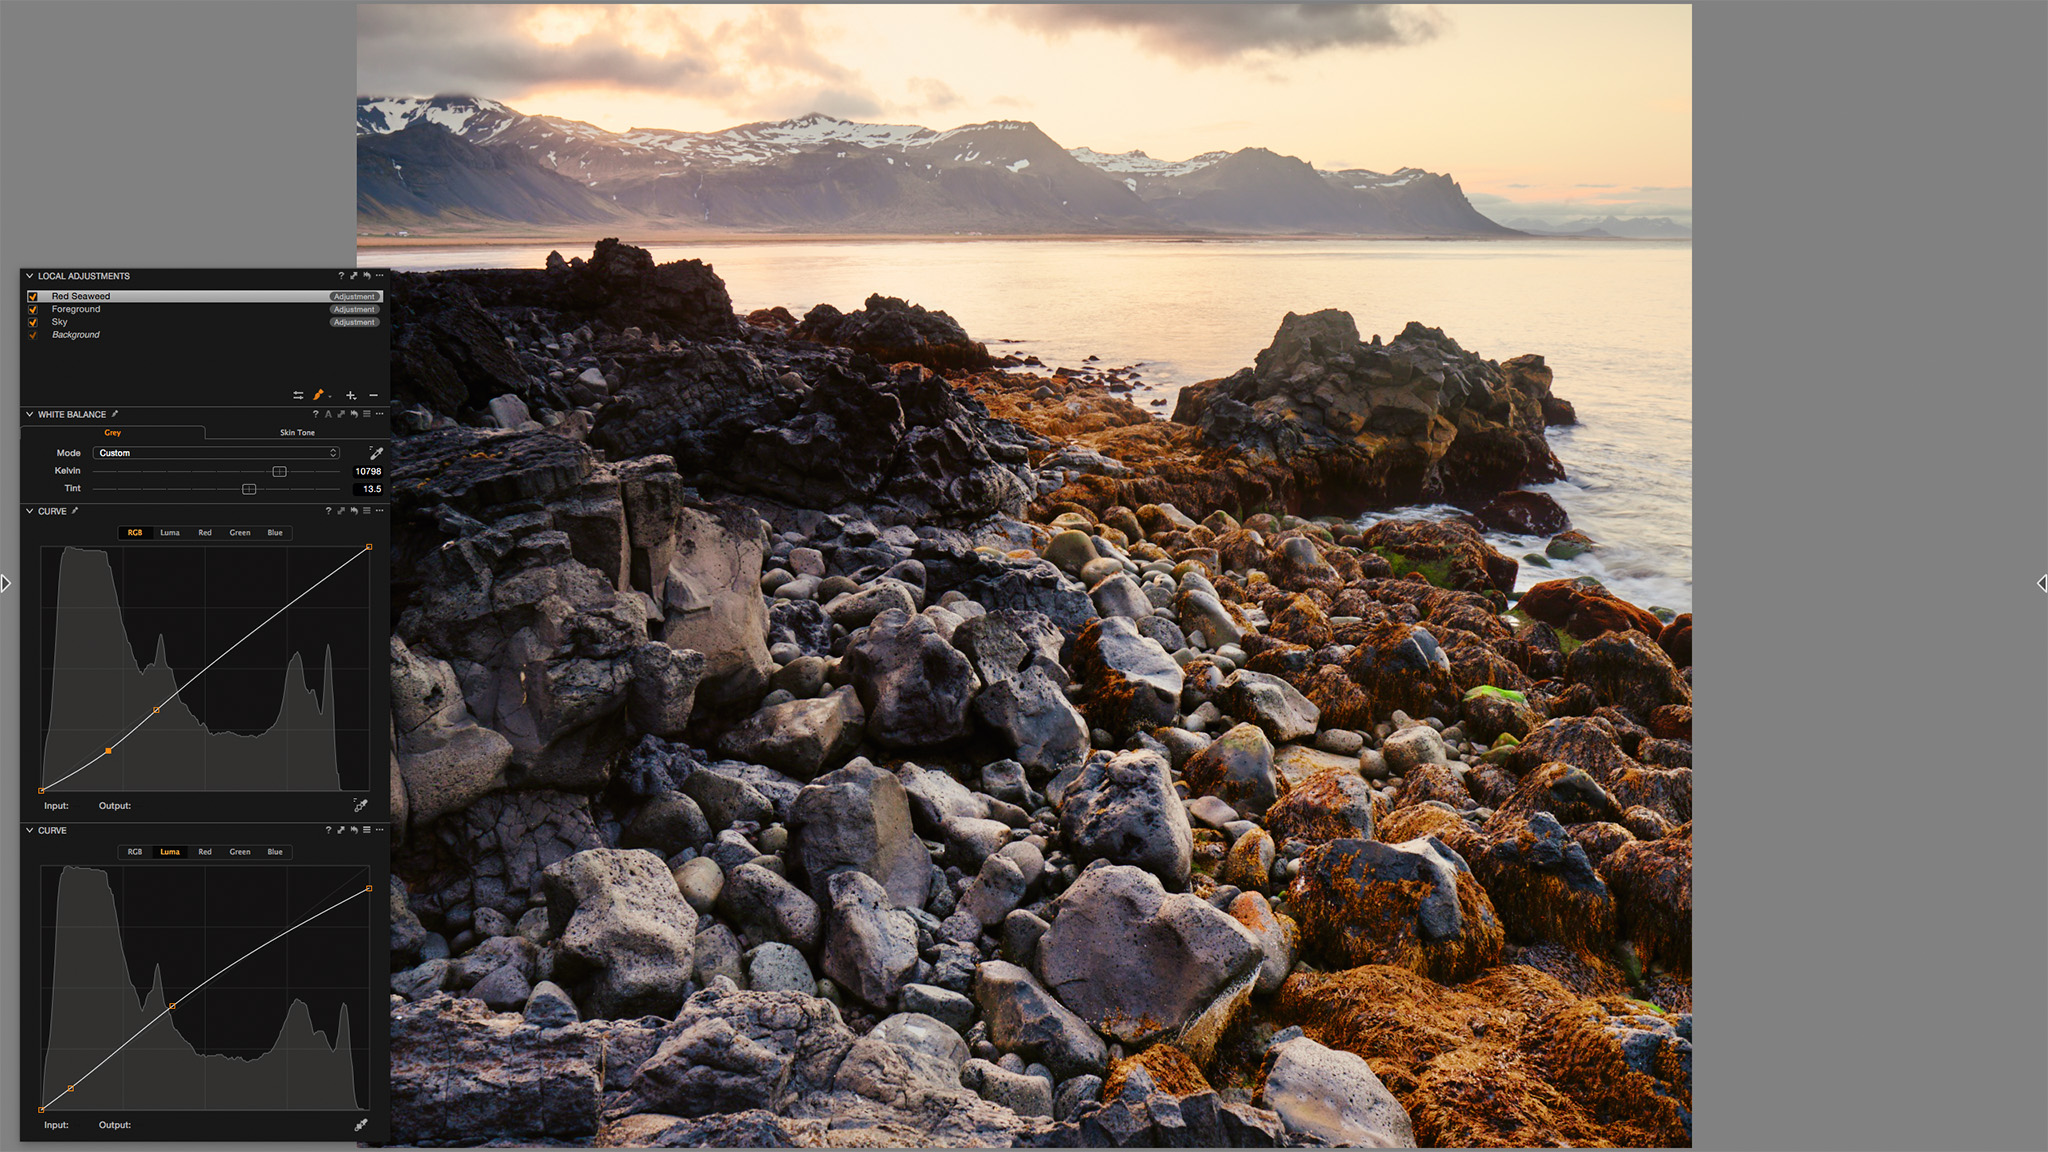
Back in 2012, I was fortunate enough to be lending a hand on a PODAS workshop in Iceland. Working on a PODAS is a fulltime job. Assisting all the participants to ensure they get the perfect shot leaves little time for you to do the same. I was able to get a few frames in here/there though, and one beautiful sunrise left me focusing on the beauty of the scene rather than properly setting up my shot. As a result, I missed the light and was left with a few flat but in-focus images. I knew the scene was there, but pulling it out and editing it to fit what was in my mind at the time was a challenge. Opening that file up in Capture One Pro 9 however, was a huge game-changer.
With the addition of Local Curves Adjustment and the ability to create an accurate and detailed mask from the Advanced Color Editor tool gave me just what I needed to bring the image back to what I knew it could be.
The image I captured was pretty flat and by all accounts, a failure. I had nailed the focus but had missed that fleeting opportunity to capture the light as it skipped across the sea in front of me. By the time I was on the ball to press the shutter, it was all gone and I only had my memory of the moment to reference.
Trying to retouch it in Capture One 7 was too much work and the image was shelved. Luckily, the shot stayed in my mind and when Capture One Pro 9 came about, I blew off the dust and gave it a go… 10 minutes into editing it and I was beside myself with how easily I could get it to where I knew it should be.
I started with the basic adjustment workflow I give to all my images. I started with a minimal contrast ICC profile and further flattened the image by applying a Linear Response curve. I always like to start editing with a flat, dull and boring RAW file so that I can build it up step by step until I’m satisfied with the results. I find that this method gives me better reference for all the detail that is present in the capture, so that I can ensure I bring it out to it’s full potential, or make the decision to lose it in a clear and responsible manner.
The beauty of Capture One Pro 9
The beauty of Capture One Pro 9 is the control. The speed improvements help, but it’s the control for Local Adjustments that really make it stand apart from Capture One Pro 8.
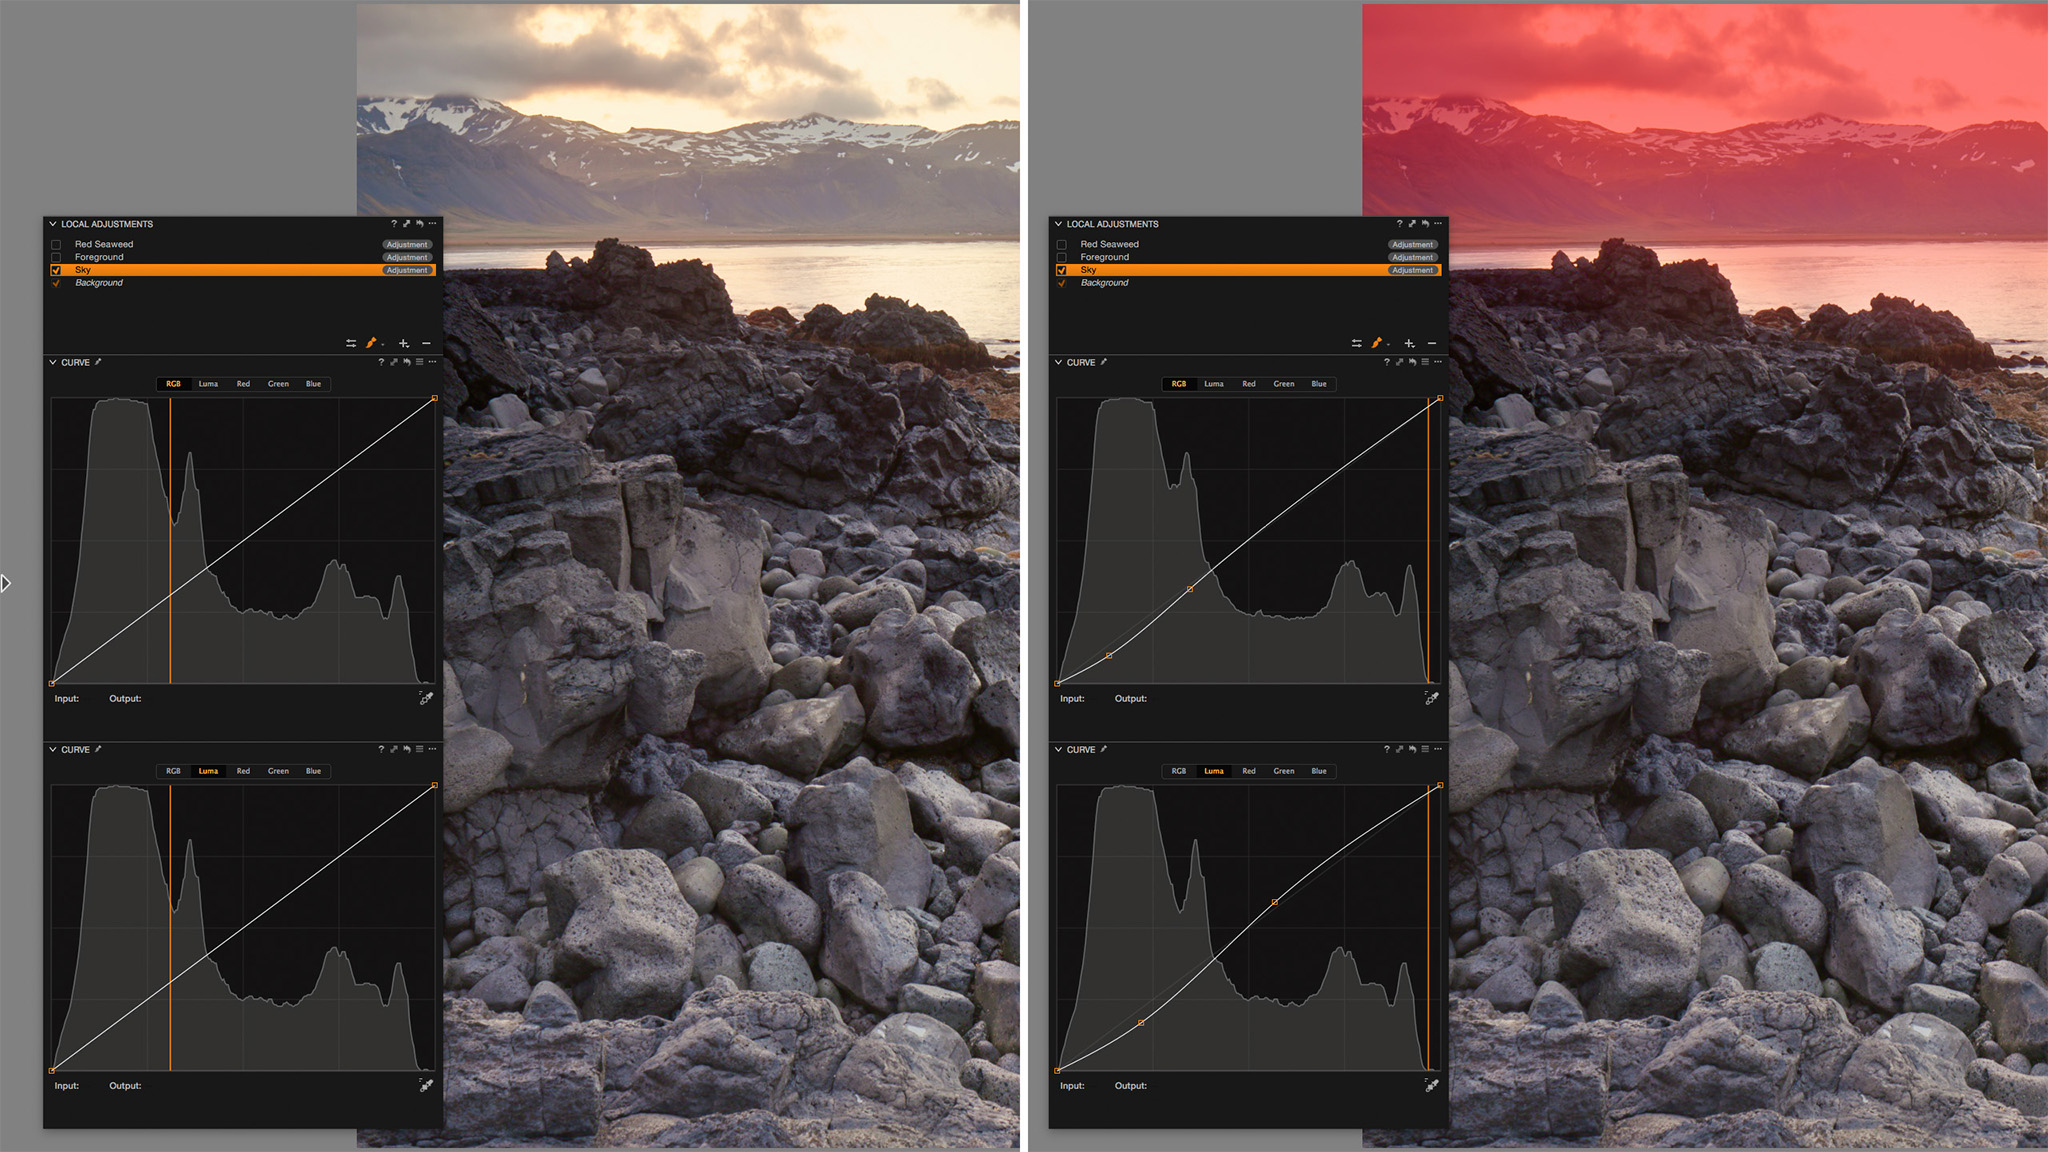
I started simply, separating my foreground and background.
A Gradient Mask on the mountains, and a Local Curve Adjustment to that mask, did the trick. See below.
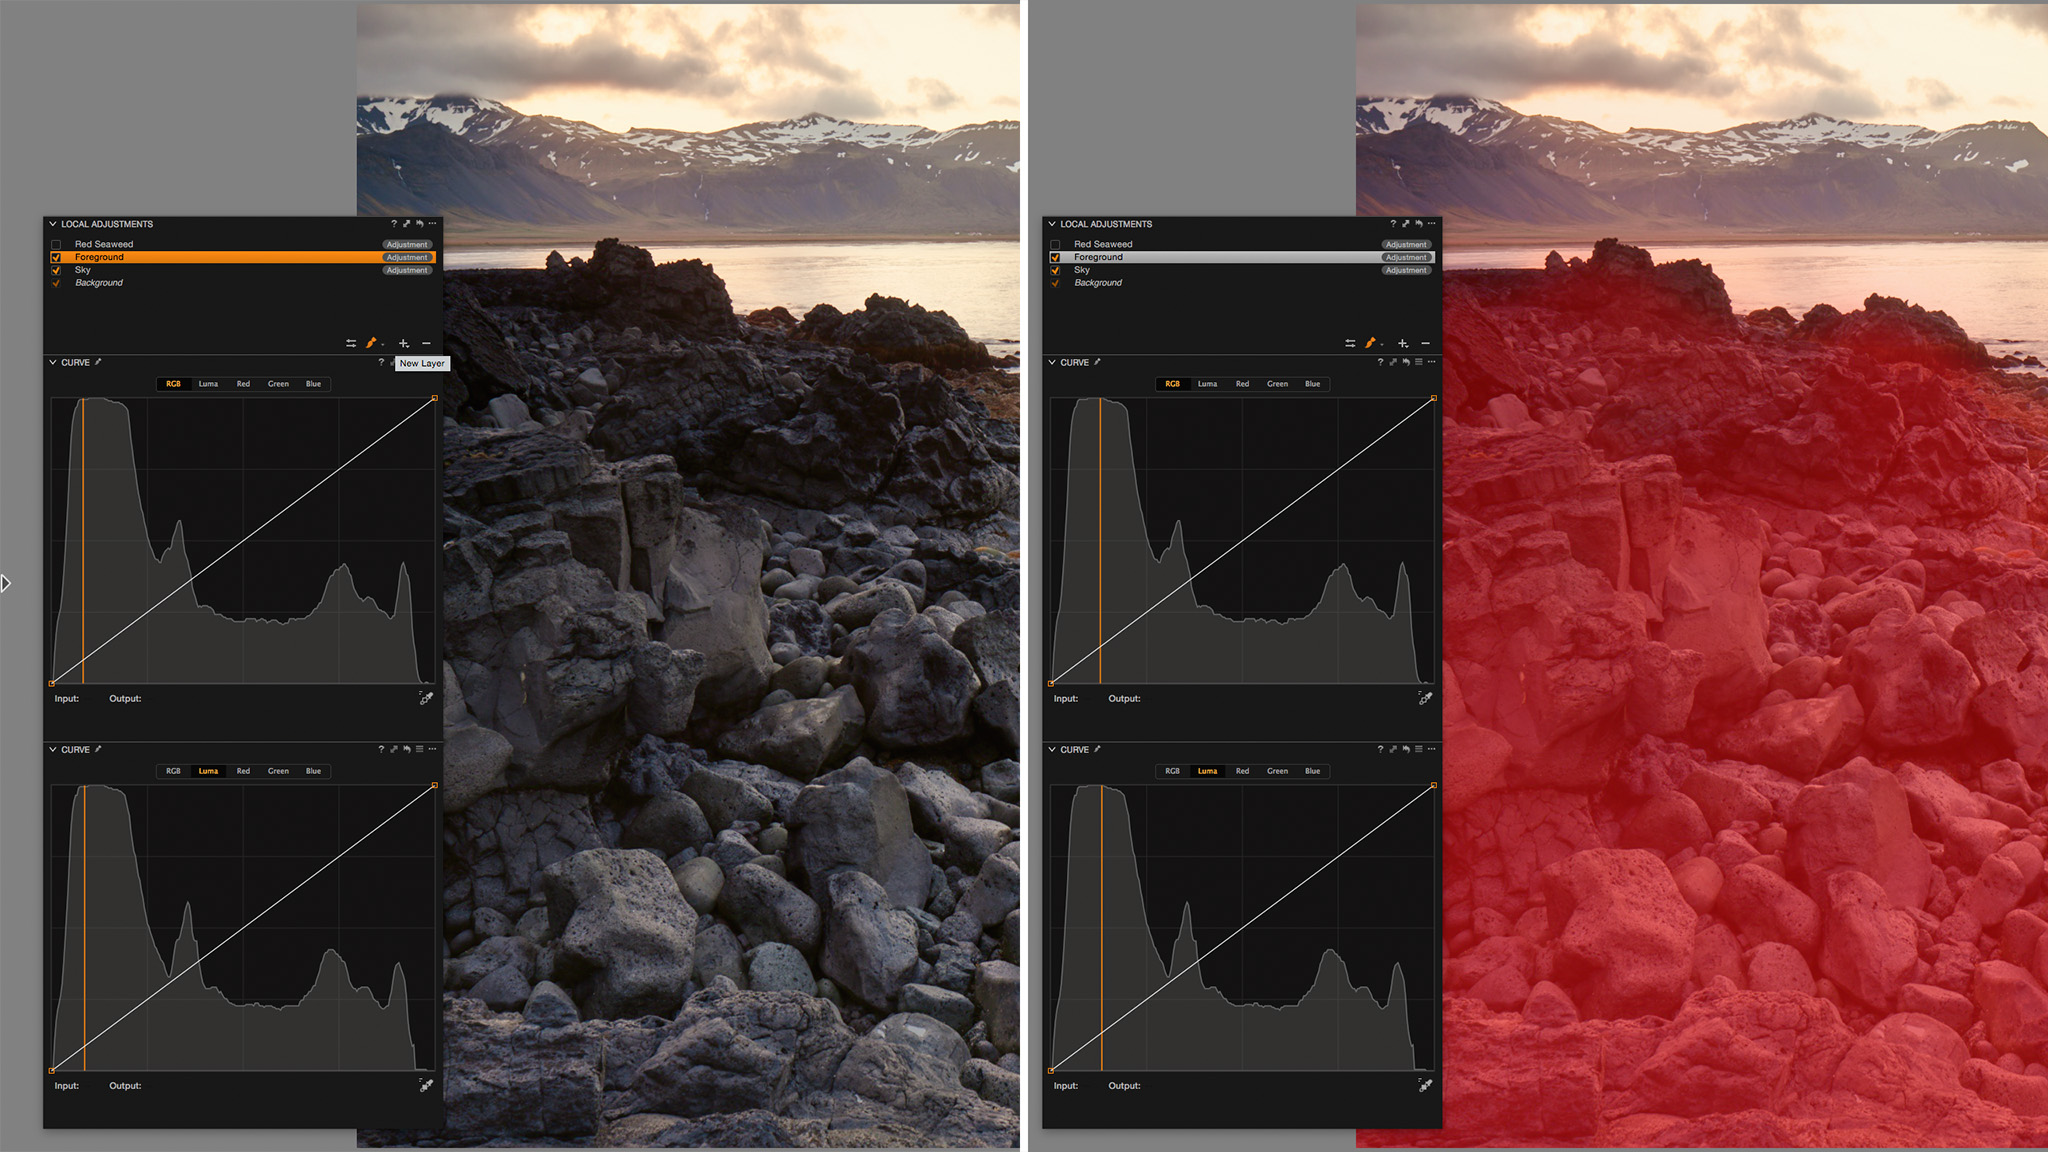
From there I knew I had to separate the foreground. There was some rich red/brown seaweed on the rocks but because of the flat light, it just blended together with the rocks.
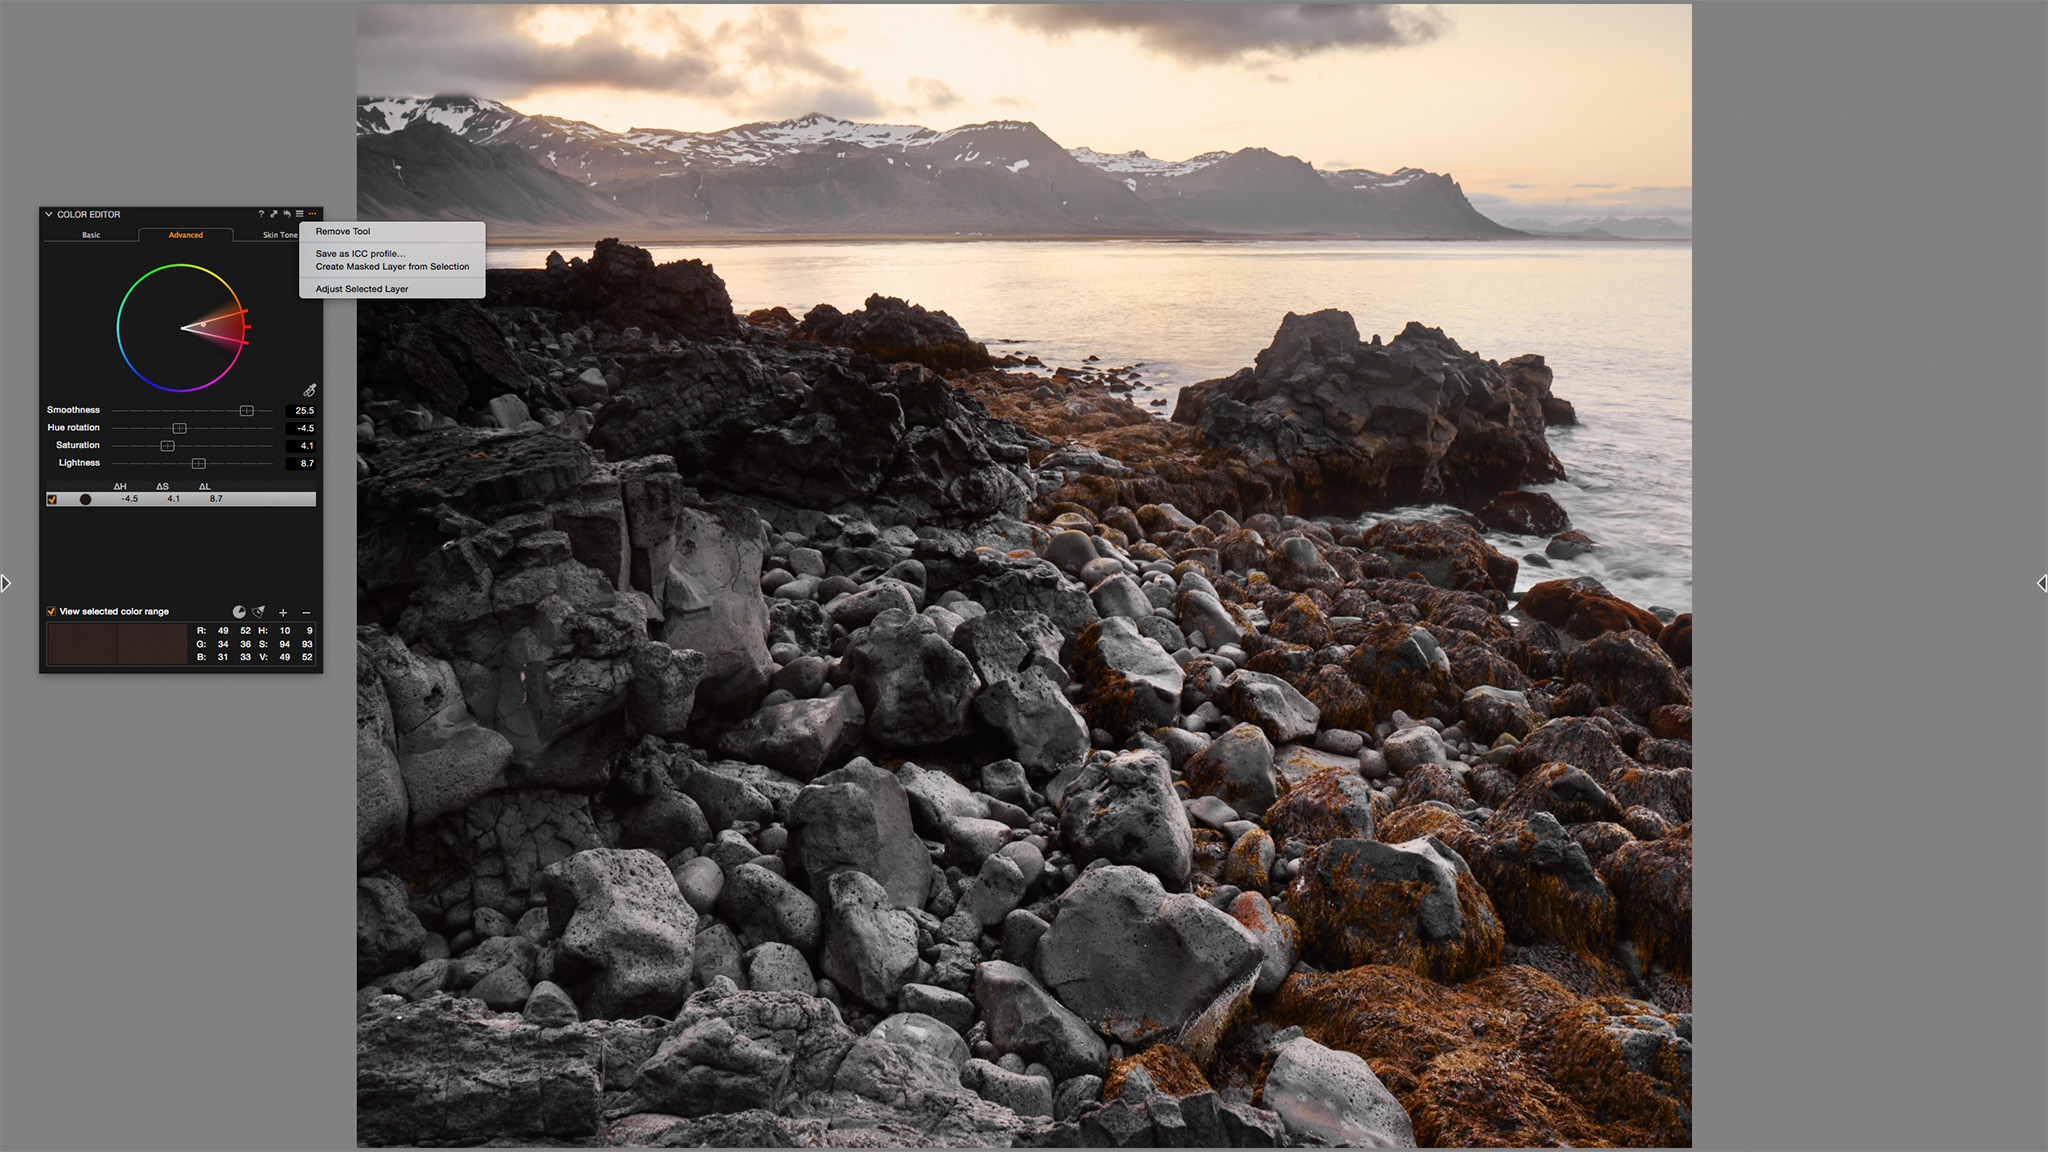
The whole foreground was dull, blue and boring. No problem! I grabbed the red/brown of the seaweed using the Advanced tab of the Color Editor Tool.
I could easily refine the selected color, using “View Selected Color Range” to ensure only the necessary red/brown hue/saturation was within the selection. I made a slight color adjustment to try and pull that red/brown closer to the vibrant tone I remember and then used the “Create Masked Layer from Selection” to get an accurate mask generated. This is crucial as it let’s me fine tune the color in one adjustment, and then accentuate the contrast of that selection in the next step.
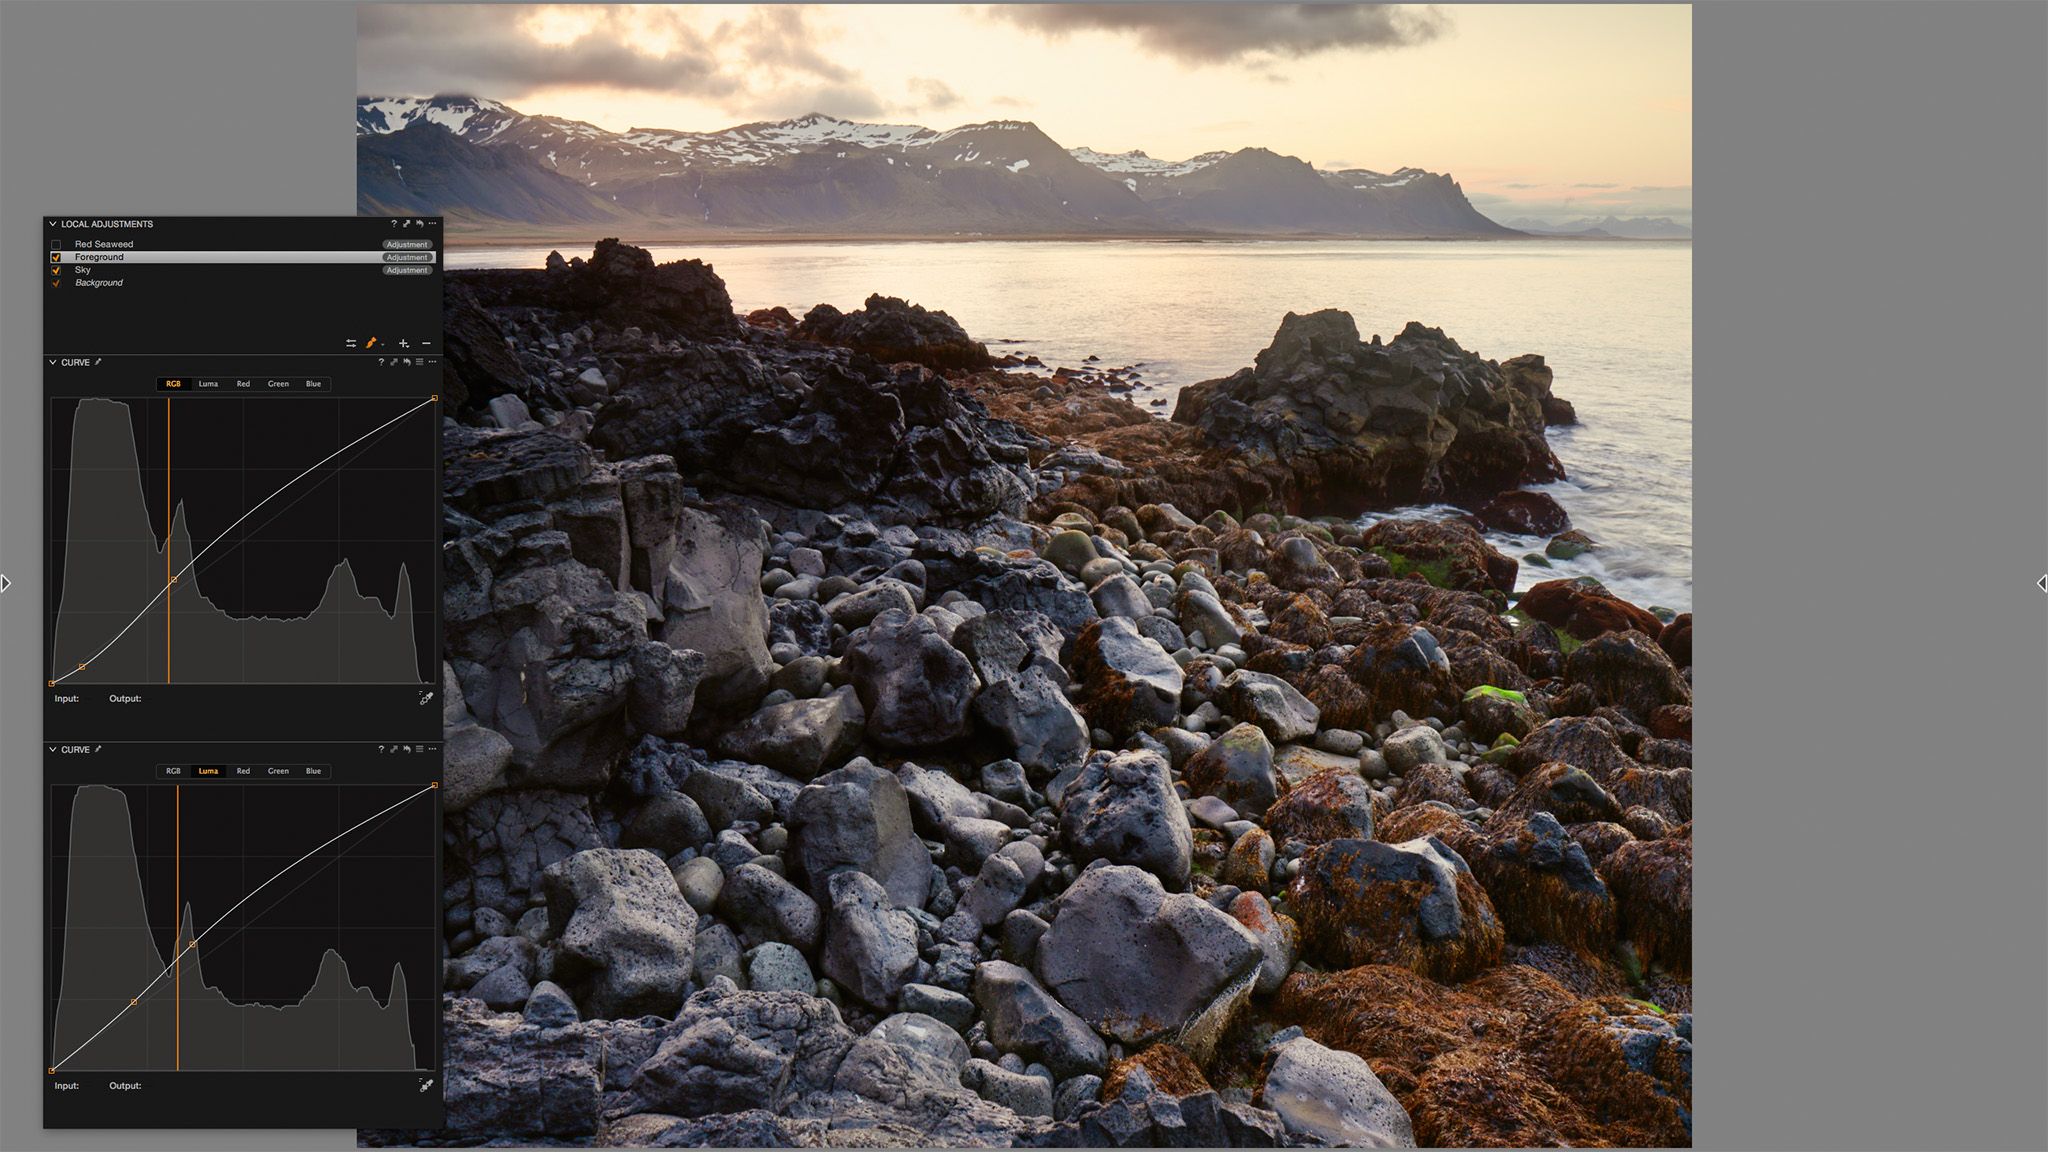
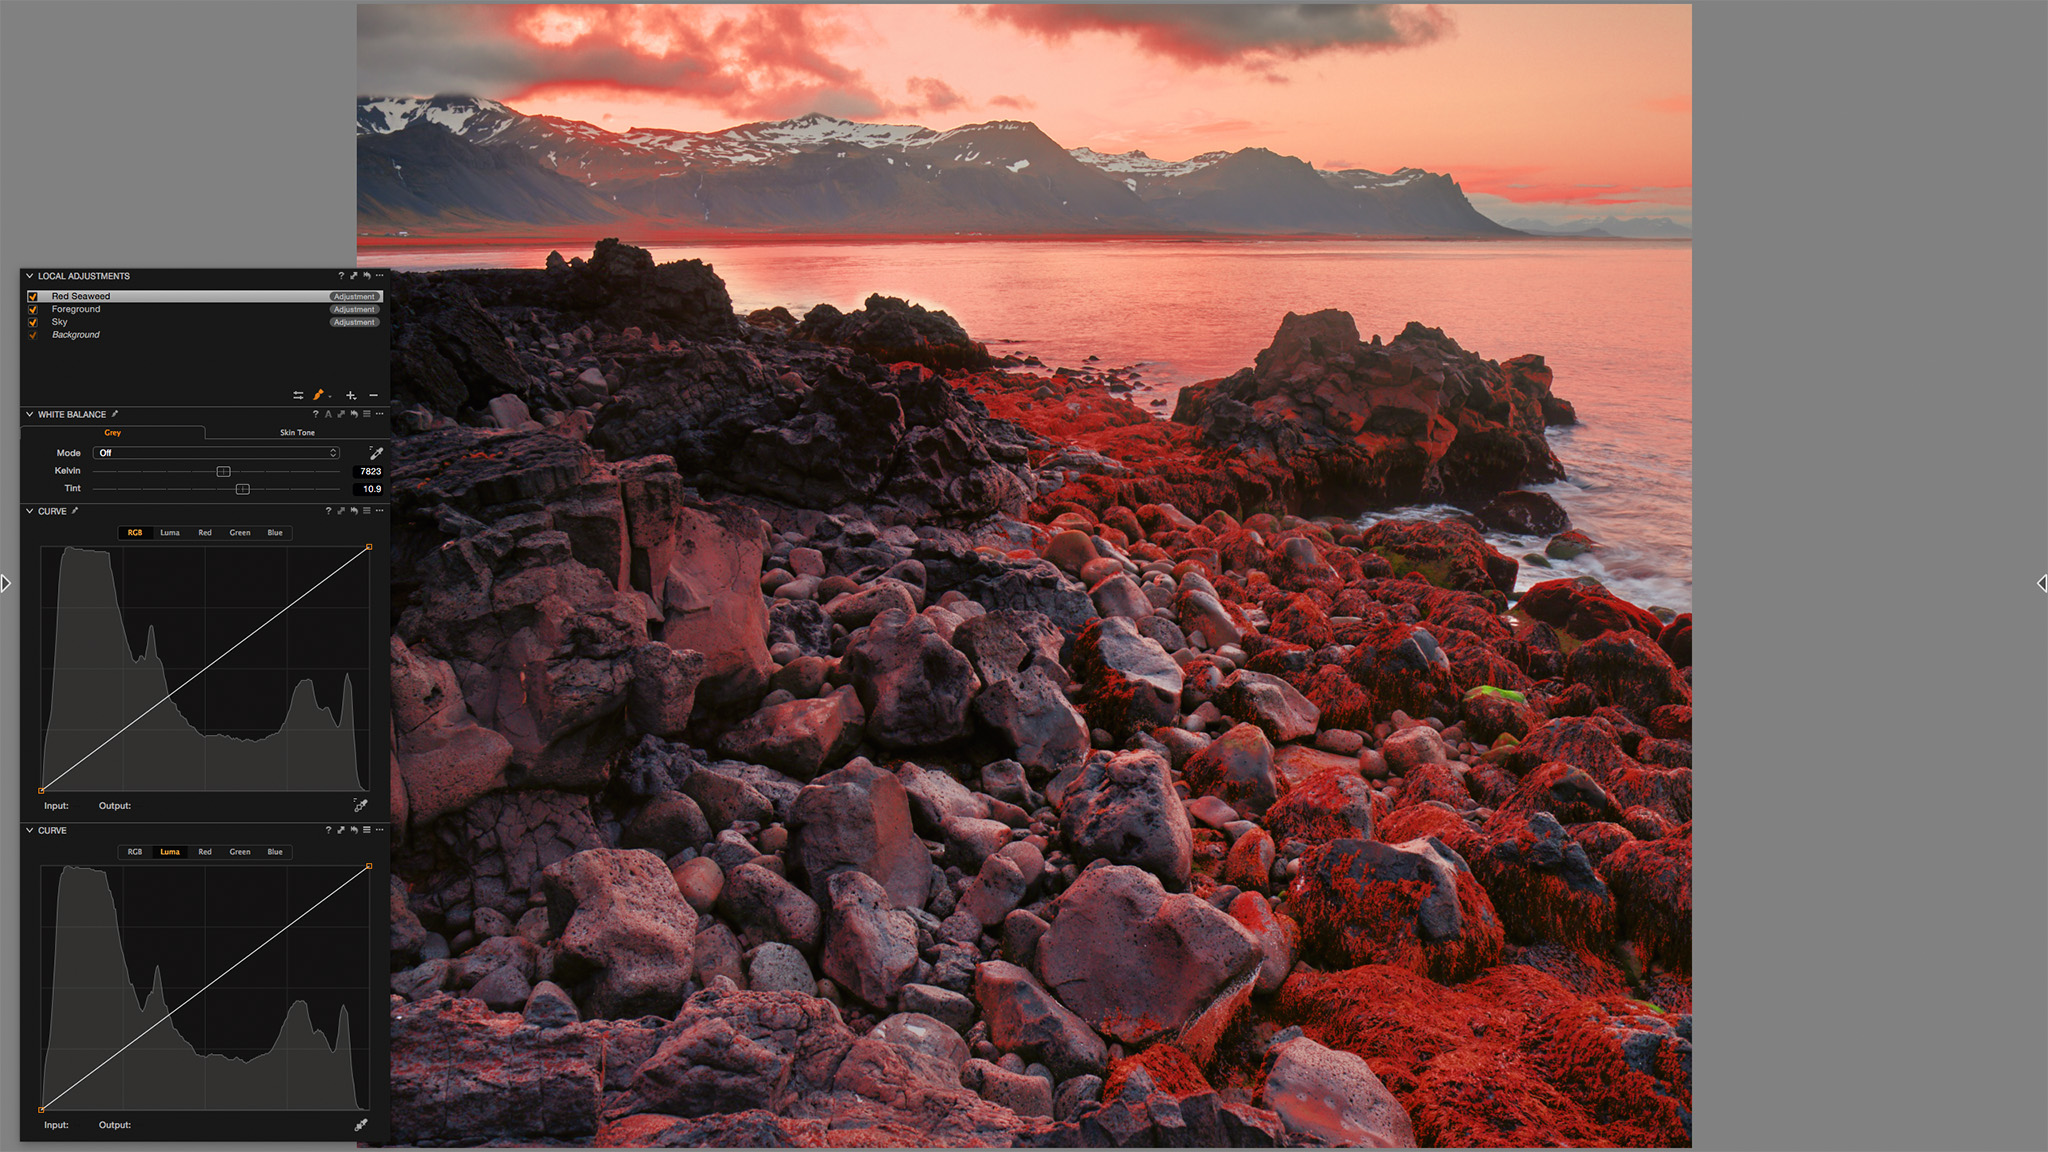 With the mask generated, being significantly more detailed than even the steadiest hand and unlimited time could generate, I could quickly get to work knocking some serious contrast into the selected seaweed. I also took the liberty of warming up the selection with a Local White Balance adjustment. A few simple steps and I had 90% of the image exactly where I wanted it.
The real beauty of the mask creation from a selected Color Range is the speed at which you can mask coupled with the subtlety the mask will provide. You’re selecting the color, not the area and that is incredibly beneficial. If there is a part of the image where the color gently tappers off or feathers into another color, your mask will do the same.
Look, for example, at the difference in the Rocks of the example image. The rocks have some slight reflection of the red/brown hue from the seaweed. When I select the color and mask it, the surface of the rocks too is ever so slightly masked. This ensures that the selection I change will uniformly change across the image. This is something that would be impossible to do manually, a heavy dense mask on some sections but a subtle and nearly transparent mask on other surfaces. The mask created from a selected Color Range provides accurate, consistent and simplified masking options and that all translates perfectly into the image.
Best regards,
Drew

Drew Altdoerffer
Drew is a Product Manager and Marketing Specialist for Phase One as well as a previous member of the Technical Supporter team. He works directly with customers in addition to assisting partners and sales associates alike to better understand the features of all of Phase One’s products. His role in the company extends to the PODAS photographic workshops, training seminars and sales events.


