
The default warning level is set to warn the user when highlight details exceed an RGB value of 250. If just one of the Red, Green or Blue channels exceeds the warning level setting, then this pixel will be painted with the warning color (set in Preferences).
Optimize different skin tones
Via the Capture One Preferences you can customize the warning levels. Set, for instance, the highlight warning level to a value of 230 and you can use the tool for optimizing portraits of people with light skin tones. Darker skin tone types need a little lower warning level.
With the highlight warning set to warn for over-exposed skin tones, it is very easy to optimize a selection of portraits via the Exposure or Levels Tool.
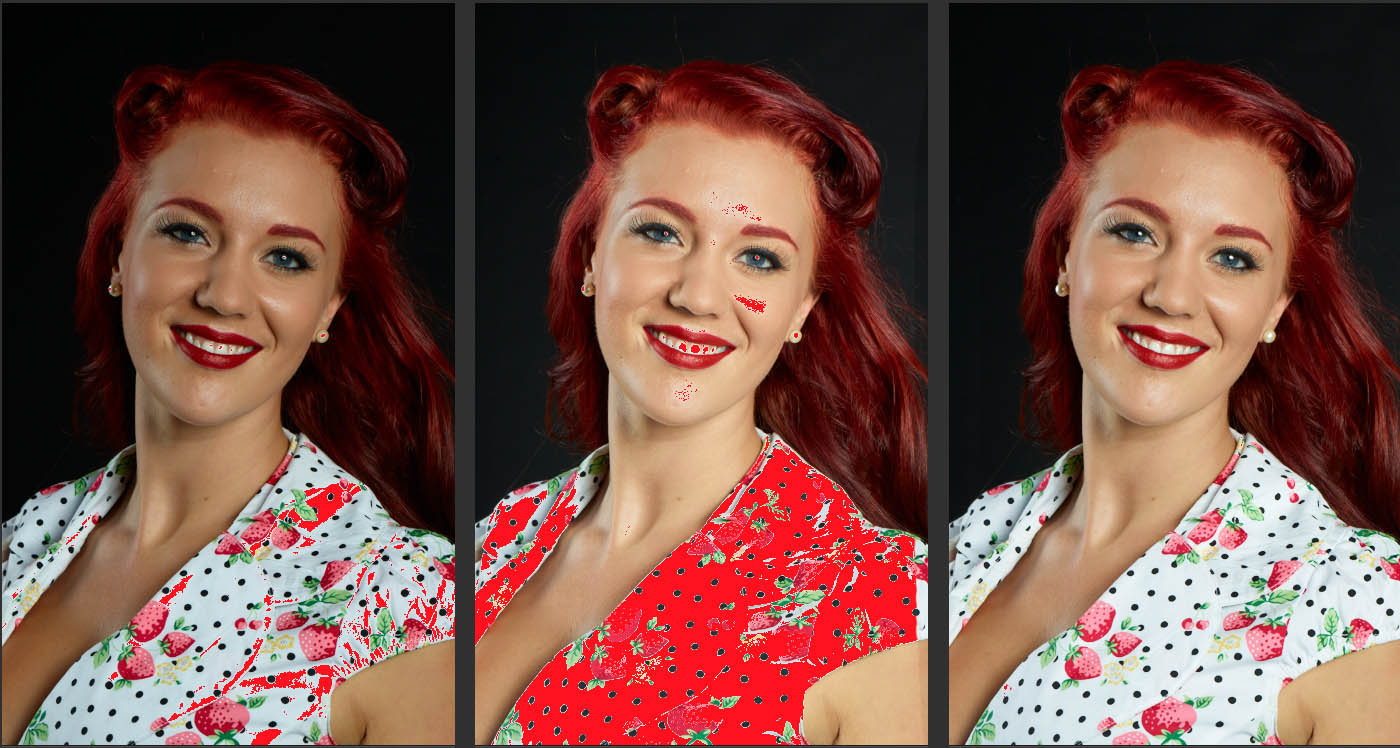
Above are three different versions of the same image. The left image shows the RAW file as it was taken, it is just slightly under-exposed.
The center image shows the Exposure Warning Tool set to warn of areas exceeding an RGB value of 230. The Exposure Tool has then been used to adjust the exposure of the image so the light reflections in the cheek just shows a small area exceeding the 230 setting.
The image on the right is the final adjusted version of the photo, now without the highlight warnings turned on.
Setting up Exposure Warnings levels
Start to setup the Exposure Warnings levels from the Preference menu.

Under the Exposure tab in the preference menu you can set the Exposure Warning level for highlights. For the cameras I normally shoot with I find that 230 works very well for the light, Nordic skin, tone types.
No universal warning level for all cameras
Different camera manufactures have quite different ideas about what a good tone curve is and how much of the cameras dynamic range should be reserved for a smooth roll-off into clipped highlights. Even though Capture One 7 uses the default Film Curve “Film Standard”, these curves are individually optimized for each camera model and take the dynamic range “roll-off zone” into account.
Some manufacturers retain their roll-off strategy between camera models but others change strategy quite often and will therefore need different optimized Film Curves. As such, there isn’t a universal warning level that works for all cameras. You will need to do a little experimentation with you own gear and lighting style to find the best warning level (setting).
Adjusting the portraits
Skin tones are typically more difficult to adjust than adjusting product shots and Landscape images. You can very easily make skin tones look unnatural.
I normally adjust color portraits mainly with the Exposure Tool and with a little highlight recovery in the High Dynamic Range tool. When doing so you adjust the tone curve very gently, which gives very nice tone transitions into the shadows and highlights.
For Landscape and Product images I often use the shadow slider in the Levels Tool. With color portrait images, however, this can lead to very unpleasant skin tone transitions into the deep shadows. When editing portraits it is better to use the contrast slider in the Exposure Tool.
Let’s go back to the example above.
With the highlight warning turned on I will increase the exposure, either by dragging the Exposure slider or the Brightness slider, until I see the Exposure Warning show up on the model.
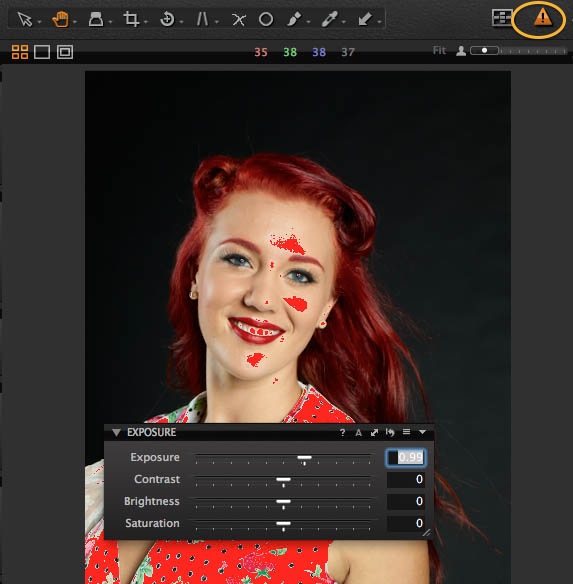
To turn the Exposure Warning feature Off or On, click the icon with the warning triangle (!) seen at the upper right corner of the screen shot above, or the more convenient shortcut cmd+e/ctrl+e.
As a final step I will use the highlight slider in the High Dynamic Range Tool to minimize the areas exceeding the warning levels. This also helps to ensure that we do not lose details in the very bright dress.
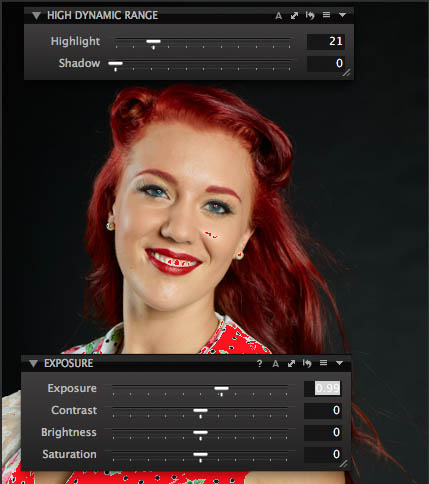
Using the exposure warnings feature in Capture One 7, as described with special warning levels optimized for portraits, makes it very easy to adjust a large number of portraits to an even standard.
All the best,
Niels

The Image Quality Professor
The digital pioneer, Niels V. Knudsen, is Phase One’s Image Quality Professor and founder of the IQP blog. Moreover, he is responsible for breakthrough advancements in image quality both in Phase One’s medium format camera systems and in Capture One Pro.


Thanks for these tips. I have just begun using Capture 1 because of the superior raw conversion of my Fuji X cameras. I am trying to decide whether to make C1 my main work horse or simply for the conversions, using Lightroom/PP as my main program. Your tips and “how to” webanars and movies have me leaning in your direction. I wish C1 had a one-key way to export to Photoshop, Efex etc.
Hi Henry,
Thanks for your kind comments. I am glad our educational initiatives are helping you see the benefits of Capture One! In answer to your question, you can set up a one key export to your chosen Image Editor. First, setup a process recipe with your chosen output parameters (I.E. Tiff, Jpeg etc). You will see an option to ‘Open With’ which you could set to your chosen image editor.
Once the recipe is setup and selected, whenever you want to go straight to your image editor, use the shortcut File>Process or simply CMD-D on your keyboard. Then your selected images will be processed and opened straight away in your editor. Have a look at the help pages here..
http://help.phaseone.com/en/CO7/Output/Process_Files.aspx
All the best,
Niels
Hello Niels,
great thoughts on how to use the highlight slider in the High Dynamic Range Tool to minimize the areas exceeding the warning levels. This will surely helps to not lose details in the dress. However, I would always use an exposure meter to set up a base.
Cheers,
Tim.
Hi Tim,
Good to hear. Thanks for letting me know.
All the best,
Niels
I try to find a way to soften a image. just like the portrait i saw in your posting today. In Aperture it’s possible to soften smal skin rinkles or so!
I Love the program
Hi Aljo,
Great to hear that you enjoy working with Capture One.
To soften the skin, you can create a Local Adjustments layer and add negative clarity.
Check out this previous blog post on the subject:
https://blog.captureone.com/get-smooth-skin-tones-using-negative-clarity/
Hope it helps.
All the best,
Niels
Hello Niels:
Why don’t you use the Portrait Curves in this case? or When we should do that?
Hi Francisco,
It can be a very good idea to use Portrait Curves, if you have a Nikon camera.
All the best,
Niels
Yes, I have a Nikon camera and this summer I shot portraits with it and used the Portrait Curve with good result. Perhaps I need more information in this blog with examples…and why is important for Nikon cameras.
Best regards from Pamplona, España
Saludos desde Pamplona, España
You said: “For Landscape and Product images I often use the shadow slider in the Levels Tool.” Do you mean the shadow slider in the HDR tool? Or is there one in the Levels Tool as well?
Hi Edward,
I was referring to the shadow slider in the Levels Tool. I use it to ensure that I have a full histogram in the final image so my blacks are really black. I typically set the shadown slider to 3-4.
All the best,
Niels
Thanks Nils for the – as usual – well written explanation. One thought: wouldn’t it be good to also allow a warning as soon as one of the individual color channels is clipped? I made the experience, that the color shift caused by one channel beeing saturated is sometimes hard to see. Or is there already a way to do so?
regards, Christoph
Hi Christoph,
Turn on the exposure warning icon to see any pixels, where one of the three colors are exceeding the threshold level in the Exposure Warning Preferences. If the exposure warning is not in your tool bar, you can customize it by right-clicking the tool bar on both Mac and PC.
The HDR Tool can be used to bring highlight clipped clors back by using values typically from 10-25 with the highlight slider.
All the best,
Niels
All the best,
Niels
I have only been experimenting with Capture One for a few days, but I seem to have a problem discovering how to darken shadows and how to blacken blacks and whiten whites. My Shadows slider starts at zero and only moves in the direction of lightening shadows it seems. I tried a 30-day free trail of Lightroom before starting the C1 trial and had become used to being able to darken shadows and blacks independent of each other, not only lighten them. And the same for whites vs highlights. How is this done in C1?
Hey Rex,
Pretty simple with the Levels tool.
Just drag the input slider (the bottom one) to the right. Or you could use the lightness slider in the Color Balance tool.
The HDR tool is purely for opening up the shadows and recovering highlights.
David