
NOTE: This article discusses an outdated version of Capture One. To learn more about our latest version, click here.
When shooting snow landscape images you are extremely sensitive to the White Balance (WB) in your images and to any tone variation in the ‘color’ of the snow.
The snow in the image is like having placed White Balance cards all over your image and if you have any systematical variation of the WB, it will be very obvious to see.
Systematical variations will come out
Even though you don’t normally notice that your camera shows systematical variations in the WB across the image, it may become obvious in snow landscape images and you will want to do something about it.
If you are having WB variation issues, the LCC Tool in Capture One Pro 7 will be the perfect tool for fixing the problem.
Something not right about the “color” of the snow
Coming home from a beautiful day in Italy’s Dolomite Mountains shooting with a camera that I haven’t been using for snow landscape images before, I couldn’t wait to see the results in Capture One Pro 7.
I noticed that there was something not right with the ‘color’ of the snow. No matter where I used the White Balance Picker to set the WB on the images, they would show a greenish/cyan cast toward the edges. My camera and lens were showing a classical Color Cast issue. This was not something I had noticed before, but now with snow landscape images it was quite obvious.

Above is the image in Capture One Pro 7 after import. I have added the color readout pins to show the difference in WB between the center of the image and the edge. At the edge the WB is off with a difference of 14 between the red and the blue color channels.
Enter the LCC Tool…..
Fortunately Capture One Pro 7 has a LCC Tool (Lens Cast Correction Tool), which has been specially designed to deal with this kind of problem.
Originally it was designed to deal with Medium Format Camera backs mounted on technical cameras where the angle of incident light through the lens to the sensor often can be very extreme and very different from when the sensor was calibrated at the factory for working with standard lenses. The LCC Tool is located in the Lens Tool Tab.
 Color Cast in the image Color Cast removed by the LCC Tool
Here you can see the effect of fixing the Color Cast issue. It would really be a shame if such an image ended up on a white wall or framed with a passe-partout without having fixed the Color Cast issue. Once you notice it you see it all the time.
You need a reference file
To fix an issue with Color Cast in your camera you basically need to shoot a reference file of a white opaque plate with the camera and the lens you were using. From this reference file Capture One Pro 7 can calculate the needed information to fix various lens/sensor related issues like: Color Cast, Dust Spots and Light fall-off. In this case I only need to use the Color Cast functionality of the tool.
How to shoot the LCC reference file:
When shooting the reference file for fixing Color Cast in your lens/camera system, it is important to use the same lens settings as when you use the lens for your real images. The angles of incident light through the lens to the sensor needs to be exactly the same for the reference shoot as for the real images you want to fix. You should also use the same kind of light.
So if you are using natural daylight, then shoot the reference file in that light and if you are using tungsten, then use tungsten also for your reference shoot. Using the same light source may not be important for your camera/lens combination, but for others it may make a difference.
Focus distance also have an influence but it’s not typically something that matters between focus distances of 5m to infinity, but it makes a difference between close-up and infinity as the light passing through the lens actually changes quite al lot between these focus distances.
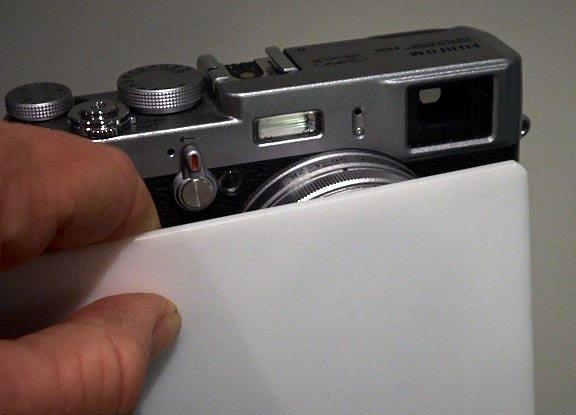
When shooting the LCC reference file you place the diffusing opaque plate right in front of the lens.
Various versions of opaque plates available
For this particular camera I am always shooting at f.5.6 and focusing on infinity. Therefore, I only needed to do one reference file using these settings. There are various versions of opaque plates you can use and they can typically be bought through your local photo dealer. In my case I didn’t expect the camera to show this kind of problem, so I didn’t bring my opaque plate with me. But I couldn’t wait to fix the problem until I returned from my trip, so I had to figure something out.
No opaque plate…….what to do?
When shooting the opaque plate you place it directly in front of the lens. This means that it is so close to the lens that it is totally out of focus. The surface of the plate doesn’t need to super perfect; the plate just needs to defuse the light so the camera doesn’t see any motive through the plate.
What could deliver such functionality? Luckily I had an almost new white plastic bag with me. Maybe this would be good enough. I cut out a piece of the plastic bag large enough to cover the lens. Holding the white plastic up to the light I could see that it looked pretty even and I decided to give it a try. And yes it worked.
Creating an LCC file in Capture One Pro 7
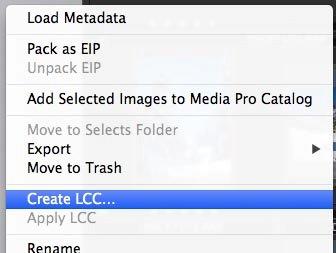
Start by importing the image of the opaque plate. Locate it in the browser and right-click on the thumbnail.
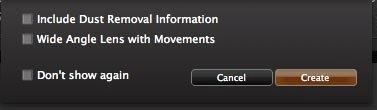
When creating the LCC calibration data you have the option of including dust removal information. If you are working with a wide-angle lens on a technical camera with a digital back, you should select the “Wide Angle Lens with movements”, as this will enable some extra analysis steps necessary for these kind of lenses but not necessary normal DSLR and mirrorless cameras.
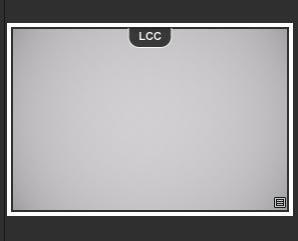
When a LCC file has been created, a LCC icon appears on the top of the thumbnail to indicate, that this file acts as a LCC references file.
The effect of removing the Color Cast:
When you have created the LCC file, it will automatically apply the calibration data to the image itself, so you can validate the effect of the just created LCC calibration file.
To show you the effect of removing Color Cast, I have made two variants of the same opaque reference image. On both variants I have picked the White Balance in the center of the image. Then a good deal of extra saturation from the Exposure Tool has been added to make it easier to see the Color Cast.
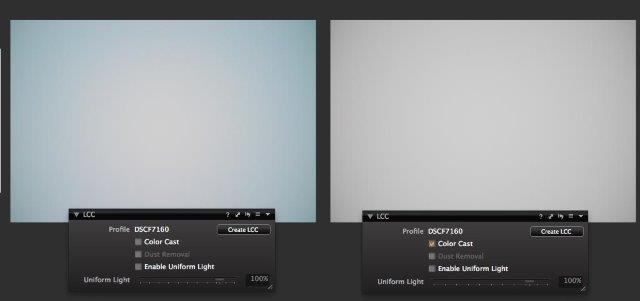
The image to the left shows the nature of the Color Cast: a green/cyan toning increasing towards the corners of the image. The image on the right side has the Color Cast applied and it shows no color at all.
Fixing the Color Cast by applying the LCC file to the real images
As this is something you probably want to do with a large number of images, you should start by setting up the “Apply LCC Options”. Click on the “triangle” icon in the LCC toolbar to get the menu list.
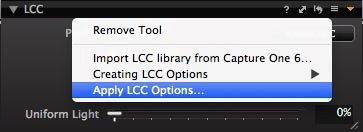

I am not interested in compensating for the light fall-off of the lens so I set the amount to 0%.
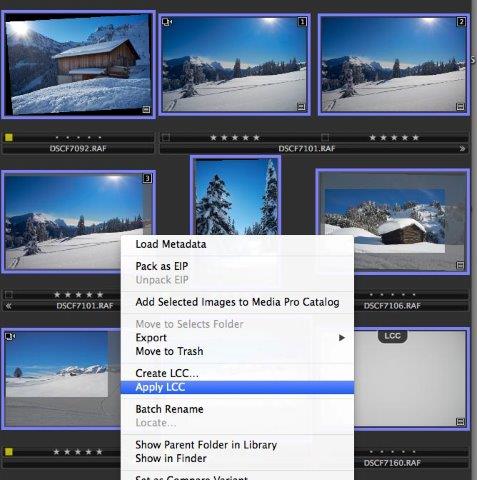
Now I want to apply the LCC to all my images. In the thumbnail browser I select all the images that I want to fix including the LCC Image. I right-click on any of the selected thumbnails and select the “Apply LCC” option. This applies the Color Cast fix to all the selected files.
For this method to work it is necessary that the LCC file is either the first or the last of the selection of files.
Making a LCC calibration Preset:
Now that I have realized that my camera actually needs a LCC file for critical White Balance images, I will generate a LCC Preset that is simple to use at any other time without having to find the image of the white opaque plate. In the LCC Tool I set the Uniform Light slider to 0%. Then I select the Icon with the 3 horizontal lines found in the toolbar of the LCC Tool. Here I choose the “Save User Preset” option.
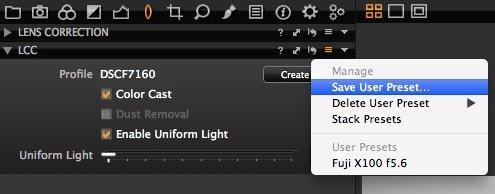
In the preset menu you can save or find already generated User Presets. In this case I named the Preset after the camera model and the f-stop. By having the Preset it will be extremely easy to fix an image shoot with this camera for color cast in the future.
All the best,
Niels

The Image Quality Professor
The digital pioneer, Niels V. Knudsen, is Phase One’s Image Quality Professor and founder of the IQP blog. Moreover, he is responsible for breakthrough advancements in image quality both in Phase One’s medium format camera systems and in Capture One Pro.


I love the LCCs to correct for dust, vignetting and white balance. I was however under the impression that an LCC with the Fuji camera that you are showing is not possible as they have a proprietary pixel array in their sensors. Am I wrong?
Hi Peter,
You are right, normally the LCC Tool doesn’t work on Fuji files due to the X-trans colour filter layout. But in this case I was using a Fuji X100, which has a Bayer Color filter layout instead.
All the best,
Niels
I don’t understand the use of the Preset as you seem to imply that you need to create a LCC for each combination of type of light, aperture, focus, etc. It is very unlikley that will be shooting under the exact light, aperture, focus conditions every time. I am missing something?
Thanks for the advice, Niels. I shall put it to use tomorrow.
One small point: the word is “diffuse”, not “defuse”. That’s to do with making bombs safe.
Hi Roger,
Glad to hear that you found the tip useful. Thanks for pointing out the misspelling. I’ll change it straight away.
All the best,
Niels
This is a beautiful solution to a real problem, especially for medium format camera users. Just one thing though, and maybe just a matter of translation – the LCC card needs to be translucent, not opaque. Opaque cards admit no light, so the LCC frame shot with an opaque card would be black.
Hi James,
Yes, a translation error. My mistake. It has to be semi-opaque.
All the best,
Niels
Thanks for a welcome tutorial. This tool is essential for copy work. Also–kudos on the MacGyver-like white bag solution!
Hi Rory,
Good to hear than you are finding the tool useful. Thanks, I am happy that my white plastic bag move worked.
All the best,
Niels
The ambient lighting conditions do not matter in any significant way. Focus matters, but only large changes in focus will have meaningful effect (e.g. changing from macro to infinity). Many landscape shooters shoot at one aperture for the majority of their shots.
Clearly if you use a very wide range of apertures and vastly different focus distances then doing presets will not be efficient for you. But it’s a good tip for those who typically shoot in the same general range of apertures and focus distances a single preset for each lens, or 2-3 presets for each lens will save a lot of time.
Thank you for the tips and the reply.
A Pringles lid will work, too.
Hi Roger,
Yes, because it is semi-opaque, it will work.
All the best,
Niels
Very nice tip, one to remember!
Thanks, also for the other replyers.
Or a piece of diffusion material used for lights…like tuflux?
Hi Joe,
Yes, that would work as well.
All the best,
Niels
I had never knew what LCC was about, thanks for the post. If I only notice the cast “after” being back, can I simply use a close relative of the lightning? E.g. daylight even if I am not on a snowfield? I suppose that the only relevant part is the spectrum of the light… even better, if I have a more or less full spectrum (again, daylight) can I assume that it will work even for narrower spectra? Or is my assumption wrong?
Hi Franceso,
Glad you found the post useful. Yes, you would be able to do it afterwards in daylight, if you do not discover the cast until you are back.
All the best,
Niels
Hello
I was wondering if a Expodisc could be used as a reference for the LCC tool?
Best regards
Hi Robert,
Yes, an ExpoDisc should work.
All the best,
Niels
Very interesting and useful, thanks.
The diffusion material must be translucent and white, of course. But it is impossible to ensure that it is absolutely neutral in color. Doesn’t this matter? Or is “whitish” good enough?
Do note that depending on the lens and use of other filters that an expodisk can sometimes cause a slight vignette at the edge of the frame. If this happens the LCC routine will intepret it as lens light fall off and would unnaturally brighten the edges of the frame. In such a case you could still use the LCC but would need to unclick the “light falloff” checkbox.
Just a thought:
Couldn’t the CO7 technical people come up with an automatic program update, that would replicate a “semi-opaque” setting based on whatever WB numbers were choisen as the final setting of the image?
If they did, you wouldn’t need to worry about doing any of the semi-opaque actions before or afterwards.
Hi George,
The article is about how to fix a minor problem in a camera. It would be hard to come up with a solution that could automatically fix a color cast as you wouldn’t know if it’s part of the image or an actual error.
All the best,
Niels
How does a Preset help you in the future? Wouldn’t the lighting conditions of the new shot have to match the conditions you shot the LCC in? Wouldn’t an LCC have to be shot at the time whenever possible?
Also, how did you shoot the LCC given that you’d left the scene already? Did you just approximate it? Did you shoot several and use the best?
Will Time of Day (Color of light), and light levels (Exposure) make a difference? (i.e.. If I need to shoot the LCC at 1/30th of second instead of 250th to obtain a correct exposure for F5.6, will that work still?
Finally, would an “Expo Disc” work as a white opaque surface?
Thanks Niels!
Hi Ben,
Typically the color cast you get on a camera is primarily dependent on the angle of incident light on the image sensor. So if you are using a prime for landscape photograph for instance, then you will often have focused on near infinity and are using the same aperture. In this case you can simply make a LCC shot of the opaque plate using the same f-stop and roughly the same focusing distance. The light used for exposing the opaque image doesn’t have to match your normal shooting conditions. I use natural daylight when i make my opaque shots. If you create LCC calibration presets from this image you will be able to use it on any of your typical landscape images.
But if you don’t have issues with lens cast with your camera then don’t bother doing this.
Just tested it and it looks like you CAN use the “Expo Disc”.
Hope that helps.
All the best,
Niels