
Capture One Pro 8 has introduced a new Film Grain tool. With this tool you can add film grain to your images in an extremely realistic way, giving the same look and feel you see in prints created from film (you remember film right?).
You can also use the tool to add texture to the surfaces in your images however you like without having any preconceived notion about emulating a film “look”.
Mimics the behavior of traditional silver halide films
The film grain options you can apply in Capture One Pro 8 are generated by an algorithm. This process mimics the behavior of different traditional silver halide films and maintains a natural feel rather than simply stamping a mask over the image as some softwares do.
The Capture One Film Grain will add texture to your images while still preserving the all-important detail and structure in the image, just like film does.
You can find the Film Grain tool in the Details Tool tab of Capture One 8.
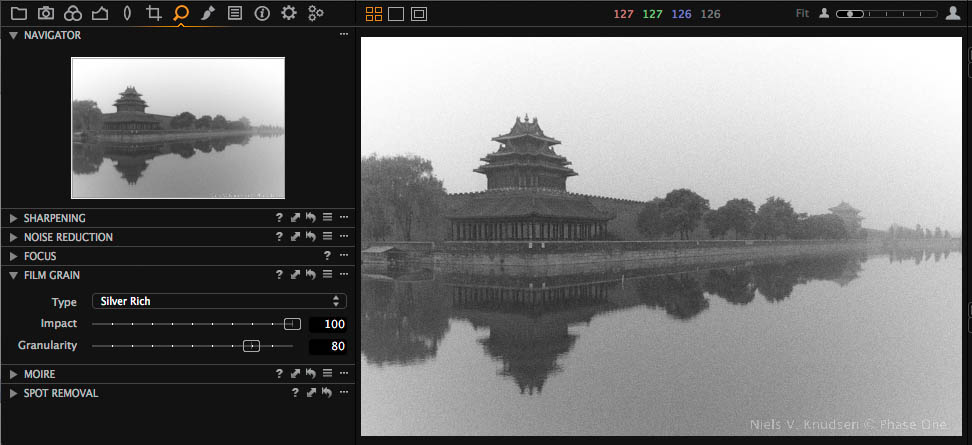 The Film Grain tool in its default location of the Details Tool Tab. Here the type “Silver Rich” has been selected with an Impact of 100% and a Granularity of 80%.
There are three different controls for the Film Grain tool, Type, Impact and Granularity:
Type: When choosing ‘Type’ you are selecting the “technology” of the film you want to simulate. The Fine Grain option is not actually a film grain but the standard “grain” that you may have used in previous versions of Capture One. So to successfully emulate a film look you should choose among the following methods:
- Silver Rich
- Soft Grain
- Cubic Grains
- Tabular Grains
- Harsh Grain
The Type that you choose will change the look of the grains by having different properties applied, which will change the shape, distribution and size of the grains.
Silver Rich is a very good starting Type when it comes to exploring the Film Grain tool.
Impact: With the Impact slider you can determine how strong you would like the effect of the film grain to show on your image. In a way it is similar to determining the opacity of the grain. If you want to simulate real film you should use maximum Impact of 100%.
Granularity: With the Granularity slider you determine the amount of grain per pixel. So to simulate a fine grain film, use low values of Granularity between 0 and 30. If you want a real strong visible effect, use values up to 100%. This adjustment can be thought of similar to the speed of the film used, when comparing the adjustment to the use of Film.
Viewing the grains:
The best way to see the Film Grain effect is to zoom into the image 100%. Only at these resolutions will you see the actual effect of the adjustment. If you zoom out, for instance, Capture One Pro 8 will simulate the grain look in an approximate manner but be aware that this is primarily used for you to see that grains have been added. You should not judge the film grain adjustment when zoomed to “Fit” as the results may not be 100% accurate to your final processed file.
100% zoom
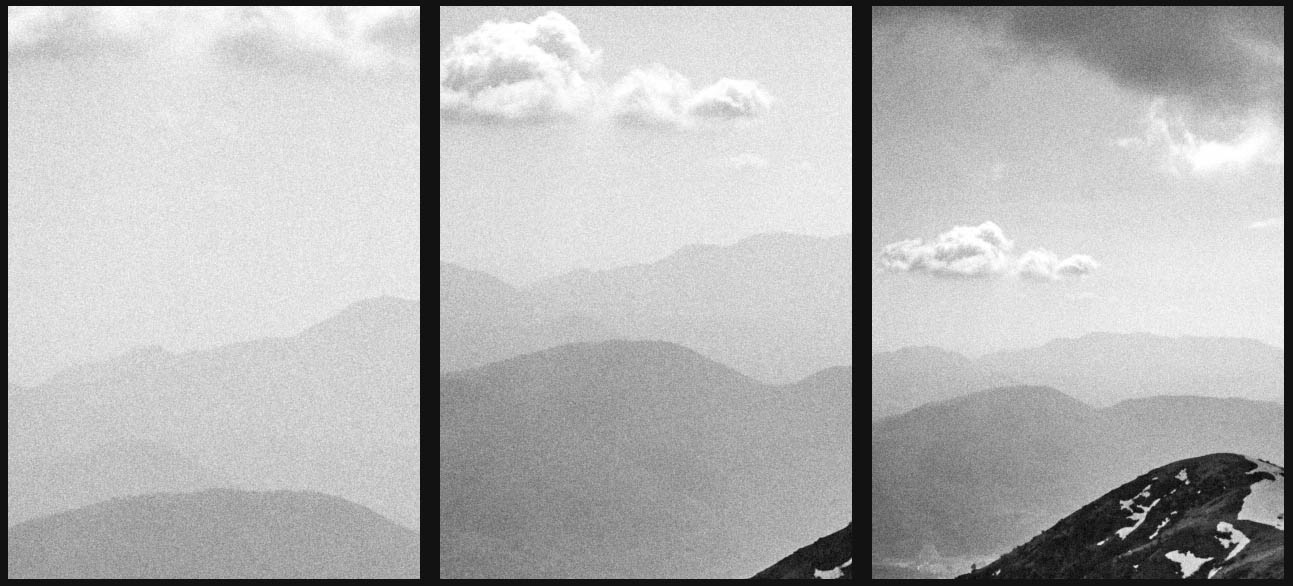
 Granularity =20 Granularity =30 Granularity =60
For all three images the Type “Silver Rich” with an Impact of 100 have been used.
Preserving details:
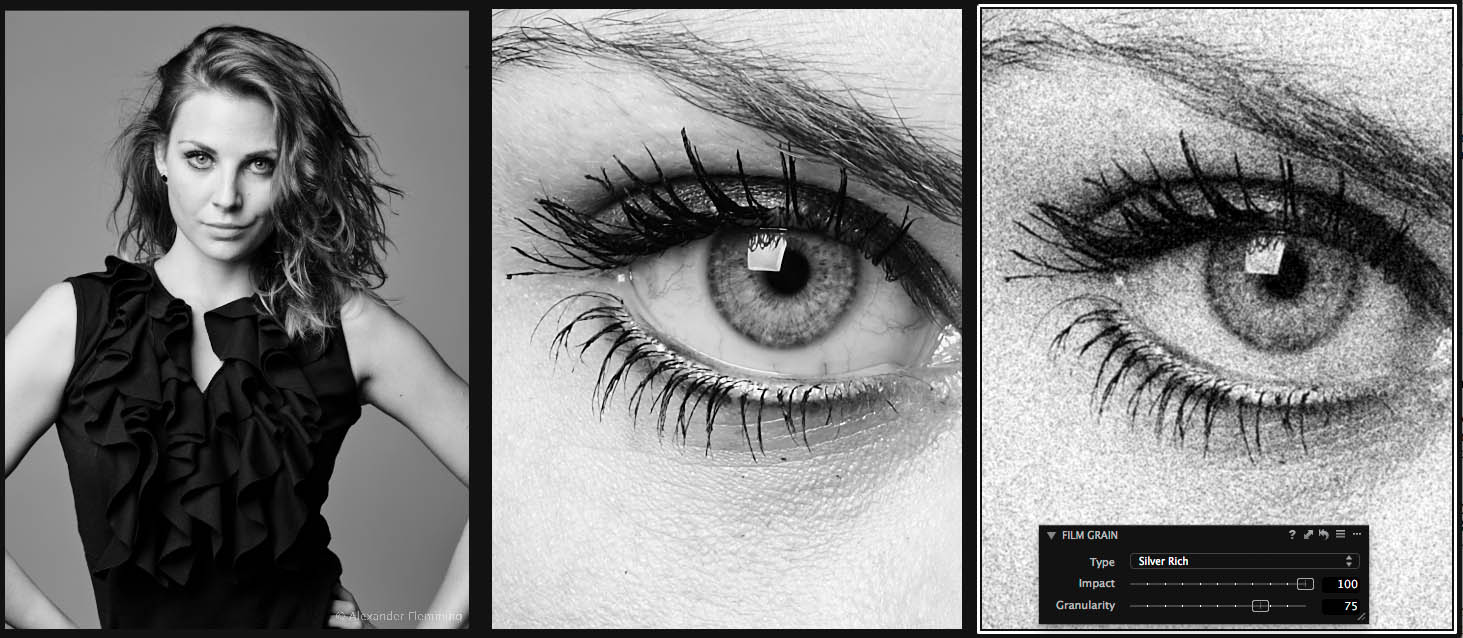 Full image 100% zoom – No Film Grains 100% – With Film Grains
In the third image above I’ve added a Film Grain with relatively strong Impact. Still you can easily see all the important details in the image that are present without the Film Grain adjustment.
The Film realistic look of the Phase One Film Grain
In the silver halide film process, a single grain would turn black after the film is developed, should it have been exposed to a proper amount of light. This means that the more light a film was exposed to, the more film grains would turn black after developing.
This kind of behavior can also be seen when using the Film Grain tool in Capture One Pro 8. Due of this film like behavior of the tool you will see pure blacks and pure whites without Grains and a super realistic tonality in between. Remember, fully exposed grains would be pure black on the negative and thus pure white on the print, and vice versa.
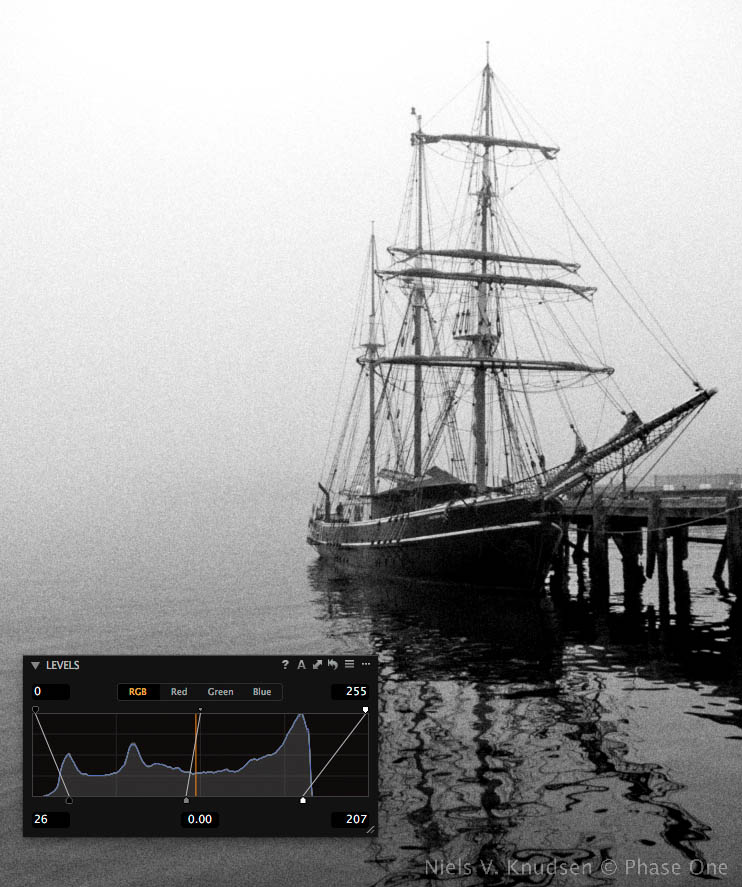
In this image I have clipped the histogram to ensure that I get real deep blacks and pure whites. The results meant to properly emulate a “film” look.
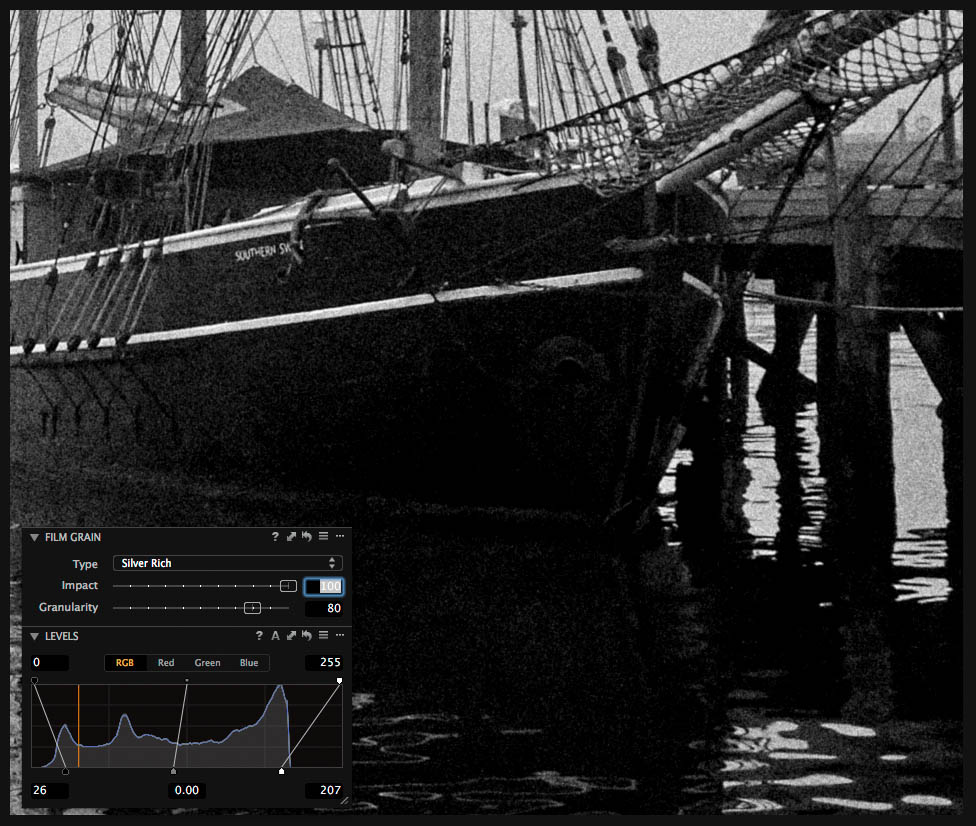
A 100% zoom into the deep black areas of the image. Notice that the clipped deep black appears without Grain. Just as film would.
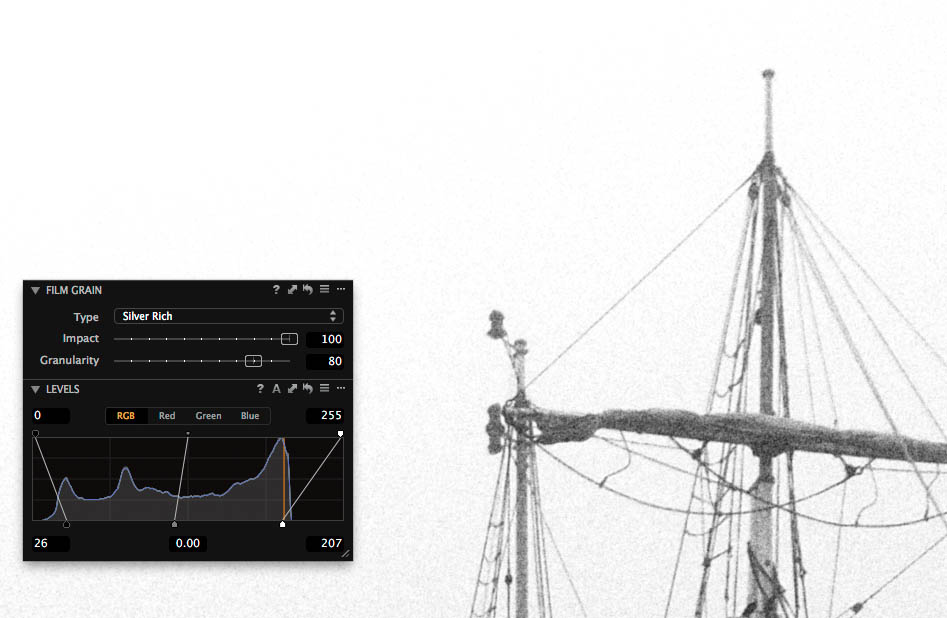
A 100% zoom into the bright part of the image. Notice that the image goes totally white simulating that all the film grains have been exposed. Again, just as we would find in film.
The Film Grain in Capture One Pro 8 will adapt to any adjustment change you do to your image ensuring beautiful and realistic Film Grain effects.
Grain designed for print
The Film Grain tool is designed very cleverly to generate Film Grain that, in print, will give the same look whether you use an image from a high-resolution camera or a low-resolution camera, as long as you print the image at the same size. As a consequence a 100% zoom into for instance a 80M pixel Phase One IQ280 image with Film Grain added will look a little different compared to a 100% zoom into for instance a Canon 5DMKII image.
Determining the right Granularity for a print
How visible the grain will appear in the final printed image depends on how large you print your image – exactly like using real film. So it is strongly recommended that you do some test print at your normal print sizes with different values of Granularity, but with fixed Method and Impact.
Once you have a clear idea of what settings you prefer for different print sizes it’s a good idea to create your own Film Grain Presets for instance:
- Medium Grain A3
- Medium Grain A4
- Medium Grain A5
Scaling an image with Film Grain:
The film grain in Capture One Pro 8 is added to the image at the full size of the images. So if you process the image to a size different from 100% you should be aware that the grain will be scaled accordingly and thus it will look different. As a rule of thumb you should increase the Granularity by approximately 30 points if you downsize the image by 50%. This should be followed in order to achieve the same size grain-look seen at 100% in Capture One.
100 % zoom
 Size = 100 % Size = 50 % Size = 25 %
Granularity = 30 Granularity = 60 Granularity = 90
The same image is processed to different sizes using the Film Grain tool. To achieve the same visual effect of the Film Grain when viewed at a 100% zoom rate, I’ve compensated with an extra 30 points of Granularity every time I reduce the image size by 50%.
Adding Grain after retouching in Photoshop
If your workflow normally involves retouching in Photoshop, you can still use the Film Grain tool in Capture One Pro 8 as it works the same when applied to Tiff and Jpg files. In this case you start processing the RAW file without using the Film Grain tool and then add the Film Grain to the resulting Tiff file after you have finished the retouching.
All the best,
Niels

The Image Quality Professor
The digital pioneer, Niels V. Knudsen, is Phase One’s Image Quality Professor and founder of the IQP blog. Moreover, he is responsible for breakthrough advancements in image quality both in Phase One’s medium format camera systems and in Capture One Pro.


Hi, I find the film grain results very interesting. But, I have to add that I shoot film besides digital 🙂
I take the opportunity to ask a tangentially related question: I am apparently unable to import Tiff files (be it after a scan or whatever post processing work). I’m using the latest 7.x windows version of Capture One Pro.
Is there something which must be done to select Tiff files in the import dialog?
I have the same issue. C1P seems to have issues importing layered TIFFs. This is true for both versions 7 and 8. C1 will simply not be able to ‘find’ the TIFF in a directory.
The only way to re-import the TIFF file back into the library is to flatten it first. This is not, of course, always optimal.
I was wondering if the new film grain tools works with color images? All the examples are in B&W, but grain to mimic old color emulsions is needed, too.
re importing of tiff files, I noticed the same issue , if I exported a tiff file from co7 to edit in photoshop and saved it as a tiff to bring back into co7 the import box showed no files but if I also saved the file as a jpeg, the import showed only the jpeg but when I cliked on import all both the jpeg and the tiff file were imported. Sorry if this is a little bit off track with the topic, just thought I would share my experience of importing a tiff file back into capture one, but I would also like to know if it can be done by altering any settings.
Re layered tiff files from PS, I have the same problem. However, it seems like this only happens to some tiff files saved in layers, and not all.
Hi all,
Thanks for your feedback all of you. It’s not possible to import layered Tiff files. In ordert to import, the file needs to be flattened and saved with a different name.
All the best,
Niels
Hi Timothy,
Yes, it also works with color images.
All the best,
Niels
do you have a filter/algorithm in the group that emulates a film like Plus X developed in Microdol X diluted 1:3 ? This produces a grain structure that is not crisp, and is more like the shape of an octopus, and is therefore extremely soft and is good for high contrast subject matter, that has been exposed for the shadows and producing wide dynamic range record… and with the photoshop ‘raw’ filters can be controlled locally for almost magical effects…
Hi William,
Thanks for your question.
No, we do not have a method to emulate a film like Plus X.
All the best,
Niels
Hi, I like this new functionality, but it would be very useful if I didn’t have to think about the size it would be processed to. It’s just a pain in the ass, and for something meant to emulate “film”, it doesn’t really make sense to me.
By that I mean, if I like the amount of grain at 100%, then that is the amount of grain I want my image to have no matter what size I process/print it to. A smaller print will have less noticeable grain, and a larger print will have more prominent grain – which is exactly how film works
I see the benefit of the current method, but a checkbox allowing users to switch between the two methods is needed.
Hi Ben,
Thanks for your comment.
The way we implemented the Film Grain tool is that if you process for a larger print, you will get more noticeable grain and if you process for a smaller print, the grain will be less noticeable. Just like film.
But we can also see that there are cases, where it would be nice to have an option to ensure similar grain independent of scale.
All the best,
Niels
For the most part I do not know why programs such as Lightroom, PS, Capture One etc. have a film grain feature. As films became better and better the manufacturers of film sought to reduce film grain. And here we are trying to put it back into our photos. Last time I looked outside or looked at a person I did not see film grain so why would anyone want to show something in their photos that does not exist in nature?
I guess the simple answer is because the market wants it! Its an option Paul, so you don’t have to use it. 😉
David
I like film grain effect in black and white photos. I’m sure I’m not alone 😉
The manufacturers may have tried to reduce grain, but users sometimes wanted to increase it. Back in my darkroom days, I’d sometimes try to get as much as grain as possible, because it can look really cool. Simple as that.
Fair enough:) I will say that although I rarely use it I do like what the Capture One people have done with it.
Why does C1 version 8 add grain to my pictures. (automaticly). It appears at iso 2500 and above. (iso 2500 = Grain Impact 10. Iso 3200 = Grain Impact 25) I’m using Fuji Xpro1 cam.
Hi Horst,
We may add a little fine grain in higher ISO images if necessary. It helps to add a bit of texture back to the image after noise reduction.
David
Hi Horst,
For higher ISO images Capture One has always added “Fine Grain” in combination with the increased noise reduction taking place in order to make a more natural and pleasing image. Capture One 7 had a tool named Noise Reduction Advanced. In this tool the Details slider and the Fine Grain slider was placed. Now in Capture One 8 the Details slider has moved to the Noise Reduction Tool and the Fine Grain slider is now integrated into the Film Grain Tool being one of the Film Grain types selectable.
All the best,
Niels
Hi,
Are there any tutorials on how to use the film grain tool to imitate a spesific ISO… or how to use this tool with the Capture One Film Styles plug-in?
In particular if you got the original edition and dont want to buy the new one just to get the film grain emulation?
All the film emulations i like is in the original package but it would be nice to combine this with an authentic grain emulation as well.
Cheers
Peter
Hi,
I’d like to emulate Ilford HP5 grain. Which grain type should I use?
I suppose grain types were modelled after real films, e.g. Tabular Grains was inspired by Kodak TMax. Have you got a table which shows which film corresponds to each grain type?
Regards,
Federico
Hi Federico,
No such table exists I am afraid. But thank you for the inspiration!
David
Completely naff. It’s about as appealing as someone scanning in a photograph and then thinking to themselves “Ohh, maybe I could make that look like a charcoal drawing or a water colour with some Photoshop algorithm written by a geek in an office somewhere”. I loathe this attitude to photography. If you want your images to look like film, shoot on film. I love both mediums, film and digital, one imitating the other is wretched..
You even have a fellow in the comments asking for a setting that imitates HP5, a film that is currently ubiquitous and widely available at a low cost. I could sort of understand wanting to emulate deleted films (film that disappear a precisely because of antics like this), but it never looks the same anyway and it makes me wonder if they’ve ever seen a darkroom print.
Hi SB,
Its not necessarily about emulating an exact film. Often grain can be useful in other ways. Either as a creative look or adding texture.