
NOTE: This article discusses an outdated version of Capture One. To learn more about our latest version, click here.
Following the previous blog post about 11 tips and tricks for Capture One, here is another post stuffed with tips and tricks to ease your workflow!
If you don’t already own Capture One, download a 30-day trial and follow along.
1. Apply a Style or Preset as a Layer
Capture One 11.1 introduced a simple way of applying a Style or Preset as a Layer.*
Right-clicking a Style or Preset will open a menu, allowing different options. Selecting ‘Apply to New Layer’ will create a new Layer with the name and adjustments of the Style or Preset. From the Layers tool, you can now adjust the opacity of this Layer, controlling the impact.
*This feature requires that the tools included in the Style or Preset work on Layers. Black & White, Film Grain, Basic Color Editor, Vignetting among others don’t work on Layers. If a Style includes tools that don’t work on Layers, a warning will show.
2. Show / hide / move the Browser, Tools and Viewer
Shortcuts in Capture One are among those things many photographers don’t take the time to learn. Continuously investing time in learning, remembering and using shortcuts will inevitably improve your workflow.
Here are five of my personal favorite shortcuts that quickly make the interface of Capture One highly dynamic and flexible:
- [Cmd / Ctrl + b] : Show/hide the Browser
- [Cmd / Ctrl + t] : Show/hide the Tools
- [Cmd / Ctrl + Shift + b] : Switch the Browser below/to the side
- [Cmd / Ctrl + Shift + t] : Switch the Tools left/right
- [Cmd / Ctrl + Alt + v] : Show/hide the Viewer
Like any shortcut in Capture One, these can be customized:
Mac: Capture One 11 > Edit Keyboard Shortcuts…
Win: Edit > Edit Keyboard Shortcuts…
3. Adding the same tool multiple times
Are you tired of switching back and forth between the RGB and Luma curve? Or maybe the Shadow, Midtone and Highlight in Color Balance? Fear not, this trick will help!
As the interface of Capture One is customizable, you can simply add the same tool multiple times and have them next to each other. You can do this in the current Tool Tabs or create your own. Right click anywhere in an empty space in a Tool Tab to add new tools.
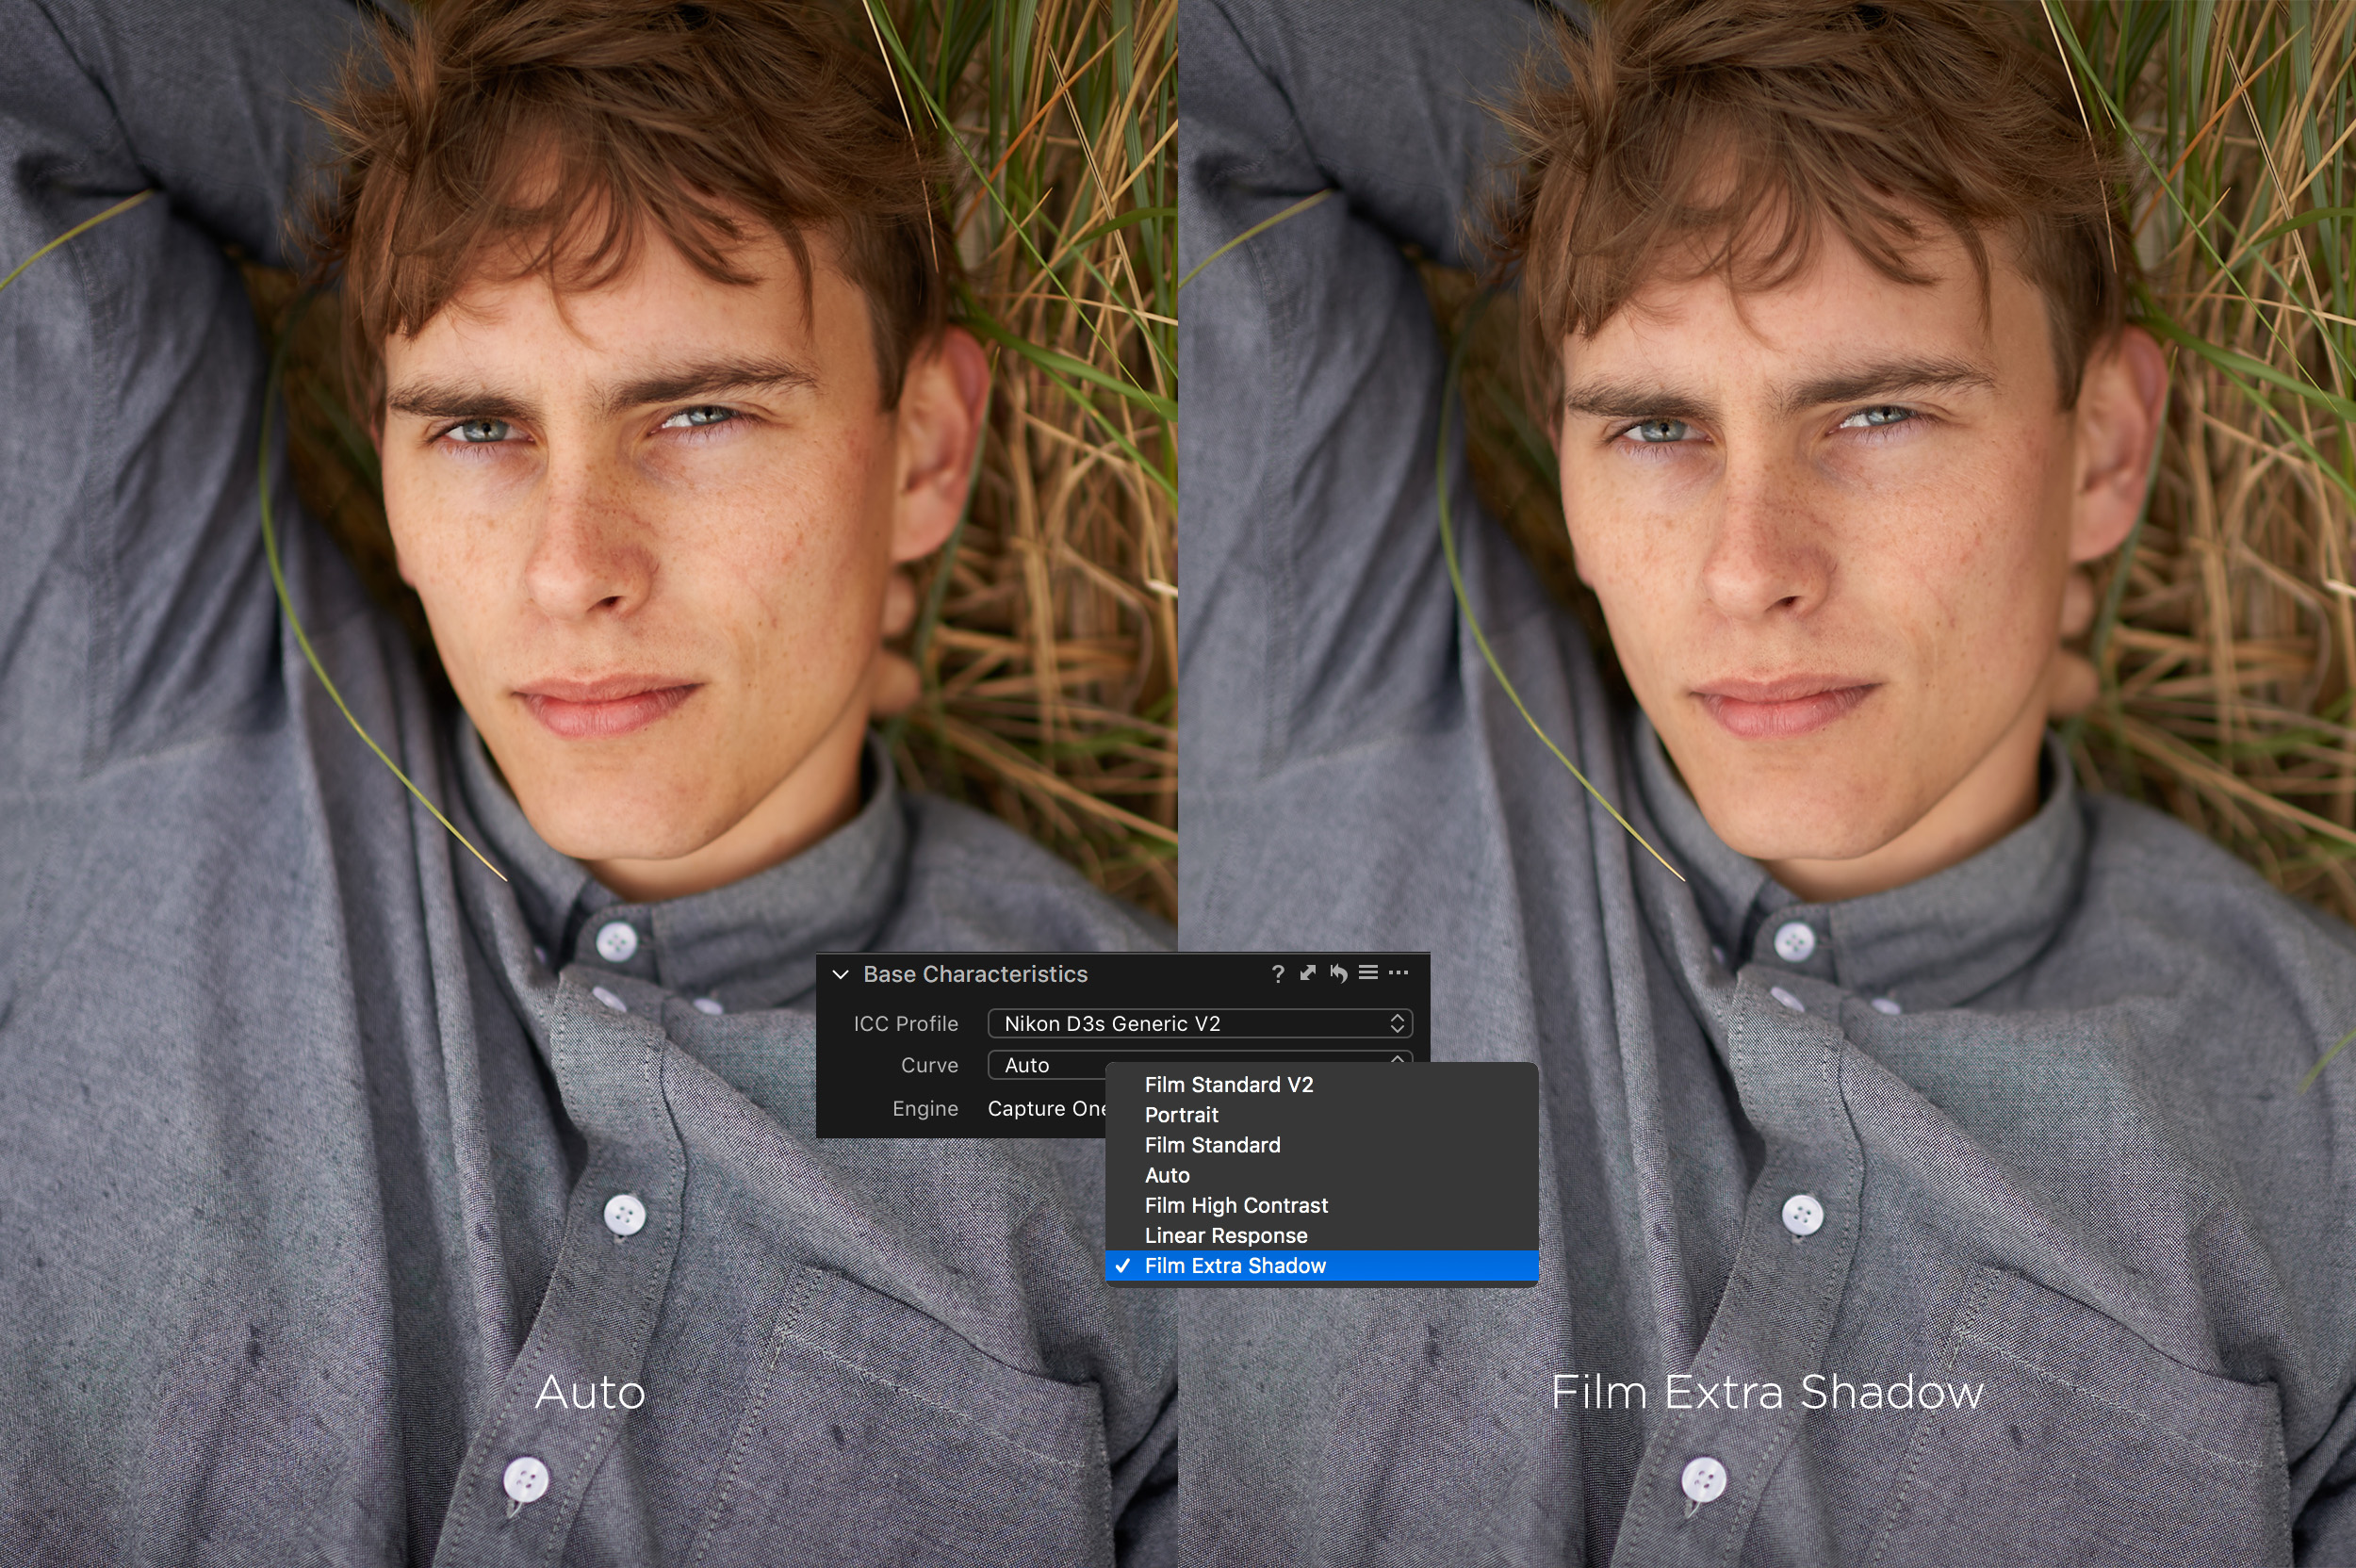
4. Film Curve – Extra Shadow
Some images are a bit heavy on the contrast or saturation straight out of camera with the Auto curve applied. This is of course a subjective matter, but if you like your images to have a slightly more flat starting point, there is a trick for that!
In the Color Tool Tab, go to Base Characteristics. Change the Curve from ‘Auto’ to ‘Film Extra Shadow’. This will provide a starting point with less contrast. Bringing back the same contrast level if needed is a quick pull in the Contrast slider or some Levels adjustments.
This Film Curve can be saved as a default option for your camera, which is applied when importing images going forward. Go the tool submenu [•••] and select ‘Save as Defaults for…’
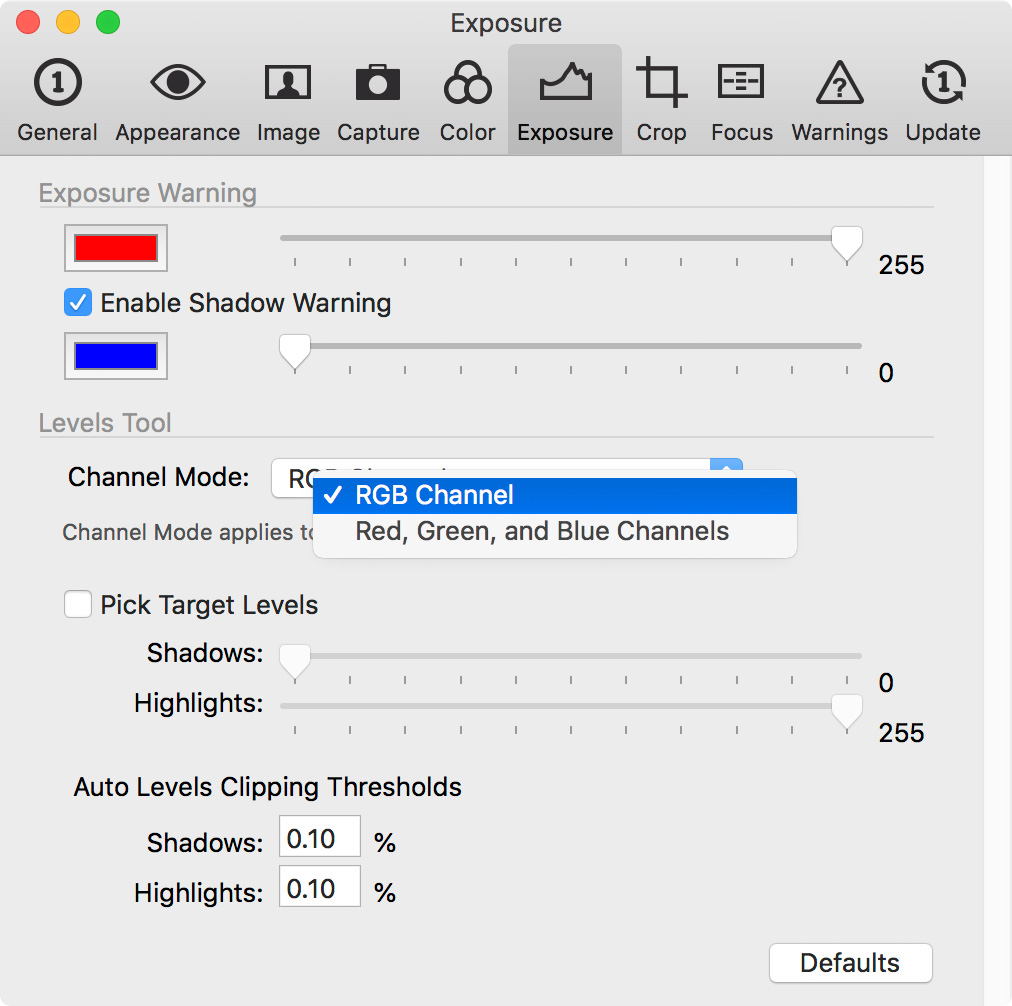
5. Two different Auto Levels methods
Auto Levels (the tiny ‘A’ in the top right of the Levels tool) is a quick method of getting a fairly decent contrast with a single click. Within ‘Preferences > Exposure’, you can select between two different channel modes:
RGB Channel: Will move the RGB channel, affecting overall contrast and luminosity.
Red, Green and Blue Channels: Will move the channels individually, affecting contrast and correcting for any color cast there might be present in shadows, midtones or highlights.

The Clipping Thresholds can also be set from the preferences, allowing control over the strength of the Auto Levels adjustments.
6. Select by filename list
You send a large number of images to a client for them to make a list of their picks. You get a list of filenames back in an email. How do you most easily find those images in your Session / Catalog? Select by filename list.
Go to Edit > Select By > Filename List… and copy the filenames into this window. Click OK, and the images from the list are instantly selected within your active album/folder. With this selection you can simply give the images a rating, color tag or create a new Album (Right Click > Create Albums From > Selection…) for further processing.
You can create keyboard shortcuts for both ‘Select By Filename List’ and ‘Create Albums From Selection’. With this workflow, selecting and managing any number of images from a filename list will take as little as 15 seconds.

7. Single Pixel noise reduction
Within Noise Reduction, there is a slider called ‘Single Pixel’. This will take care of most instances of hot pixels in your images. A hot pixel is a dead pixel on your camera sensor that typically shows up as pure white.
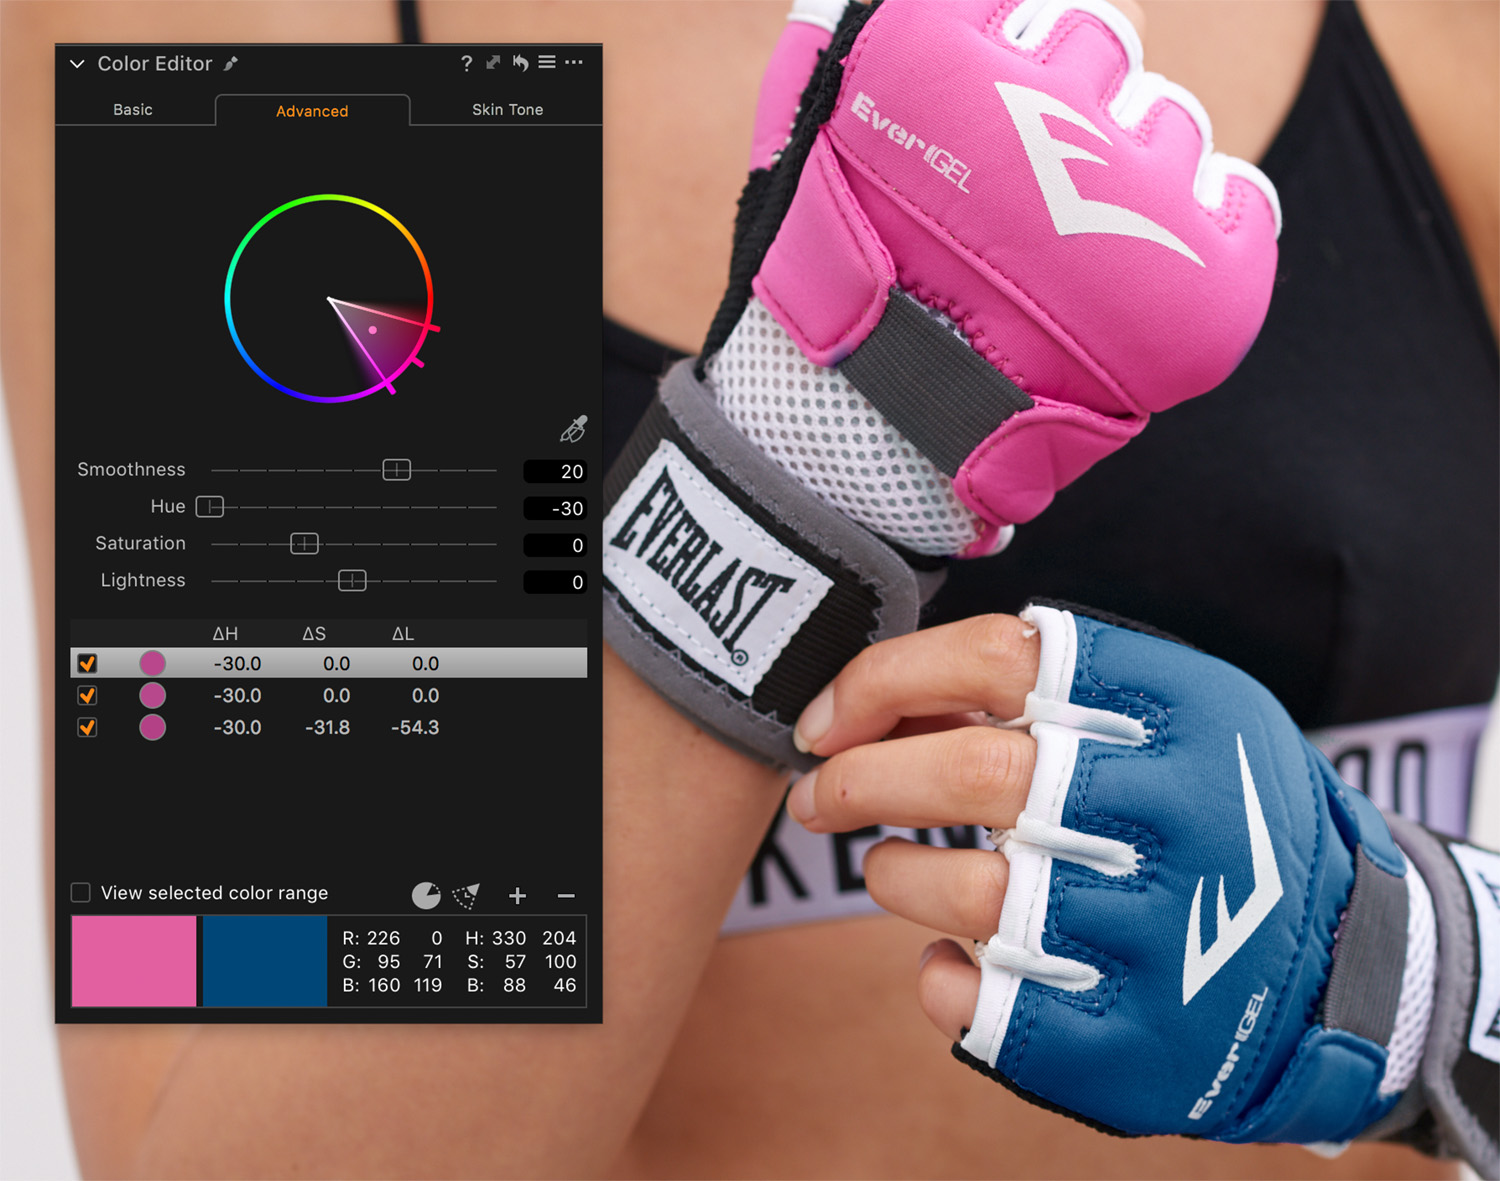
8. Advanced Color Editor, hue rotation
If you’re familiar with the Advanced Color Editor, you might have encountered the limit of 30 degrees with the Hue slider. Does this mean you cannot change a color range more than 30 degrees around the hue wheel? Nope, there is a trick!
The tool allows up to 30 color picks – per layer. With this in mind, you can simply pick the color range again (and again and again…) and change the Hue in the same direction, effectively pushing the change 30 degrees per color pick.
The reasoning behind the 30 degrees limit is to make sure precise adjustments are fast and easy.
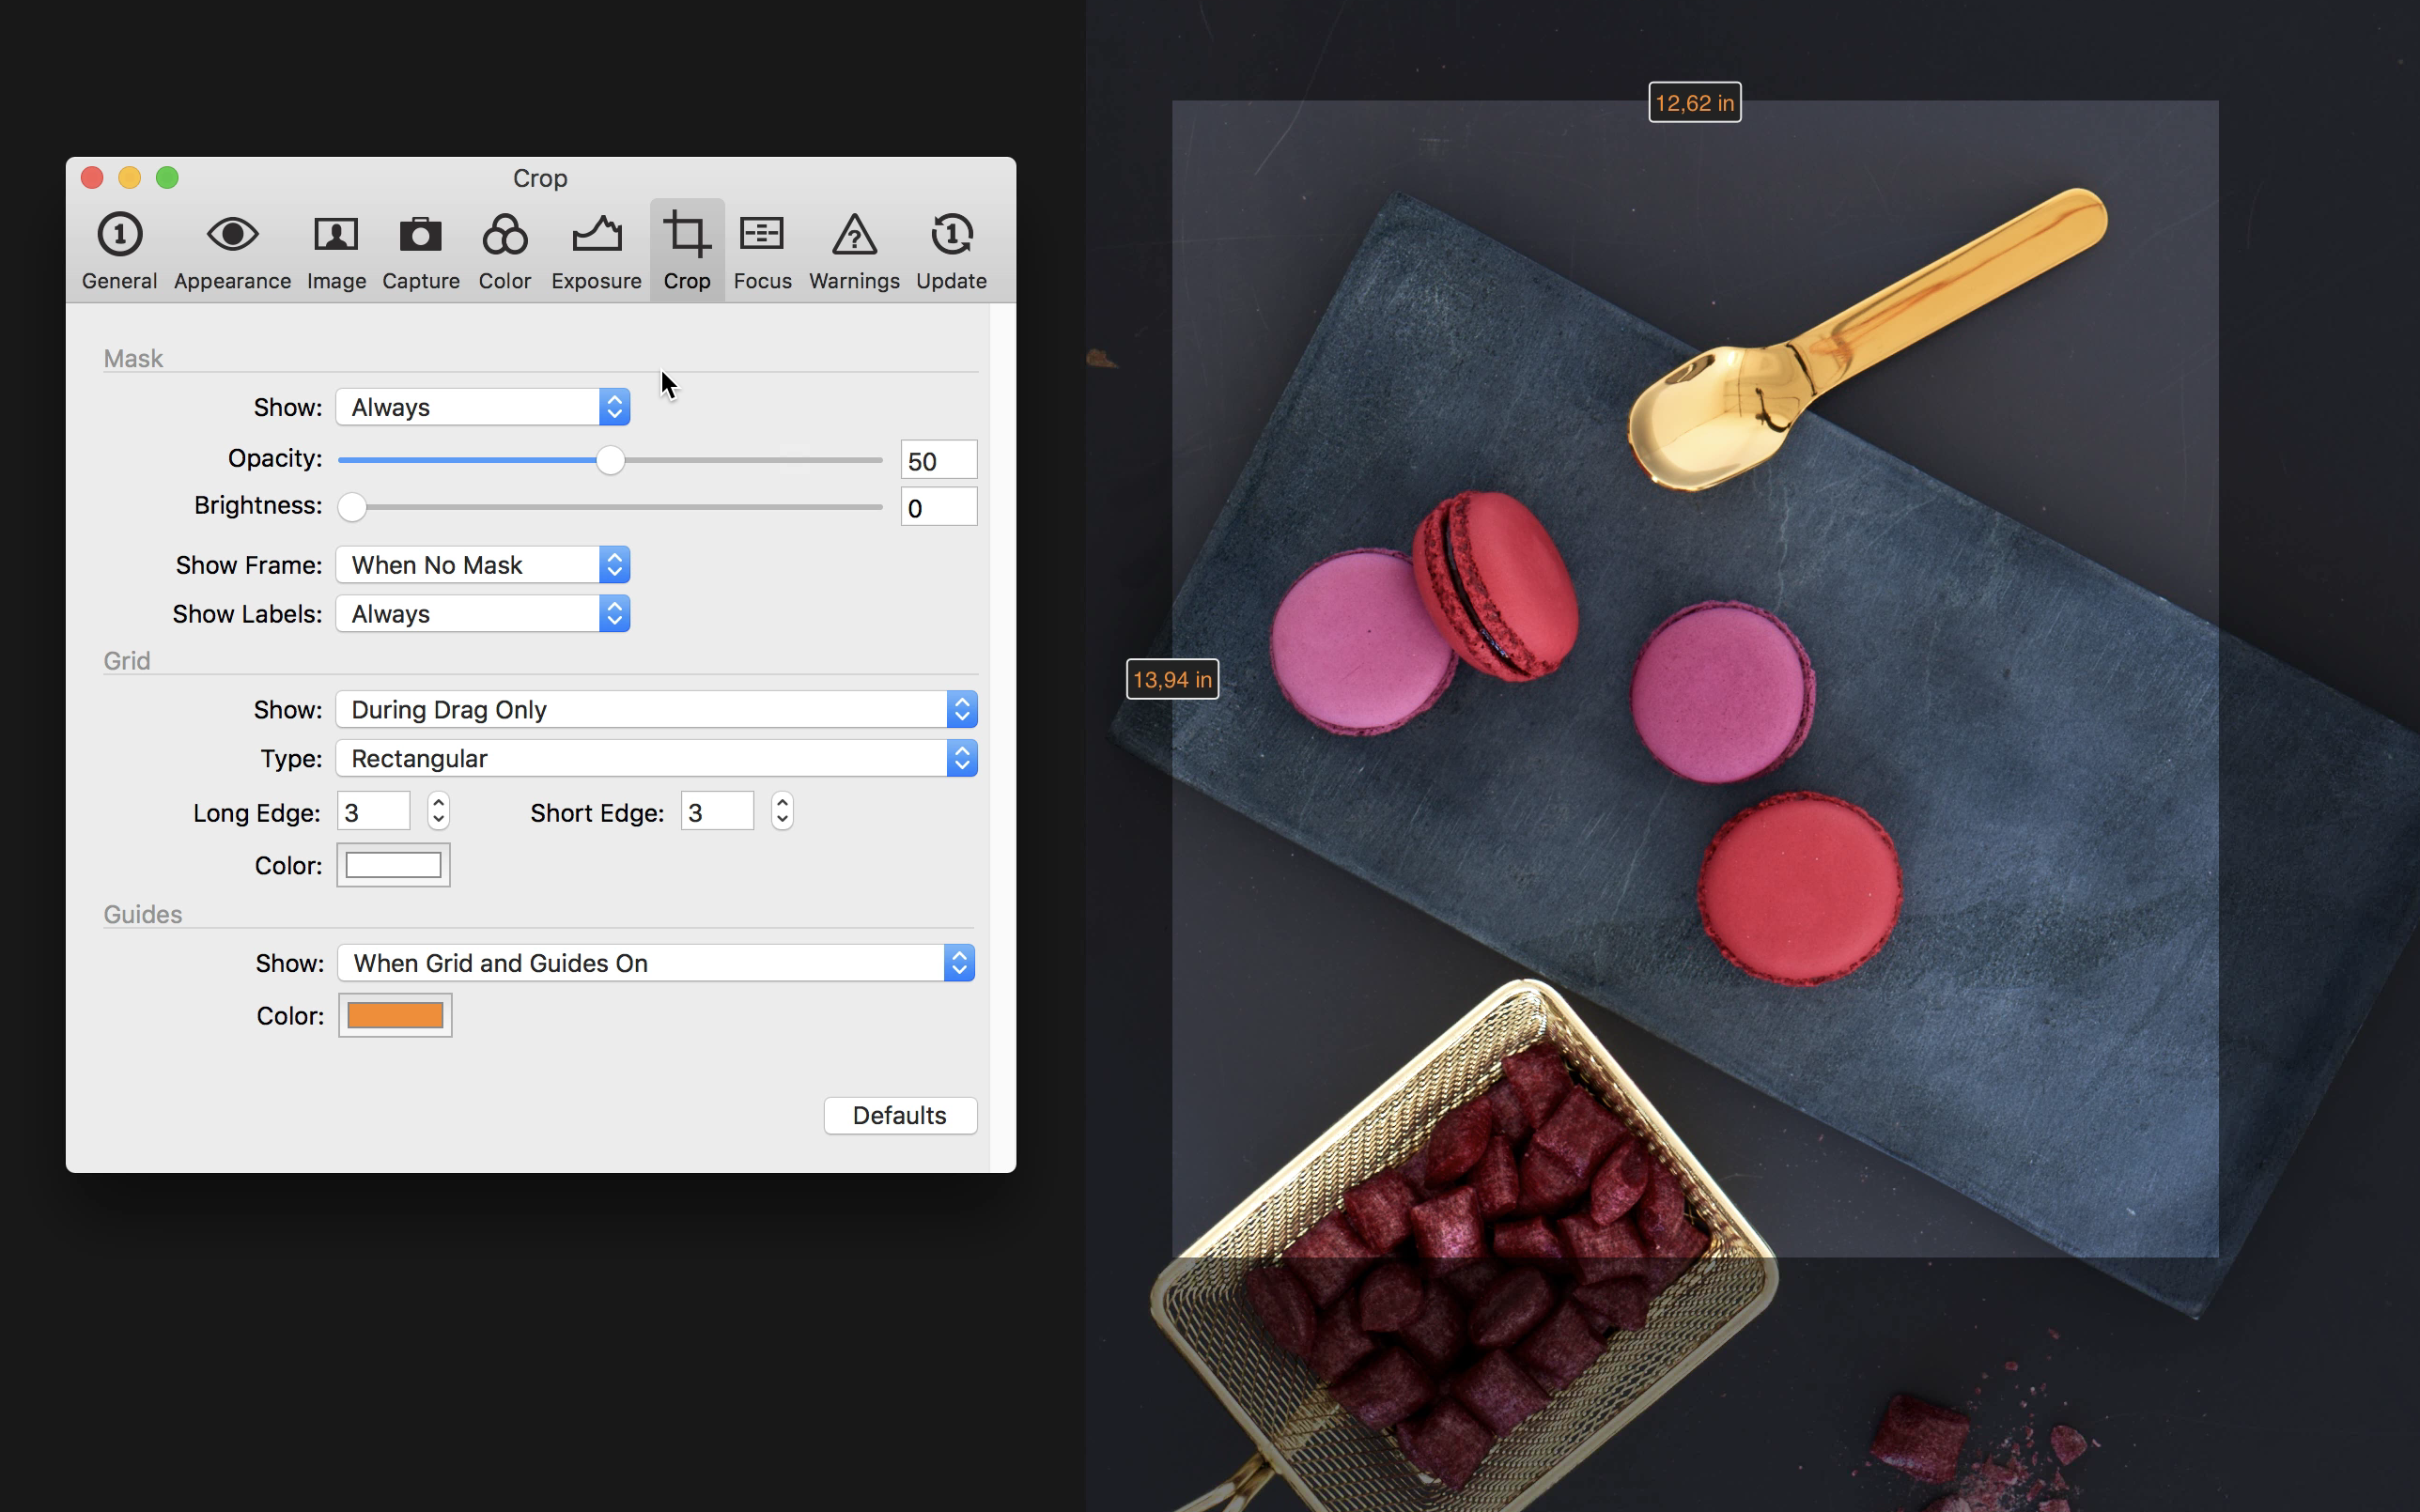
9. Crop settings
In ‘Preferences > Crop’ you can decide what to show and when to show it when working with the Crop Tool. You can mix and match your settings as desired. The easiest way of finding out what works for you is to select an image, select the Crop Tool and make a tight crop, then go to Preferences without switching to another cursor tool.
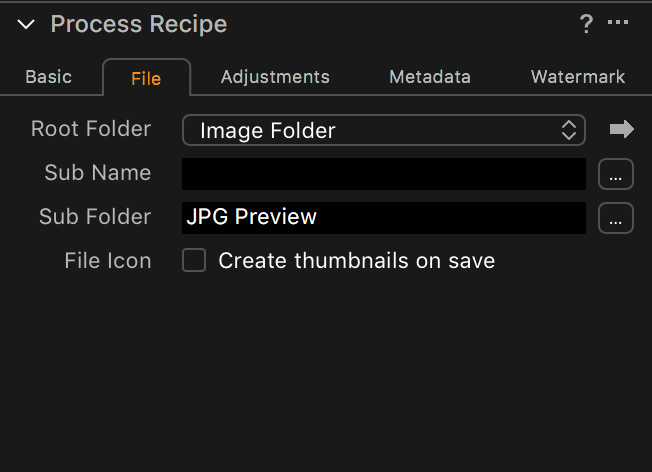
10. Sub Folders in Process Recipes
If you use Process Recipes (if not, then you should!), you might have seen the field ‘Sub Folder’. It’s a nifty little feature that allows you to specify a sub folder for each recipe, automatically placing images exported with the recipe in the respected sub folder. You can, for example, add a ‘TIFF’ sub folder for your TIFF recipe and a ‘JPG Preview’ sub folder for your small resolution JPG recipe.
11. Toggle cursor tools with the same shortcut
This is not specific to Capture One, but the trick to toggle between cursor tools with the same shortcut is to hold down Shift as well. For example, toggling between the rotation cursor tools is [Shift + r].

12. Creating custom ICC profiles
Is the skin tone of a specific camera model too red, or do you need the blues of another camera to be permanently less saturated?
If you are unhappy with a color profile of a supported camera model in Capture One, you can create your own. Any color adjustments made in the Color Editor can be saved as a custom ICC profile and used on future images.
To learn more about how the Color Editor works, you can watch the webinar, Color Editor Master Class (60 minutes).

What are your favorite tricks in Capture One?
If you missed it in the beginning, here are another 11 tips and tricks for Capture One.
If you don’t already own Capture One, you can download a 30-day trial and discover the power of it!
Alexander Flemming
Alexander works as a Product Manager at Capture One. Previous experience as a Test Engineer along with 10 years of photography have provided Alexander with a broad understanding of the many technical advantages of Capture One Pro.

Great concise information- thank you!
Is there a way to auto-process files as they are incoming? All the great features for developing unique image styles and automate absolutely everything end there, who else is paying people just for pressing CMD+D the whole day!?
Hi Dominik,
There is unfortunately no built-in feature for that. You would need to look into Apple Scripting for that (Mac only).
– Alex
Is there a way to view the before and after of an edit or of all of the editing you’ve done thus far? Lightroom has this as backslash \.
Hi Michel,
Yes, there is! If you hold down your ALT key, you can click and hold either the global reset icon or the tool based reset icon. This will show your image without the settings.
– Alex
Dear Guys
I just started to familiarize myself with the Capture One demo, but whenever i open or import a RAW, it automatically gets some profile or curve, which i cannot get rid of. I would like to see the pure raw image, which is completely clean and untouched like in any other RAW manipulating application. I swictched off every adjustment i could, etc, so what i’m suspecting is that my ICC Profile (SONY A7 S2) is messing it up somehow, especially the shadows lifted like crazy. Please check the screenshot on the link (if i can add link in this comment). It is just imported, nothing touched. I dont know what more to switch off, please help.
Thanks
http://tinypic.com/r/2923evt/9
Hi Gabriel,
It does indeed look like something has been touched. Try resetting the image completely (cmd/ctrl + r). If that doesn’t get your shadows right, contact our support here: http://www.phaseone.com/support
You mention, however, that you want to see your raw file as it is, exactly like other RAW applications are doing it. I will guess that most of them apply a curve and ICC profile as well, so you’re not seeing the RAW image as it is. To get close to that in Capture One, you will need to select the curve ‘Linear Response’ within Base Characteristics, and ‘No Color Correction’ as ICC profile.
– Alex
Wow Alex, fast response! 🙂 Great:)
I realized what was the issue, somehow the sony a7sII camera profile i have downloaded before from Filmconvert.com for video editing as a plugin, seemed to mess up Capture One’s (sony) profile. I have since uninstalled the filmconvert sony profile and voila, Capture one shines and works perfectly! And especially the “no color correction feature”! Beautiful!
Thank you very much Alex! 🙂 Its been a pleasure
Regards,
Gabor
Hello,
Are we able to edit video with Capture One? I read somewhere you can do Canon DNG files but does it support any other camera profiles?
I am currently using Capture One Pro and use a Sony camera.
Thank you.
Hi Paul,
Video editing is currently not something Capture One offers.
– Alex
Hello. I have begun learning Capture One 12 and I’ve run into a problem. Not sure if it’s my lack of understanding or a glitch. When I am in C1 working with anything there and leave it to view a help video or look up something I am unable to get back into the Program. When I click on the icon at the bottom of the screen I get a message that there is already a version of C1 open and I cannot get back in. I have to restart the computer and reopen the program. What am I missing?
Hi Patricia,
It seems like your docked icon is not the same as the current version of Capture One you have open. If you remove that icon, launch Capture One, then right-click the running Capture One icon and go to Options > Keep in dock, it should be alright.
– Alex
How come I can’t see the date of an image anywhere? In the browser and on the viewer. Is there a way to display the date on an image?
Hi Mitch,
The date of the image can be seen within the metadata tool. You can add it directly to the image by adding it as a watermark to the selected recipe. You do this by adding a Token in the Text field within the Watermark tab of the recipe.
– Alex
my recipe is adding “and 1 more” to the processing. Where can I remove this process to just create one TIF file?
Hi Glenn,
I’m not quite sure what you mean with adding “and 1 more”. Is it adding another file? Is it adding something to the file name?
A recipe can only create one file. If you get two, then you have two recipes selected. Look out for tick marks in the process recipe tool. 🙂
– Alex
Alex – many thanks for the reply. I’ve attached a screen of the Process Summary – we’ve recently updated to the latest version and I can’t seem to locate where to turn off the second Recipe, and not sure how it may have been engages…, thanks in advance
Alex – found it! you are correct – there was a second Recipe checked, many thanks!
Great! I’m glad it got resolved.
– Alex
Hi!
Thank for tricks! Very helpfull!
But I don’t find the dicision of my task:
I arranged my shots in user collection by albums (people names).
I want to export the shots (jpg for web as example) into folders that named as my albums, but don’t resolve this task:( Can you help me?
Hi Vadimych,
Great, I’m happy they’re helpful!
Regarding your workflow; this is a result of images being able to be in as many Albums as you want. Because of this, there is no way for Capture One to know which of the Albums to use in naming. You can do it using ‘Collection Name’ and then exporting from each Album at a time. Otherwise you need to divide them into physical folders that are added to the Session or Catalog. Then you can use the token ‘Image Folder’, which will take the name of each folder for creation of the export folder. You can read more about this workflow here: https://blog.captureone.com/managing-multiple-headshots/
– Alex
Is there a way to add a shortcut if it already doesn’t exist, for a reset action? I mean, to set everything (tools, adjustments etc) to zero or by default. Thanks.
Hi Christian,
Yes, you can use [Ctrl/Cmd + R] or assign your own shortcut from ‘Edit > Edit Keyboard Shortcuts…’
Alex
Hi there,
I’m having difficulties trying to print.
When I click on the printer tab and select my icc profiles. I set resolution to 300ppi (correct for Canon pro 10s printer)
I then go into print settings to select quality + Media from the drop down menu. I then click photo paper followed by photo paper plus semi gloss. (This is correct for the paper I am using – Photospeed Legacy Gloss)
When I click save, C1 changes my settings to Canon Paper Pro Platinum with a ppi of 1200.
My prints are printing incorrectly due to this.
Any ideas why this it?
(Colour management is greyed out when icc profiles are selected)
Many thanks in advance.
When I’m browsing through images in the grid I can double click my trackpad to select one to view, if it’s not the one I want I either have to select View>Viewer to go back or use a keyboard shortcut. I have changed the default shortcut to a single key (F19), but I still don’t find it intuitive to keep moving from trackpad to keyboard.
It would be far easier to double click again to go back to the grid as I used to do in Apple’s Aperture.
Is there any way I can set this up myself in Capture One?
Using C1 20, printing to Canon Pro 1000 from C1. When printing directly from C1, just a blank (unprinted) page ejects from the printer. If I develop the file and print via Photoshop, everything works fine. Seem that this problems is related to C1 ?